*This post contains affiliate links to Simon Says Stamp.
Showing posts with label Christmas. Show all posts
Thursday, April 27, 2023
Another Christmas Card featuring Purple Onion Designs
I've got another Christmas card to share today. This time I'm using an image from Purple Onion Designs illustrated by Stacey Yacula called Snow Crooners.
This is such a cute image and gave me another opportunity to do some more coloring.
I use Gina K Black Amalgam ink when I color with Copics. I tried to keep the coloring pretty light with some bolder pops of red and green.
To frame my image, I die cut a domed opening using an old MFT die from a panel of kraft cardstock. Then I added a bit of texture using the Snowfall and Banks stencil and some embossing paste.
Once dry, this panel was popped up over my image with foam tape.
For the sentiment, I used an older set from Hello Bluebird called Typed Christmas. The sentiment was embossed in white on a skinny pennant cut using an old Neat & Tangled die. This was also popped up with foam tape.
I love this cute little trio don't you?
Labels:
Cards,
Christmas,
Purple Onion Designs,
Simon Says Stamp
Tuesday, April 25, 2023
Janes Doodles, First Christmas Card of the Year
*This post contains affiliate links to Simon Says Stamp.
It's April and I'm finally getting around to making a Christmas card. I'm hoping that these are going to be a more regular occurrence here as I try and start building up my stash for the end of the year.
My absolute favorite stamped Santa is from Janes Doodles. She's drawn this guy a number of times in a number of different poses.
Unfortunately Jane decided to shut down her store recently, but I was able to scoop up a couple of the Santas I don't have yet including this one.
If you're looking for Jane's images, she has converted several to digis which you can find here, and I know that she's working with a company to produce some new designs. Fingers crossed that more Santas are involved!
Anyway, I hadn't had my Copics out in a while, so I decided to pull them out for this card. Coloring is quite cathartic and it was fun to just sit and color.
This is a nice large image, so it really didn't require much.
I used one of the Nested Domed Arches dies to cut an arch in a piece of warm gray cardstock and popped that up over my image to frame it and give the card a bit of dimension.
The sentiment is also from the stamp set.
One Christmas card down, a gazillion to go!
Wednesday, December 14, 2022
Spellbinders Layered Windmill Dies
*This post contains affiliate links to Spellbinders.
Hey everyone! There's a new collection from Spellbinders available today, the Home Sweet Quilt collection. I love the quilted look, so was excited to get to play with some of these dies.
Today's cards feature the Layered Windmill dies. This is a set of ten dies, there are some detailed dies that create filigree pieces you can layer over the different triangles, but my cards feature just the two primary dies.
I started by selecting some coordinating papers. To make this easier, I just pulled a bunch of prints from an old Lawn Fawn 6x6 pad.
I used six prints and die cut the quilted piece from each. I then used the outline piece to die cut around two of the negative pieces to create an outline piece.
I also die cut two solid octagons using the outline to use as the base for my quilted pattern. These pieces were run through my Xyron machine to add adhesive.
The webbed pieces were adhered to each base piece, and then I added my different prints into the webbing to create the designs.
Once done, I trimmed the final design down to fit onto my card base.
I added a mat from that same Lawn Fawn paper pack, and adhered the quilted piece over top.
I didn't want to cover up the designs, so I opted for a couple very simple sentiment strips to finish things off.
These take a bit of time, but you could really create six different cards by mixing and matching all the die cut pieces.
Be sure to check out the entire Home Sweet Quilt Collection at Spellbinders!
Tuesday, November 22, 2022
Layered Alpha Noel
*This post contains affiliate links to Simon Says Stamp.
I've got a quick Christmas card to share today mixing some non-holiday with older holiday products from Simon Says Stamp.
I started by inking up NOEL using my Layered Alpha stencils using Cherry, Watermelon, and Pearfection.
I thought it would be fun to contrast the more rustic/graphic look of the letters with some delicate sparkly snowflakes, so the top and bottom edges of the panel were stamped using the Snowflake Edges set and embossed with WOW! Metallic Gold Sparkle Embossing Glitter.
To pull some of the color from the letters out, I added some soft inking around the edges of the card using Pearfection, and then added some colored accents to the snowflakes using Copics (R12, R35, and R43).
A couple colored mats finished things off.
Hope that your week is going well. We're gearing up here for a lot of pie on Thursday!
Labels:
Cards,
Christmas,
Layered Alpha Stencils,
Simon Says Stamp
Thursday, November 17, 2022
SSS Holiday Sparkle, Fir Branches
*This post contains affiliate links to Simon Says Stamp.
I've got a very clean and simple card to share today featuring the new Fir Branches card from Simon Says Stamp.
I wanted to create a frame of fir branches, so I started by die cutting an oval from the center of a piece of soft gray cardstock.
The branches were die cut five or six times from a dark green, and then arranged around my oval.
To add a little contrast to the greens, I swiped my white pigment inkpad over the branches and used a blending brush to add some of that white to some harder to reach/swipe places.
To add a bit of color, I die cut several berries using the Berry Stems dies. These were then scattered around the frame and adhered in place using Micro Dots.
The sentiment, from the Holiday Greetings set was stamped directly onto my card base in Cherry ink, and then then frame panel was adhered with foam adhesive for some extra dimension.
That's all for me today, thanks for stopping by!
Tuesday, November 15, 2022
SSS Holiday Sparkle, More 'Same but Different' Cards Using the Retro Layering Christmas Stencils
*This post contains affiliate links to Simon Says Stamp.
Hi friends! Today I'm sharing a series of cards that really put a dent in my need for more Christmas cards.
Similar to the these cards that I shared last week, today's cards were mass produced using a similar recipe and common products.
Here's what I used:
1) Layering stencil for the background
2) Holiday sentiment set
3) Some largish die cuts (don't need to be holiday themed) that work with the background stencil
4) Sequins.
For the layering stencil, I'm using the new Retro Layering Christmas stencil set. One of the best parts of this set is that it's so big. Each inking created two backgrounds which goes a long way in speeding up the cardmaking process if you need to churn a bunch out quickly.
There are some really beautiful cards folks have created using this stencil where it's inked with multiple colors - green for the leaves, red for the berries, etc. For my purposes, I was going for speed and volume, so I opted for a tone on tone look. I used Field for the green cards, Cherry for the red, and Flannel for the neutral.
The detail layer for each of the cards features gold embossing paste.
While my backgrounds were drying, I stamped and gold embossed a series of sentiments using the Holiday Greetings stamp set. Mats were created for each of the sentiments using the same cardstock as for the card base, but swiping the edges with the same inkpad used for the stenciling. For the neutral cards, I just used a white mat.
I also die cut some greenery/foliage from Matte Gold cardstock. I used both the Privet Branch and Delicate Leafy Branch dies for this.
Once all the backgrounds were dry, they were cut in two. For the green cards, I also made mats for the stenciled panel in the same fashion as the sentiments.
Then it was just a matter of putting all the pieces together. The die cut greens were adhered directly to the stenciled panel, and then the sentiment pieces were popped up.
I used the sequins to add some extra sparkle and balance to the elements.
I love how quickly these came together as well as the fact that I was able to mix old and new, holiday and non-holiday, to create these.
Thanks for dropping by!
Saturday, November 12, 2022
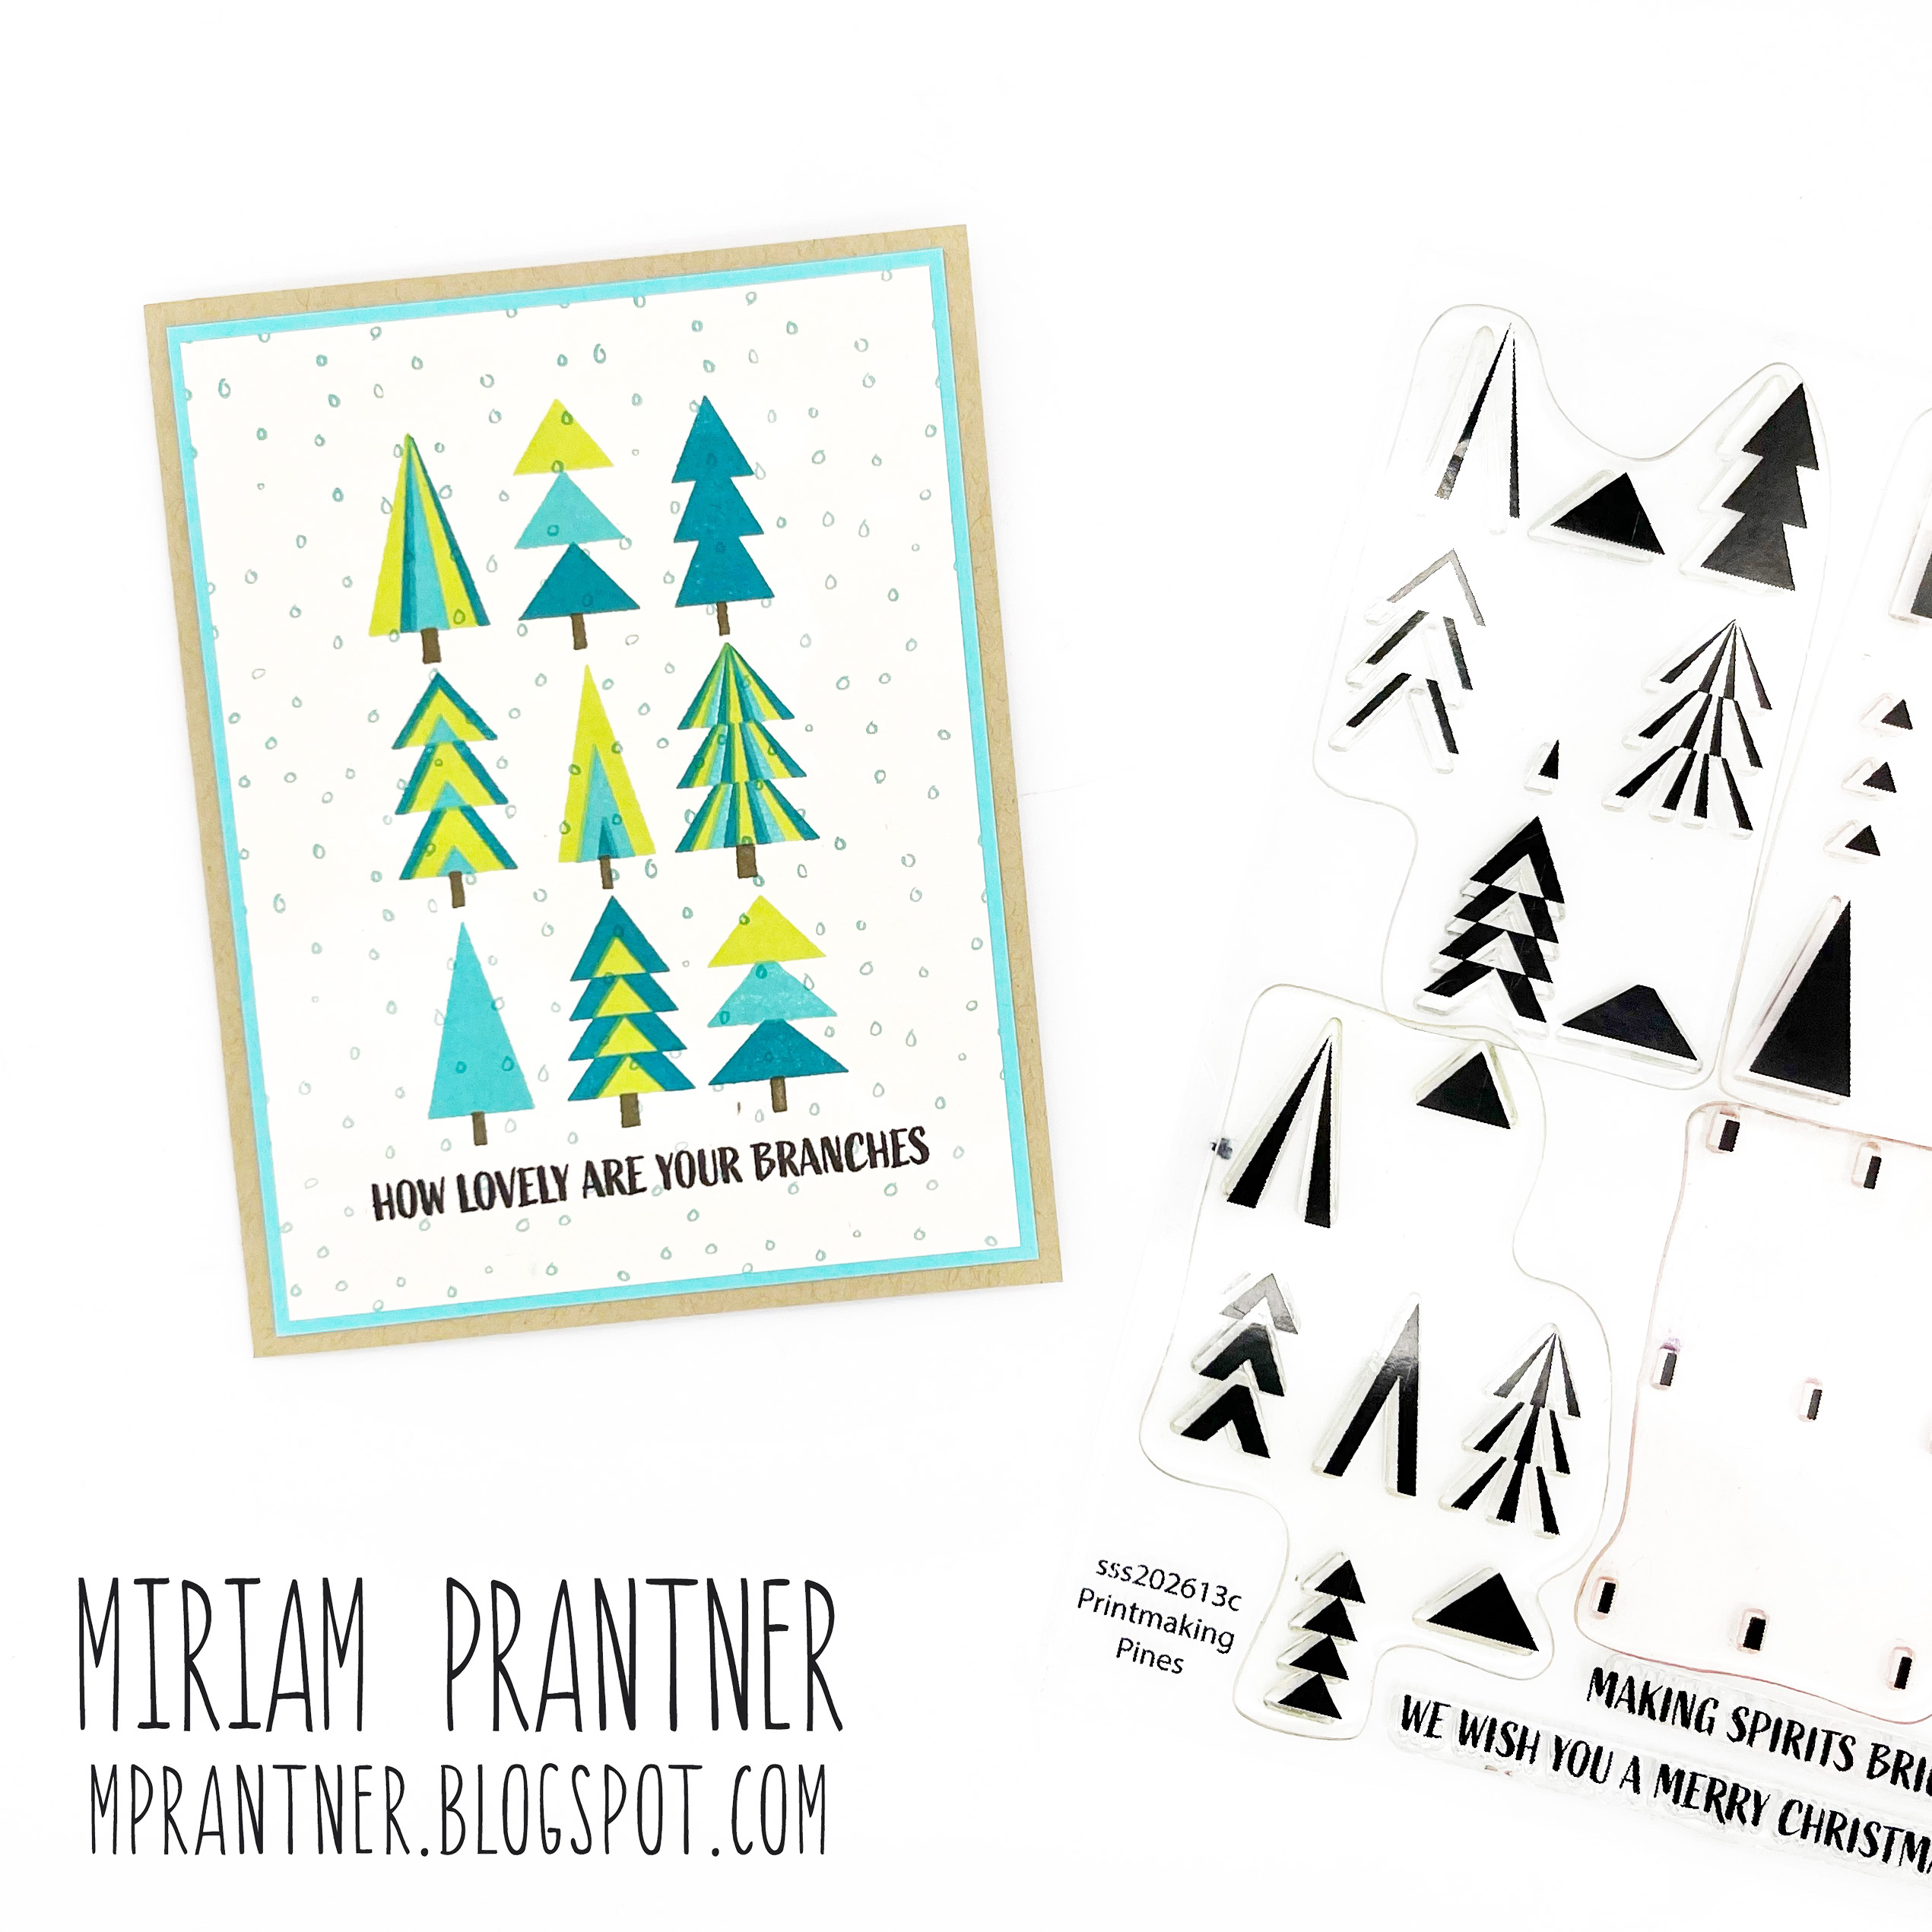
SSS Holiday Sparkle Blog Hop, Printmaking Pines
*This post contains affiliate links to Simon Says Stamp
Welcome to Day 2 of Simon's Holiday Sparkle Blog Hop! The fun all starts at the Simon blog. You should be arriving here from Alberto Gava's blog, but I'll have the whole list at the bottom of the post in case you need it.
The best part of blog hops are the prizes, right? Well, not only is Simon giving away $25 to spend in the store to a commenter at every stop, you can also use the code CUTEBAG to get the above holiday pouch with any purchase of $50 or more this weekend.
OK, now onto my cards!

Today I'm showing off my new Printmaking Pines set. While there are coordinating dies available for this set, today I'm showing off some one layer cards that focus on stamping.
This set is unique to my Printmaking series in that there isn't an outline stamp. I wanted the trees to be larger, and I just couldn't fit in the outlines. I promise these are very easy to line up though, and the larger size works perfectly for mini-slimline cards.
This first card features the Pawsitively Saturated Trio 14, which includes Pine, Sage, and Aspen inks. The tree trunks were stamped with Mocha.
The trees were stamped on a subtle white patterned paper from Lawn Fawn, and the sentiment is from the set.
I added some stitching around the stamped panel for a little rustic texture.
This next card also features stamping on patterned paper. This print is a little less subtle, and I'm usimg some unconventional colors: Ocean, Surf, and Limelicious. The tree trunks were again stamped with Mocha.
When stamping these cards, I actually used two stamping platforms. Two of tree stamps were placed in the MISTI in two different corners, so I stamped the first, rotated my panel placing it in the opposite corner and stamping the second layer. In my Tim Holtz stamping platform was the third tree layer as well as the tree trunks.
The card was finished off with another sentiment from the set as well as a turquoise mat.
Next up, I stamped the trees twice, side by side on a subtle grid paper, to create a patterned paper using some more unconventional colors.
This time I used Surf, Sweets, and Limelicious for the trees, and black for the trunks to give a graphic punch.
The sentiment, also from the set, was embossed in white on black cardstock and the popped up over the panel. I also added a black mat which shows just on the right and left sides.
This last card is my favorite.
I started with a medium green cardstock, stamping the first two layers with Pine and Field, and gold embossing the third layer as well as the sentiment. The trunks were again stamped with Mocha.
Lastly, I inked the edges of the panel with Pine to give it lovely glow.
I hope I gave you guys some ideas for how to use this set as well as show off the variety of looks you can get from it.
Your next stop is Anna-Karin Evaldsson, and the full hop list is below. Happy hopping!
Labels:
Cards,
Christmas,
Printmaking Pines,
Simon Says Stamp
Thursday, November 10, 2022
SSS Holiday Sparkle
*This post contains affiliate links to Simon Says Stamp
Happy Thursday! The Holiday Sparkle release is now available at Simon Says Stamp, and it's definitely been helping me get my Christmas cards done!
I love the idea of mass producing cards, but I get bored making the same card repeatedly. Today's cards are a solution to this boredom. They follow a recipe, the same products are used in each, but they are all unique in their own way.
The focal point for these cards were created using the new Sweater Weather embossing folder/dies as well as another new product, Luxury cardstock. This cardstock has a soft brushed feel that reminds me of fabric/leather.
I started by die cutting my Sweater Weatherr pieces from the soft brown/gray color. There's a hat, a stocking, and two mittens. There is also a die for the pom pom on the top of the hat, as well as the cuff of the stocking. I cut those secondary pieces from the white Luxury cardstock as well as the bottom portions of both the mittens and hat because I wanted some contrast there.
Each of the pieces was then placed in the embossing folder and run through my die cutting machine. For those bottom pieces, I just trimmed the piece down to create the 'cuffs' for the mittens and hat.
To really bring out the pattern of the embossing, I ran my white pigment ink pad across each of the pieces. Don't they look so lifelike?
Because I knew I was going to pop these pieces up, and the Luxury cardstock is a little softer/less sturdy than normal cardstock, I also die cut pieces from cardstock to use as a base, and adhered the luxury cardstock pieces to those.
For my backgrounds, I stamped three different backgrounds onto red cardstock using Cherry ink, trimmed them down, and then added some white splatter.
For some extra pop, texture, and interest, I die cut the Harmony Snowflakes from white cardstock to use with each card.
The stocking card features the Dimensional Quilt background. To ground my stocking, I cut the Large Rounded Tag die from a soft gray, added some twine, and adhered it directly to my background.
The snowflakes were adhered over top, and then the stocking as well as a sentiment from the Reverse Love Peace Joy sentiment strips were popped up with foam adhesive.
The hat card features the Large Kaledoscope background (currently unavailable). The snowflakes were adhered directly to the background, and the hat and sentiment were popped up with foam adhesive.
This one looked a little stark, so I added a few clear sequins.
This final card features the Soft Plaid background. This time I used two sets of snowflakes in the top left and bottom right corners, and also added a bit of twin connecting the mittens.
Just like with the other cards, the embossed pieces and sentiment were popped up with foam adhesive.
These were really fun to make!
You'll want to hop over to Simon to check out the whole release, which includes my latest Printmaking design, Printmaking Pines:
Be sure to swing back tomorrow as I'll be showing off this new set as part of Day 2 of the Holiday Sparkle blog hop.
See you then!
Thursday, November 3, 2022
Christmas Cards Using Your Stash, Part 2
*This post contains affiliate links to Simon Says Stamp.
This Rustic Snowflake stencil creates a big impact with very minimal effort.
I rarely do this, but I stenciled the snowflake directly onto my card base using gold embossing paste.
I love the look of the gold on the soft gray.
For the sentiment, I used the CZ Merry and Bright die. I stacked three red die cuts together, and then clear embossed the entire piece three times to get that really glossy puffy look. The only hitch with this is that embossing gives the cardstock a darker look. Next time, I'll start with a lighter red, or even a pink, so that the finished piece is brighter.
The sentiment was adhered directly to my card base.
I debated adding some extra bling in the form of sequins or clear drops, but opted to stick with a cleaner more modern look.
Hope you like it!
Thursday, October 27, 2022
SSS Berry Stems, Take 2
*This post contains affiliate links to Simon Says Stamp.
Hi all! I've got a card to share today using the same Berry Stems dies I used on my last card. The previous card was all about texture, today's card is straight die cutting and has a much more graphic feel.
I cut the leaves from two different shades of green cardstock, the stems from a chocolate cardstock, and the berries from a deep red.
I used that same red for my scalloped mat, adding a soft gray panel on top.
The die cut pieces were then arranged and adhered, and I added a sentiment from the Reverse From Me Christmas sentiment strips which was popped up with foam adhesive to finish things off.
Super simple.
My earlier card was definitely a little more labor intensive, lots more steps. This one is pretty straightforward and something that you could mass produce pretty easily.
That's all for me today. Thanks for visiting!
Tuesday, October 25, 2022
SSS Cozy Hugs, Berry Stems
*This post contains affiliate links to Simon Says Stamp.
It's almost November, and I find myself in familiar territory again....almost Christmas and hardly any Christmas cards to speak of! It's about to get very Christamay around here! Today's card features the new Berry Stems dies from Simon's Cozy Hugs release as well as some Christmas items Simon released last year.
The Berry Stems dies include two different sizes of greens, two different berry stems (which includes both the stem pieces as well as the individual berries) and a twig die which isn't featured here.
I cut my greens from a medium green cardstock and then used Pine ink to add a little extra color/variation.
The berry stems themselves were cut from kraft and the berries from red.
I knew I wanted to use a kraft background, so in order to make the die cut berry stems pop a bit more, I used Latte ink to add a bit of shadow in the center of the card. I also added a bit of inking to the edges of my panel.
For some texture, I ran the panel through my die cutting machine using the Delicate Pine Branches embossing folder. I also added some white splatter to the panel.
Once dry, the panel was machine stitched to my card base, and the die cut pieces were arranged and adhered.
The sentiment is from the Snowflake Edges set and was white embossed on a small kraft banner which was popped up over my die cut pieces.
One more card for my Christmas pile!
Thursday, October 20, 2022
SSS Cozy Hugs, Glistening Snowflakes Take 2
*This post contains affiliate links to Simon Says Stamp.
Hi all! Today's card was SO easy! On Tuesday I showed off the dies that come with this Glistening Snowflake embossing folder. Today's card shows off the embossing folder itself, and this is definitely one of those cards that you could mass produce.
I started by embossing a piece of kraft cardstock.
Then I swiped my White Pigment ink pad across the panel to enhance and highlight the embossed snowflake.
That's it.
All you need to finish things off is a great die/sentiment.
For my card I used the Large Joy die. I die cut the sentiment itself from white cardstock, and the outline from red. Theses were adhered together and then popped up over my background with foam adhesive.
The secondary sentiment is from the Love Peace Joy Reverse Sentiment Strips and was also popped up with foam adhesive.
Super simple and quick!
Tuesday, October 18, 2022
SSS Cozy Hugs, Glistening Snowflakes
*This post contains affiliate links to Simon Says Stamp
Hi friends! Today I'm sharing a clean and simple card using the dies that come with the Glistening Snowflakes embossing folder from the Cozy Hugs release.
I love the clean and simple modern lines of this snowflake and really wanted to highlight it.
There is a detailed snowflake and then a solid/outline die.
I started by die cutting both of the pieces together. I used some light tack tape to hold them in place, and die cut from white cardstock. This created both a detailed cut as well as an outline around that cut.
I then die cut the detailed piece two more times from white cardstock and once from Gold Matte, adhering these together.
Next, the solid die was die cut from another piece of white cardstock and covered that with adhesive. The white outline from the first cutting was adhered to that as well as the layered piece. I also die cut solid die from the soft gray that I used for the background, and adhered the negative cuts into the spaces in the center of the die between the arms of the snowflake.
For the sentiment, I used the Holiday Greetings set. The sentiment was embossed with gold, but I repeated the embossing twice to get that really lovely puffed up dimensional look.
The snowflake piece was then adhered to the card.
I love how elegant that snowflake is! I'll be back later this week with a look at the embossing folder that comes with these dies
Subscribe to:
Posts (Atom)