Showing posts with label Punky Sprouts. Show all posts

Thursday, December 12, 2013

Holiday Gift Boxes with Punky Sprouts


Hey everyone!  Today I am sharing some cute ways to dress up your gift boxes for Christmas using Punky Sprouts embellishments.

You can use ready made boxes, ones that you create with cut files/dies, or use your brand new Gift Box Board like I did.

I love the Punky Sprouts embellishments, and used a bunch here.  The doilies are a great way to add some softness to your box, and if you aren't a fan of the slits/perforations that you get with some die cutting machines/dies, this is a great way to cover them up.


For the tall box, the trees were made using each of the three sizes of Lil Blossoms.  Each one is folded into quarters.  Before I adhered those I tied a bit of Punky Sprouts twine around the center of the box.  The tree trunks were a bit of scrap paper that I stamped using Neat & Tangled's On the Strip stamp - the woodgrain strip.


For the little box I wanted more color.  I used some more Punky Sprouts doilies, cutting one in half and then trimming off a little excess to decorate the sides of the box.  Then I sprayed some Lil' Petals with Lindy's Mist.  A little red and white twine was tied around the centers and the dried petals were adhered over top.


I just love how these turned out, and they really were so easy to do.

Supplies Used
Punky Sprouts (http://getpunkysprouts.com/store/?page/63371/products) -Canvas Lil' Petals, Parchment and Lacey Lil' Blossoms, Funky Punky Fiber Pack; Lindy's - Cathedral Pines Green Starburst Mist; WRMK - Gift Box Punch Board; Echo Park - Season's Greetings Collection; CTMH - Kraft and Chocolate card stock, Chocolate Ink, Bonding Memories Adhesive; The Twinery - Maraschino Twine; Neat & Tangled - On the Strip; Helmar - Quick Dry 450

`

Sunday, November 3, 2013

Thank You - with Punky Sprouts


Hey everyone, sharing a card today using some of my favorite Punky Sprouts products - the Lil' Lacy Blossoms (doily) and Lil' Blossoms.

Lil' Blossoms are a little bit thicker than tissue paper and come in three sizes.  For this card I used the smallest size to create the flower which I layered over the doily.  I used some Trendy Twine and a MME button to accent the center of the flower.

Here's a little visual of how I created the pieces for the flower:


1) Fold Lil' Blossom in half and then in quarters.  Open the quarter fold and then fold one side back into the center.
2) Fold quartered piece back from center.
3) Repeat on other size.
4) Pinch in between the two sides, on the quarter fold to create a 'hill'.

I made a bunch of these pieces and then adhered them to a small punched circle.

The sentiment is embossed.  It's a little difficult to emboss on this woodgrain cardstock.  After the initial embossing, I went back with a Tsukineko Versamark pen to get the parts that weren't covered well, and embossed again.

I'll be linking this one up with the Simon Says Stamp challenge also since it's Anything Goes.

Thanks for coming by and have a great day!

Supplies Used:
Punky Sprouts:  Lil' Blossoms and Lil' Lacy Blossoms - Available here:  http://getpunkysprouts.com/store/?page/63371/shop-punky
Other:  LCI - Woodgrain Cardstock; Avery Elle - Modern Leaves Stamp Set; Versamark and Versamark Pen; Stampendous - White Embossing Powder; MME - Merry and Bright Buttoms; Trendy Twine - Peppermint Stick Twine; Thermoweb - Zots Dimensional Adhesive; Tombow - Mono Adhesive

Monday, October 28, 2013

My little book of lists - Punky Sprouts Teenie Beanie Mini


Ack!  I just realized that I forgot to set this post live here on the blog last month when it was posted to the Punky Sprouts blog.  Last month we teamed up with Epiphany Crafts, I was pretty psyched as I've been wanting one of the Epiphany tools for a while.  Anyway, it's a little aged, but still a fun mini.  Enjoy! 

Lists seems to be kind of the rage right now.  They are a quick and easy way to do journaling if you are pressed for time or have some writer's block, and an easy way to create meaningful layouts without having to do a ton of journaling.

The Teenie Beanie mini was the perfect size for this.  I used papers from Echo Park's Everyday Eclectic collection, and some washi from my stash as well as some Lawn Fawn alphas.  The Epiphany tool was so easy to use too.  I'm thinking I need to get some more!

The Teenie Beanie has two fabric pieces in it.  For this first one I use some old (ugly) alphas that I had, stuck them down and misted over top.  So easy, but I love how bold it is.


I divided up the mini into several categories so I can 'file' the lists in different areas, here's an example of a To Do list.  You could certainly be more mundane like:  things to do today, honey do lists, stuff to get at the grocery store, stuff to pack, etc. 


Since I'm so bad about journaling these days, I thought I would try to include more 'diary' type lists.


And of course lists with long term goals/plans.


Hopes might sound a lot like dreams, but I consider this more about other people - things that I wish for my kids, husband, the world around me.  For this canvas piece I used my SC circle graph set and just misted over it and added the title with an ultrafine Sharpie.


Finally, a look at the back of the album - all of the reverse sides of the pages were finished with paper from Everyday Eclectic and washi or another thin strip of paper at the top, but I didn't photograph them all because I thought it would make the post too long.


Thanks so much for coming by!

Punky Sprouts:  Teenie Beanie Sprout - Available here:  http://getpunkysprouts.com/store/?page/63371/shop-punky
Epiphany Crafts - Oval Tool and Bubble Caps Ovals
Other:  Echo Park - Everyday Eclectic Collection; Lawn Fawn - Riley's ABCs; Memento - Tuxedo Black Ink; CTMH - Bonding Memories Adhesive; Dylusions - Vibrant Turquoise, London Blue, Bubblegum Pink, and Squeezed Orange ink sprays; Queen & Co - Black Text Washi; Webster's Pages - Composition and Color Washi Tape; Misc Washi from stash; Studio Calico - Circle Graph mask; Tombow - Mono Adhesive; American Crafts - Precision Point 08 Pen; Ultrafine Sharpie Marker; WRMK - Cropodile


Saturday, October 26, 2013

Thanksgiving Coundtown/Gratitude Decor with Punky Sprouts


A while back my friend Elena shared this project on her blog.  I love the idea of getting the kids actively thinking of things they are grateful for, so I adapted the idea and came up with my project for today.

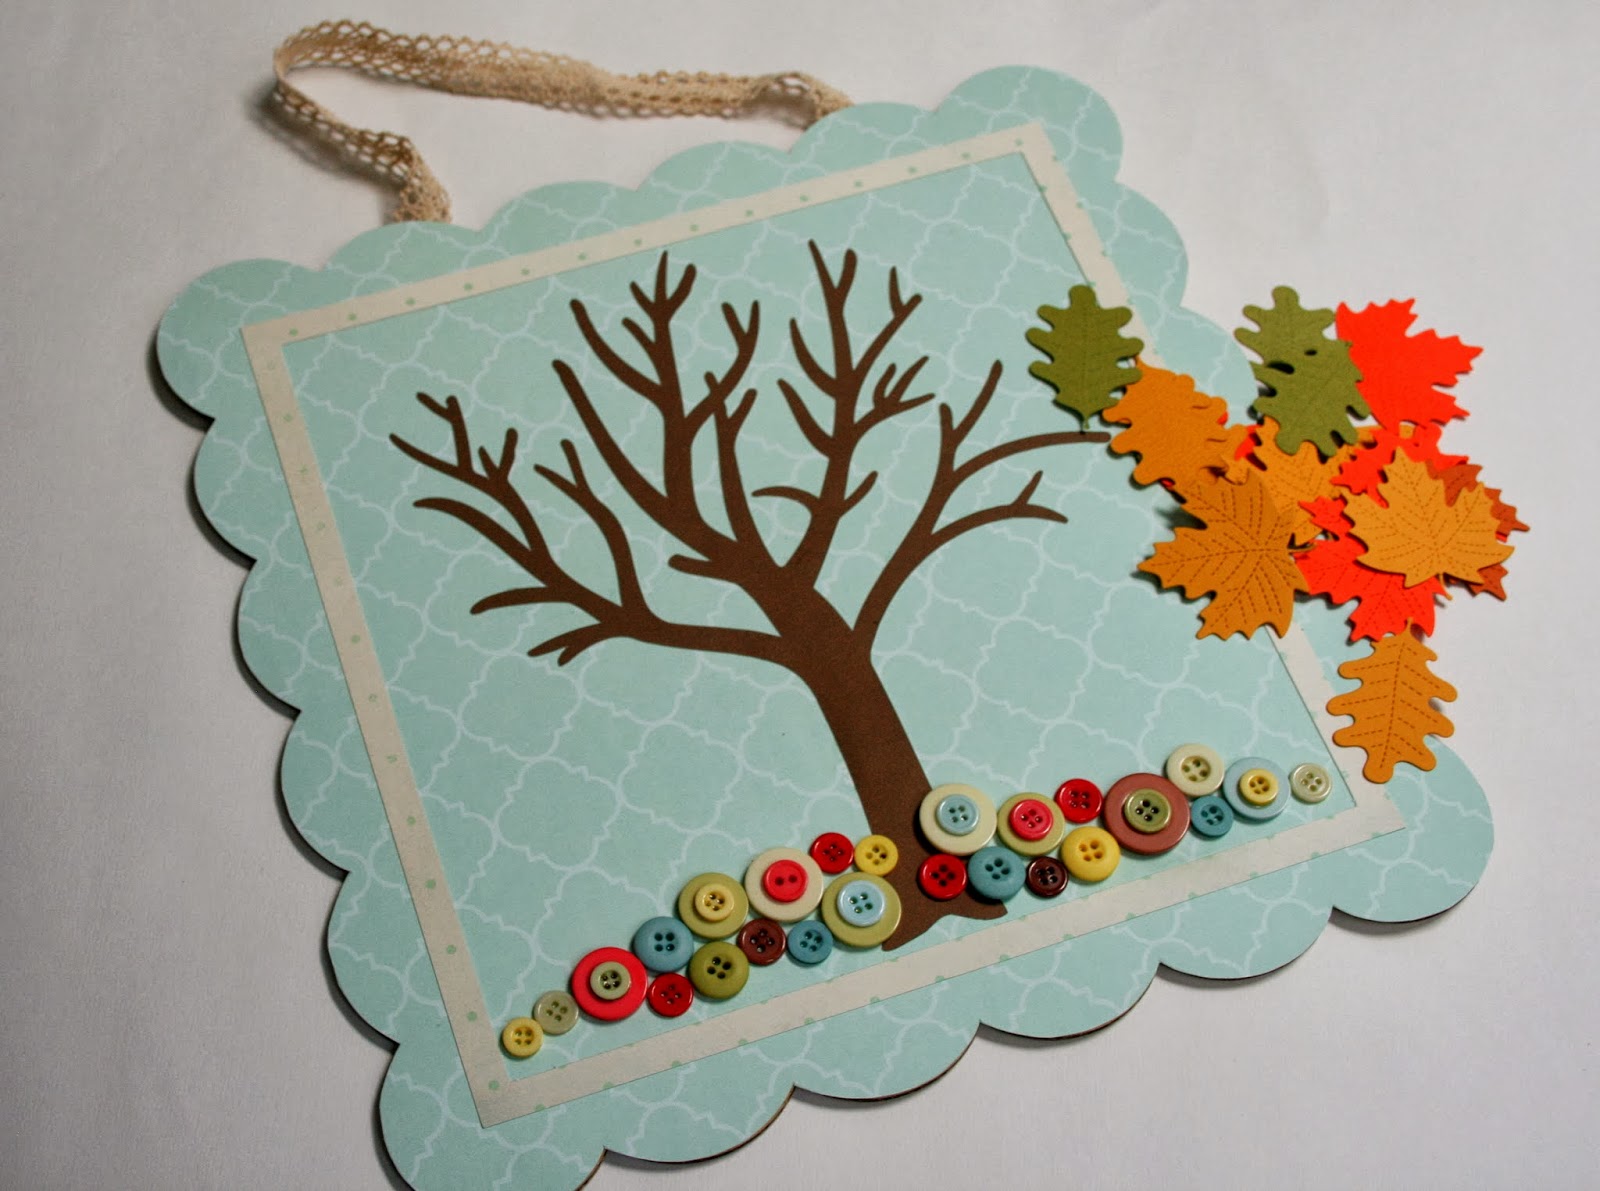
I used a piece of Punky Playground covered with patterned paper and this tree cut file from the Silhouette store.  A bunch of gorgeous Punky Sprouts buttons 'ground' the tree.  At first I used just the softer button colors to match the background, but then I decided it would look too light once the bright leaves were added, so I mixed in some of the brighter colors, and also layered buttons on buttons, because you can never  have enough buttons, right?  I also added a little bit of the crocheted trim that Punky Sprouts is now carrying on the back so we can hang this.


Then I cut a whole bunch of Lawn Fawn stitched leaves dies in different colors of cardstock.  Beginning in November, I'll have Ellie add one leaf to the tree each day, writing on it something she is grateful for.  At the end of the month, she'll have a beautiful leafy tree and a reminder of how blessed she is.


I love how this turned out.  It was so easy, and the best part is that nothing here was new, all the papers/cardstock came out of my stash of old things.  This is a quick and easy 2 hour project that will turn into a keepsake.  I showed it to Ellie today and she actually wanted to know if we would do this every year!

Have a wonderful day and thanks for coming by!

Supplies Used:  
Punky Sprouts:  Assorted Buttons, Punky Playground, Crocheted Lace - Available here:  http://getpunkysprouts.com/store/?page/63371/shop-punky
Other:  Lawn Fawn - Stitched Leaves Dies; MME - Merry and Bright Patterned Paper; Fancy Pants - Summer's End Patterned Paper; Various Scrap Cardstock pieces; CTMH - Liquid Glass, Bonding Memories Adhesive

Tuesday, July 23, 2013

Punky Sprouts Button Love


Hey everyone it's my turn to share over at Punky Sprouts today.

If you follow my blog, you know that we just moved our daughters into the same room.  This has actually worked out pretty well.  They like being together, they've sorted out the whole sleeping at night thing, and we're working on naps.

I thought it would be fun to create some new pieces for their room, and decided to use the new Punky Sprouts buttons as the focal point.

Previously we had several Curious George prints up (helpful/cheap trick for those of you decorating a room - buy a book or calendar and just mount the photos on scrapbook paper and frame - so much cheaper than buying from somewhere), so I decided to replace two of them.


The great thing about this project was that I was able to reuse both the frame (withouth the glass) as well as the cardstock from the original Curious George prints, I just added an extra layer of white cardstock for definition.


The buttons are mounted on two of the pages from the Teenie Beanie album.  I first painted the edges with gesso and then covered them with white cardstock.

Then came the button placement.  After some experimenting, I decided to create two layers of buttons, little ones on the bottom and then the larger ones on top.  They are adhered with Liquid Glass.


I also added a little piece of cardstock with their names written in cursive. 

I love the way these turned out and the girls were pretty excited to have their letters displayed in their room. 

Thanks so much for coming by today!

Supplies Used
Punky Sprouts:  Assorted Buttons, Teenie Beanie Sprout - Available here:  http://getpunkysprouts.com/store/?page/63371/shop-punky
Other:  CTMH - White Daisy Cardstock, Liquid Glass, Bonding Memories Adhesive; Claudine Hellmuth - Gesso; Tombow - Mono Adhesive; American Crafts - Precision Point 01 Pen


Tuesday, June 25, 2013

Kindergarten Loves


This month is "Something Old and Something New" month at Punky Sprouts.  We each received a 'retro' album--one of the original albums as well as new Punky Sprouts embellishments.  That's right Punky Sprouts has some gorgeous new buttons and crochet trims.  I am in love!

I received a Punky Love mini and decided to create a 'Kindergarten Loves' album for Ellie:  things that she's loved about this past year.  The pages in this mini are a mix of clear acrylic and cardboard, but I opted to go ahead and cover all the pages regardless of what they were.

In keeping with the Something Old part of the challenge, I decided to do some stash busting and use some of my older collections.  There's a bunch of My Little Shoebox Up in the Trees and Oh Deer, Pink Paislee Hometown Summer, and Echo Park This and That.

For the cover on the canvas piece I painted color on using a paintbrush and a couple spray mists.  The 'loves' thickers are DIY thickers that were colored with a Spectrum Noir marker.

Ellie loved her teachers this year, so the first page is going to hold photos of her with her two teachers.  You'll notice the album is mostly devoid of photos.  That's because I got most of them at the end of the year and haven't had a chance to print them yet, plus I don't want to post pictures of her friends without asking their parents and I haven't gotten around to that either.

I used a black journaling pen to add some doodles around the pages and frames for a little definition, and you can see those great new buttons/trim.


Field trips are next.  Ellie's kindergarten class went on FIVE field trips.  Granted I only went to 1/2 day kindergarten, but I'm pretty sure we didn't have field trips until we were in the higher grades when I was growing up.  Ellie loved them.  They were lots of fun, plus she is a walker so any reason to ride a school bus at this point is aces with her.

The numbers are Elle's Studio stamps stamped on the same paper I'm using for a mat on the right hand side, and I used a few of the stickers from MLS's Oh Deer collection as accents.  I'm going to create a mini collage of field trip photos to add to the right hand side.


Learning:  Ellie is really made for school.  She loves structure and she loves to learn.  I was actually really surprised when I asked her what her favorite subject was and she said math because that is the subject that caused the most frustration for her this year.  When I asked her why she liked it best she said because even though it's hard she likes being able to do it and that there are different levels that get harder.  LOVE that she likes to be challenged!

Ellie also learned to read this year, a big deal for someone who is as into books as she is.  I included an excerpt from her report card:  "Ellie is reading independently.  She has a lot of confidence when she is reading and is not afraid to make mistakes."


And finally making new friends.  On the first day of school I asked Ellie what specifically she'd like me to pray for and she said "that I would make some new friends."  She definitely has.  We have been so blessed to have her in this class!


This mini came together so easily and quickly, and I think it will be a lot of fun for Ellie to flip through to remember her year.

Supplies Used
Punky Sprouts:  Punky Love Album, buttons, and crocheted lace
Other:  Pink Paislee - Hometown Summer collection; My Little Shoebox - Up in the Trees and Oh Deer collections; May Arts - White Burlap String; Elle's Studio - Number It Stamp; American Crafts - Assorted thickers; Studio Calico - First Kiss Mister Huey's; Dylusions - Bubblegum Pink Ink Spray; Pigma - Black Micron Pen; Fancy Pants - Childish Things Alpha Stickers; October Afternoon - Mint & Creme Mini Market; Helmar - Craft Adhesive; Tombow - Mono Adhesive; CTMH - Colonial White cardstock; Corner Rounder


Tuesday, May 28, 2013

Try New Things - Punky Sprouts and Faber Castell


I was pretty excited when I heard that Punky Sprouts would be swapping with Faber Castell this month.  I had some Faber Castell products already and was looking forward to trying out some new stuff.

My goal for this mini was just to stretch myself, try out some different techniques and combinations, and experiment.  I think you have to do that every so often....that's how you learn what works, and what doesn't.  I chose to use a Tutu Punk album.  This is the perfect album for experimenting with mixed media.  It consists of alternating pieces of scalloped cardboard and a really absorbant mixed media paper. 

For the cover I used some FC Gel Medium on a Ronda Palazzari Crafter's Workshop Stencil. After I let it dry, I generously misted it with a variety of mists.  Then I colored some DIY Thickers with Gelatos and adhered them.  They were a little bright, so I toned them down with some stamping, using Pitt Markers as the stamping medium.


On the next page I applied some gelatos.  Then misted a background stamp with water and pressed it into the gelatos.  I thought it would remove some of the color to give it some extra texture and pattern, but I think my layer of gelatos was too heavy.  Still, the stamp itself did pick up the gelatos color, so you can see that on the right and left where I stamped the background stamp without cleaning it off.  The sentiment was colored with a Sharpie marker and deliberately smudged to add some shadow.

On this page I used the Gel Medium to decoupage newspaper onto the cardboard piece.  I added some stamping (hard to see) in the background using a woodgrain background stamp and gelatos.  Then I colored some circles, turning them into lanterns, and added some detail with a marker.

This page involved rubbing gelatos at the top (and then the side) of the page , spritzing it with water, and then allow the drips to travel down the page and dry.  The letters were made using a stencil and black dye ink, and then I added a little doodling around the letters as well as a bit of mist.


Remember when I said that it was good to play around and see what works and what doesn't?  Well this next page definitely didn't, but I kept it in the mini as a reminder that mistakes are part of the creative process.  Bunch of mist, a stencil, some Gel Medium, some coloring with Pitt Markers....this one just didn't come together the way I envisioned.


On this page I colored with my Gelatos, and then used a wet brush to blend it in.  The sentiment and the houses were cut using my new Silhouette Portrait and I attached them using Gel Medium.  It actually gives it kind of a vinyl look.  I added a bit of mist as a finishing touch.


This next page was super simple, but one of my favorites.  I just painted the cardboard page with gesso, and then misted over a Studio Calico stencil, spraying it on heavily.  Then I added some white thickers that were colored with a Stamper's Big Brush Pen.


For this page I wanted to play with stamping using the Pitt Markers.  I used the Mama Elephant Trifecta set and created kind of an ombre effect with my four markers.  You'll notice that it's easy to blend the colors with the markers, and you can also color them on blended too.  I added a little bit of gesso on the sides to soften the colors a little and drew the sentiment freehand.


Finally, for the back cover I pulled out that Ronda P pie chart stencil again.  First I lightly misted the cardboard with white mist.  Then I used the Gel Medium over the stencil again and let it dry.  Once dry, I painted mist onto each of the pie sections.  The stickers are Bazzill.  They stick really well, but I still added a layer of Gel Medium over top.  It picks up some of the mist color so the stickers blend in a bit.

I really had a great time creating this album, and I left all the backs of my pages unfinished, so I'm thinking I'll go back and do some more experimenting as time permits.  Based on my experiences thus far, there are several other techniques/variations I still want to try.

Thanks so much for coming by!

Supplies Used:  

Punky Sprouts - Tutu Punky (http://getpunkysprouts.com/store/?page/63371/shop-punky)
Lindy's - Cathedral Pines, Rudolph's Nose and Starburst Sprays (http://getpunkysprouts.com/store/?page/63371/load/product_category/category/8580/imageID/0/more-mixed-media) 

Faber Castell - Gel Medium, Yellow Gelatos, Green PITT Artist Pens, Red Mixed Media Sampler

Other:  Crafter's Workshop - Ronda Palazzari Pie Chart Stencil; Studio Calico - Bubbles and Arrows (exclusive to Neverland Scrapbooking Kit) Masks; Dylusions - Cherry Pie, Squeezed Orange, Lemon Zest, Cut Grass, London Blue, and Crushed Grape Ink Sprays; Claudine Hellmuth - Gesso; Mama Elephant - Trifecta; American Crafts - DIY, Nutmeg, and Prancer Thickers; CTMH - Giggle lowercase Alpha and Black Ink; Hero Arts - Snow Dots Cling Background and Woodgrain Background; Memento - Tuxedo Black ink; Bazzill Basics - Big Word Stickers Celebrate

Friday, April 19, 2013

Punky Playground Display Frame


Hey everyone, here to share a fun, easy project using Punky Playground today.  Punky Playground pieces are 12 x 12 pieces of corrugated cardboard that have scalloped edges.  They come in a pack of two, and you'll need both pieces for this project.

On the bottom piece I cut a 10 3/4" square piece of cardstock centering it.  The papers I chose to use for this project are from My Little Shoebox's Up in the Trees collection.

The second piece of Punky Playground is the front frame.  I measured 1 1/4" in on each side and cut out the center square.  Then I traced the frame on the pink polka dot paper and cut around the scalloped edges.  In the center, I added about 3/8" and cut out the center of the paper.  I scored along the lines that I traced, and snipped the corners in on a diagonal to create flaps that were folded in to create a finished look.  I adhered the front piece of cardstock with Bonding Memories Adhesive, and used Helmar Quick Dry 450 on the small flaps that were folded on the inside edge of the opening.  If you are pressed for time or looking to simplify the project, don't worry about the flaps, just cut right along the traced line in the center of the frame.

Here's what the it looks like without the photos/ephemera:

The trim going across the frame that the items are hung from is Lil Twiney that I crocheted.  It's secured between two Helmar Zapdots.  Additional double layers of Zapdots were used to secure the front and back of the frame.


I used some of the Lil Canvas Stems from the Punky Fiber Pack to hang the frame.

This was a fun, quick project to put together.  I didn't embellish it too much, just added a bit of paper to frame the opening, because I haven't decided who is getting this.  Originally I thought I would give it to Ellie, but I kind of want to keep it now, although she did see it when I was photographing and wanted to know if she could have it....

Supplies Used
Punky Sprouts:  Punky Playground, Canvas Funky Punky Fiber Pack
Other:  My Little Shoebox - Up in the Trees papers; CTMH - Bonding Memories Adhesive; Helmar - Quick Dry 450, Zapdots; Tombow - Mono Adhesive

Monday, March 25, 2013

Punky Sprouts and Carta Bella


I was so excited when I heard that we were teaming up with Carta Bella this month.  I've been a big fan of Carta Bella's collections from the start, and I was lucky enough to get to work with the Winter Fun collection. 

I have two projects to share with you today.  The first is a layout. 


This is from Christmas Eve 2009.  We generally spend Christmas Eve with Andrew's family, and we were down at his parent's house that year.  As you can see, there was a lot of snow on the ground, and Andrew's dad volunteered to take Ellie out for a walk to see the stream at the back of their property.  They never made it all the way as Ellie was just the right size where she would put her boot down on the snow and it would hold for a few seconds, and then as she continued to walk the boot would fall through.  She did NOT like that, so back they came, but I was glad to have gotten these shots of the two of them.

I used two similar photos.  One as the main image, the other covered with vellum as kind of an echo of that image.


The layout includes both  Lil' Lacy and Lil' Parchment blossoms.  The Parchment blossoms are the medium size and were folded and adhered to the vellum mat to create a frame for the photo.  I also added a little glassine bag to hold the journaling tag. 

The strips from the bottom of the page as well as the Winter Days block were cut from the border and journaling block sheets in the Winter Fun collection.

My second project is a card.


Usually I like a sentiment on my cards, but I really wanted the flower to be the focus on this one. 

I chose two of the Winter fun papers, distressed the edges and sewed them together and then to the card.

Then I added a Lil Lacy blossom.  To create the flower, I got one of the small Lil' Parchment Blossoms, folded it in half four times, then opened it up, and kind of pinched/twisted the center and manipulated it until I was happy with it.  It's adhered with a Zot dimensional adhesive.  A button and some twine finish it off.  This was a really easy card to put together, but I think it has a big impact. 

Thanks so much for coming by today.  Be sure to head over to the Punky Sprouts blog to check out the rest of the projects that the Design Team created this month. 

Supplies Used:
Punky Sprouts:  Lil' Lacy Blossoms, Lil' Parchment Blossoms  Punky Store-http://getpunkysprouts.com/store/?page/63371/shop-punky
Carta Bella - Winter Fun Collection
Other:  American Crafts - Black Nutmeg Thickers; Trendy Twine - Peppermint Stick; Curtsey Boutique - Glassine Bag; CTMH - Cricut Art Philosophy Cartridge; Kraft Button; Thermoweb - Zots Dimensional Adhesive; Tombow - Mono Adhesive; Sewing Machine

Monday, February 18, 2013

Be Joyful Always


Happy President's Day!

It's my turn to share over at the Punky Sprouts blog today.

This month we are all working with the newest Punky Sprouts album, the Hunk Punky.  I really love this album.  If you are intimidated by minis, it's the perfect size.  The pages are 4 1/2" x 6 1/2", so you could literally just fill it up with 4x6 photos and not have to worry too much about extras.

I chose to create a prayer mini.  I've realized that while I'm pretty good about praying for things, I don't often record the answers or when a prayer was answered.

You'll see that the album kind of follows 1 Thessalonians 5:16-18:  Be joyful always, pray continually, give thanks in all circumstances.

On the back of the cover I wrote out one of my favorite prayer passages:  Phillippians 4:4-9


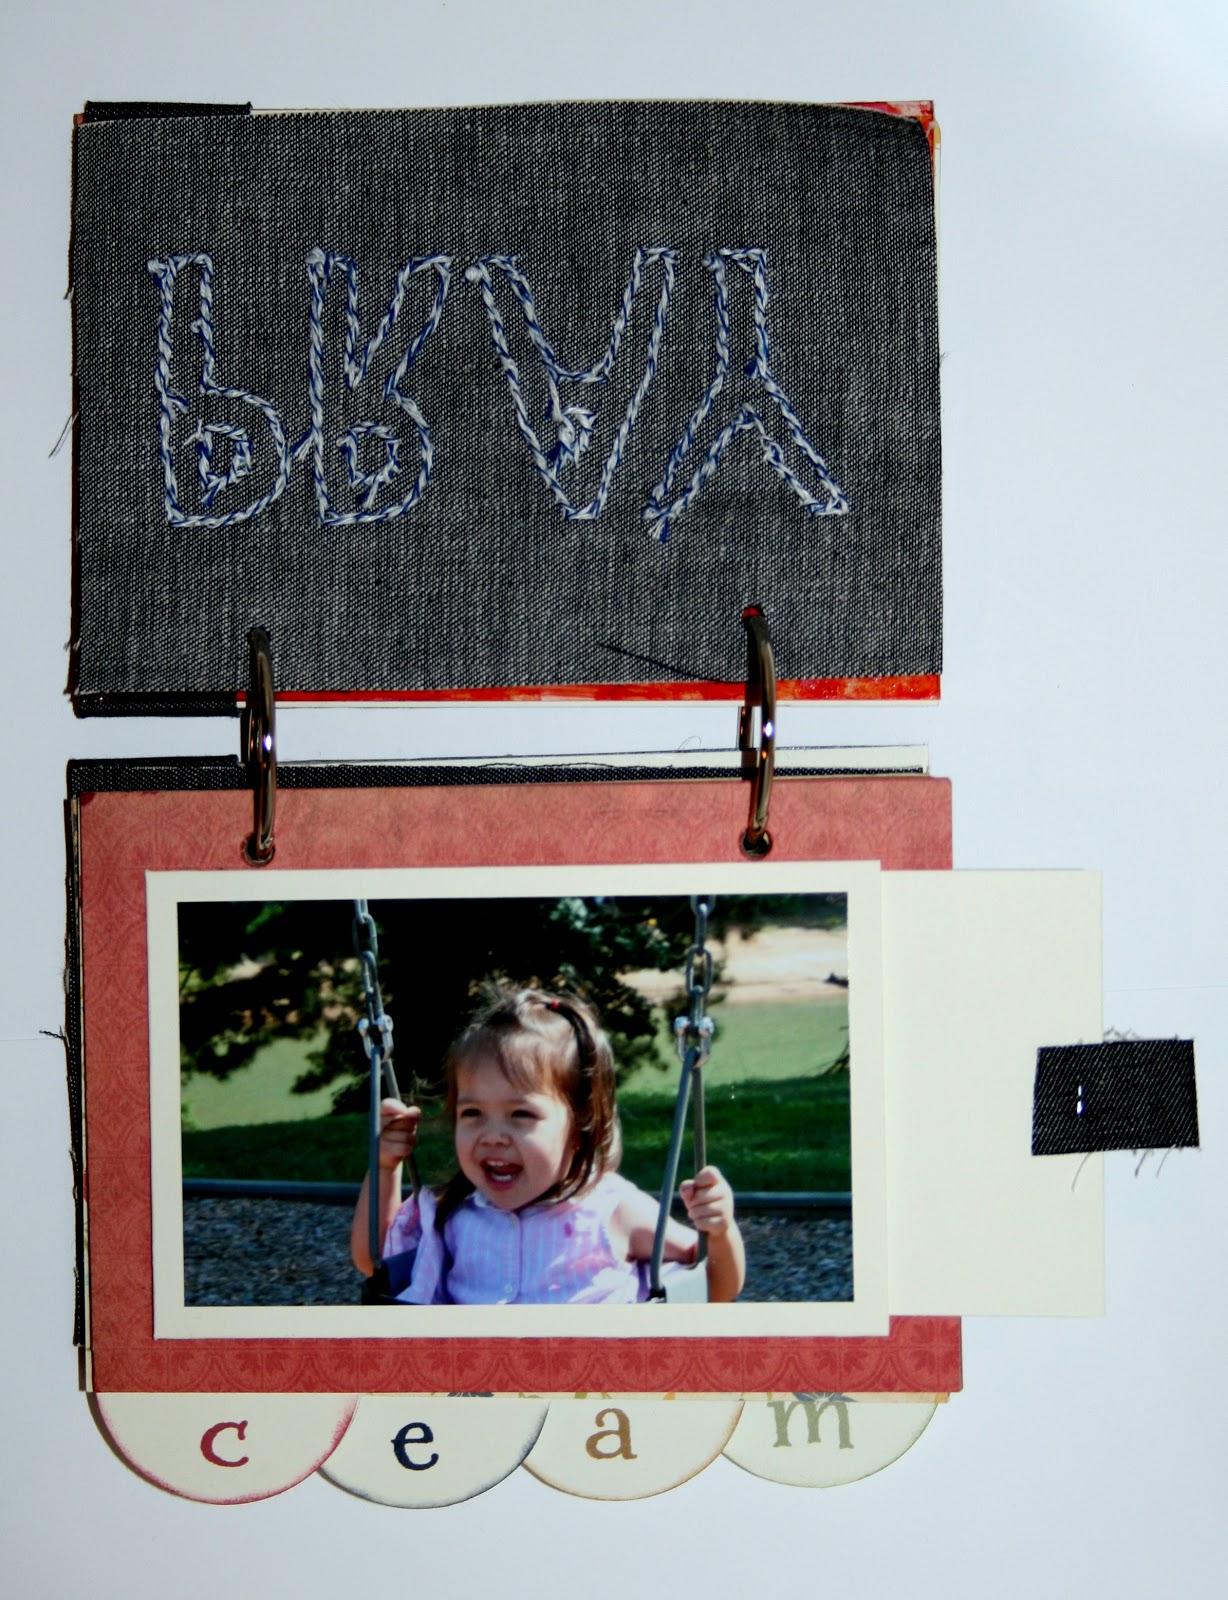
There are some additional sheets in the album, including a clear piece.  I chose to use this like an overlay.  I used alcohol inks to add some color/texture.   There are also two denim sheets.  On this first one I used Lil' Denim Twiney for the stitching.


There are four tabbed pieces in the mini - perfect for a our family of four. I've dedicated one to each of us. On the front of each section is a photo/pocket for that family member. There's a tag that slips in behind where I can record current requests.  Here's Carina's page. 


Here's Ellie's page.  You can also see the back of Carina's page.  On the backside of each tabbed page is another pocket that holds a tag where I can record answers/praises.  All the papers are from Carta Bella's Traditions collection, and I used some Hero Arts background stamps to add some pattern to the pockets/backsides of the tabbed pages.


I'm skipping Andrew's and my pages since I need to order some photos for those pages still...it's amazing how few solo photos we have of one another!

For the second denim page I stitched the word 'continually' with my sewing machine.  I actually wrote the word onto a piece of parchment paper.  I pinned this to the denim pieces and sewed over it.  Then I ripped the parchment paper off to reveal the word.  I went over it one more time to give it a little more definition.


And here's the final page - with the final portion of the Thessalonians passage.  Hope you like the mini and that this gives you some ideas on how you might use it.  AND, if you want to win one of your own, Punky Sprouts is giving one away right here on my blog as part of the Made with Love blog hop....click here to leave a comment, and while you're at it, check out the other stops on the hop - there's candy at every stop! 


We're enjoying a three day weekend here in the states.  Hoping to get caught up on some projects and paperwork and have some fun too.  Hope you are enjoying the start to your week!

Supplies Used
Punky Sprouts:  Hunk Punky, Denim Funky Punky Fiber Pack,
Other:  Carta Bella - Traditions collection; CTMH - Colonial White, Outdoor Denim, Ruby, and Bamboo cardstock, Ruby, Garden Green, Bamboo, and Outdoor Denim inks, Giggle lowercase alpha, Cricut Art Philosophy cartridge; Ranger - Adirondack Alcohol Inks in Butterscotch and Wild Plum; Hero Arts - Large Fabric Design and Lotus Background stamps; Tim Holtz Tiny Attacher; Sewing Machine; Tombow Mono Adhesive