Showing posts with label The Crafters Workshop. Show all posts

Thursday, August 27, 2020

ZAP Thank You Cards


It's apparently thank you card week here on the blog.  I've got the cards for Carina's party (which doesn't happen for another week and a half) to share today.

Carina is turning 10 this year which means it's her last year for a party and she gets a bigger one.  She really wanted to have it at one of those jumping places, but given the current state of affairs, it didn't seem like the best idea.

Instead, we're doing a laser tag party, but it's an outdoor party.  The company shows up with the guns and organizes the games.  A lot of people do it at their home, but our yard isn't huge, so we're going to have everyone meet at a local park.

There are no images of laser guns in my stamp stash, so we went a little more generic with these, using products from several different companies.

The background was created using the retired Spiral Staircase stencil from The Crafter's Workshop.  It was inked with Altenew Desert Night ink over PTI Blueberry Sky cardstock.


The letters are cut using the Caps Bold Alphabet die set from Altenew, and the sentiment is from MFT's Level Up set.

These were a little more involved than the thank yous I normally make, but it was easy to divide the steps up into chunks:  inking the backgrounds, die cutting the alphas, adhering the alphas to one another, stamping/embossing the secondary sentiments, and then putting all the pieces together.

The other fun thing was that before I went into mass production mode, Carina and I worked together on the design.  I had a few different stencils I was considering, so I inked each one up and she picked the one she like the most, she helped decide on the sentiments and colors, etc. 

Thanks for visiting!

Monday, March 30, 2015

Piecing with Stencils Tutorial


I've used this technique before, but I thought I would share a tutorial today.

First using washi/masking tape, affix your stencil to the card base and using an ink dauber, apply ink to create the outline of the selected image.  You don't need to fully ink it, you really just need the outline so that you can adhere the pieced cassette.


In actuality, for a card like this you could skip this step, but if your image is more complicated, or you were going to show more than one cassette, this helps with placement.


For the remaining pieces, you'll want to use an extra fine Sharpie marker.  As before, place the stencil over your paper and use the Sharpie to color in the lines for the portion of the stencil you are piecing/cutting out.  To give you a clear idea of what this looks like, here is on white cardstock:


And this is what the individual patterned pieces look like prior to cutting them out.  Keep in mind that unlike above (where these are the last pieces which will be cut out), you need to trace around enough of the stencil so that you maintain the reference lines for the next item to be adhered.  So you can see on the orange piece to the left the outer line of the cassette as well as the inner lines where the green piece will fit.


 Once that's done, fussy cut the pieces.


And then adhere to create your finished piece:


Although a little labor intensive, it's a fun and easy technique and also adds some great dimension.


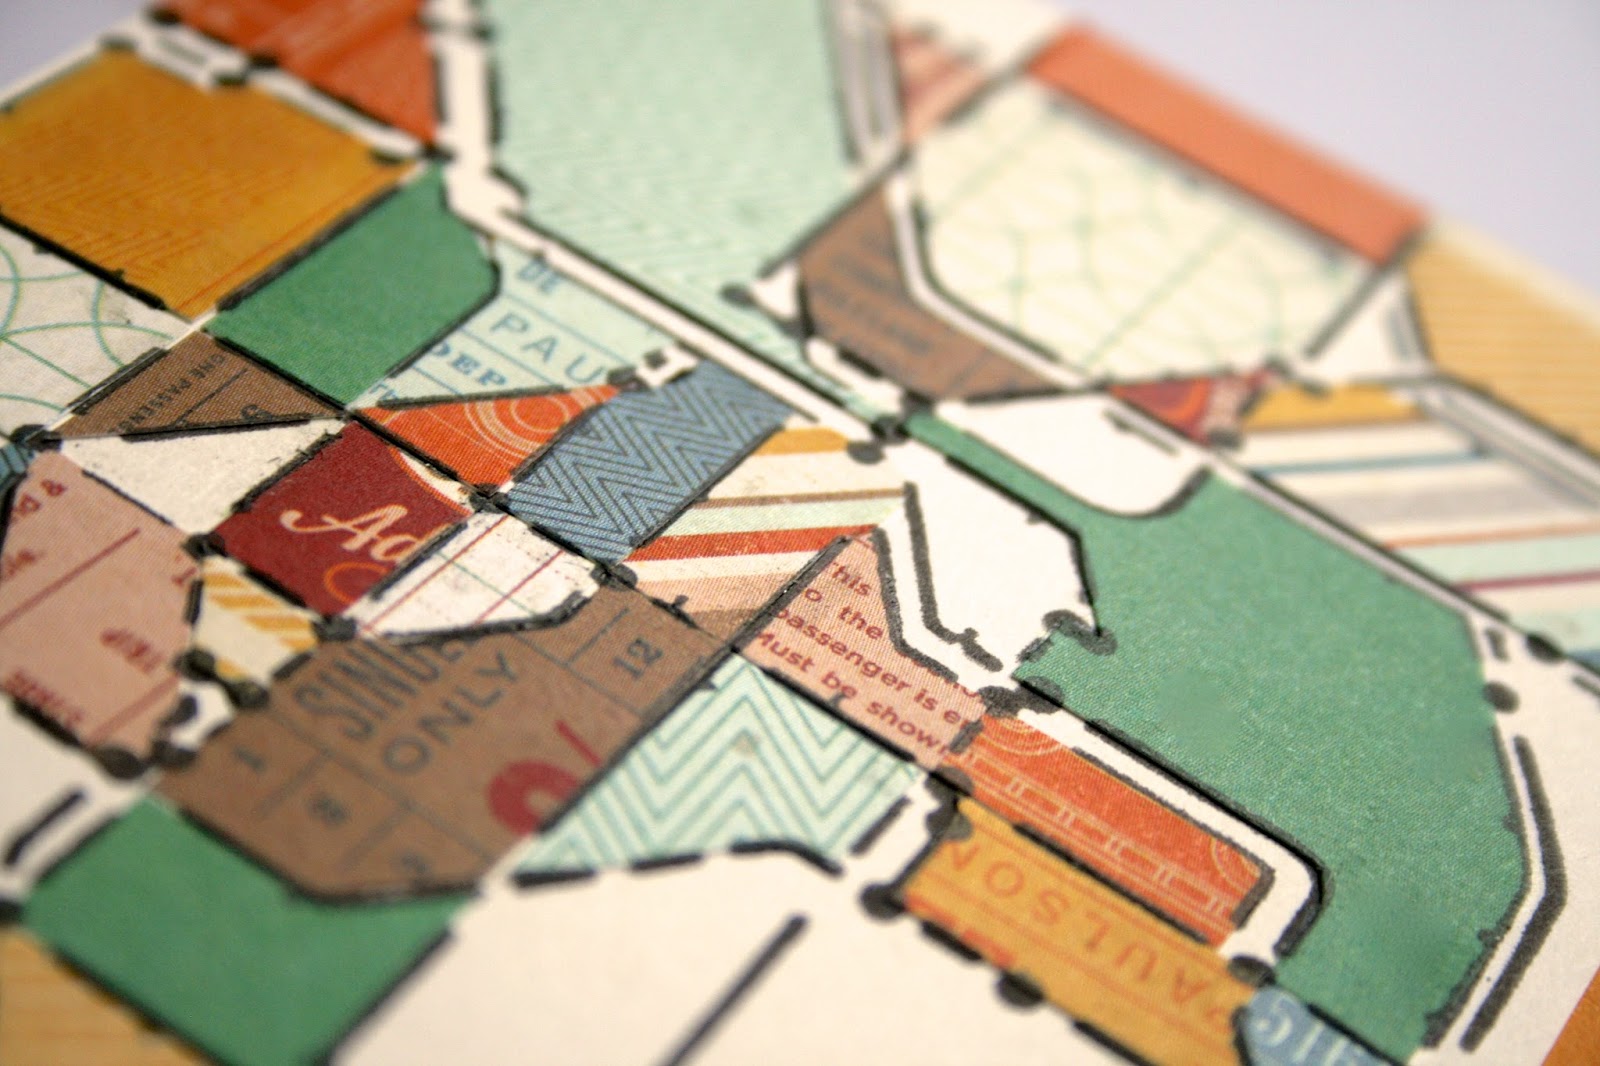
That was a pretty simple way to use the technique, with a focal point, but you can also use the technique on very complex and detailed designs, such as this card with The Crafter's Workshop subway stencil.


This one definitely took a long time, but the results are worth it.  Here's a close up view of the piecing.


Piecing isn't for everyone, but if you are a fan with your stamped images, I would encourage you to give it a try with your stencils.  I think you'll really love the results, and if you do try it, please let me know, I'd love to see!

Supplies Used
Paper/Cardstock:  Avery Elle - White and Cream cardstock; PTI - True Black Cardstock; Fancy Pants - True Black 6x6 pad; Basic Grey - Carte Postale 6x6 pad
Stamps:  Mama Elephant - Good Times, Wanderlust
Ink:  Memento - Tuxedo Black; CTMH - Black
Other:  The Crafter's Workshop - Mix Tape and Subway 6x6 stencils; Sharpie - Extra Fine Marker; Kuretake Glue Pen; Tombow - Mono Adhesive

Monday, February 2, 2015

Jessie


I'm slowly starting to work on our vacation photos from last year, literally, as we were in Orlando this time last year.

We were lucky enough to find Jessie right by the railroad stop in Adventureland, and we had some time to kill since Andrew was riding the roller coaster.

I created the background using the Retrobursts stencil from The Crafter's Workshop.  This is what the stencil looks like.


I used a pencil to trace around the center row (on the angle) of the rays/bursts in each row and then cut those shapes out with my craft knife.  For the remaining rays, I softly inked them with a sponge dauber.


The paper was trimmed down, just a bit on each side and then mounted on a piece of red cardstock.  I added stitching around the edges for some extra texture.

Then it was just a matter of trimming down the photos, adhering them, and adding the journaling and title.

The stencil really did all the work for me.

Hope you had a great weekend!

Supplies Used
Paper/Cardstock:  CTMH - White Daisy Cardstock; AC - Red Cardstock
Ink:  CTMH - Slate
Other:  The Crafter's Workshop - Retrobursts 12x12 stencil; American Crafts - After Glow Black Thickers; CTMH - Craft Knife; Tombow - Mono Adhesive

Tuesday, December 23, 2014

Signing off for the week!


I'm signing off of the blog for the rest of the week.  We'll be seeing both sides of the family, and spending lots of time relaxing and testing out Christmas loot.

I thought this card was appropriate for this time of year.  I always have lots of big plans for the holidays.  Invariably there are things that fall through the cracks, and don't get done.  Kids (or really anyone) might not react/behave in that magical manner they are supposed to at Christmastime, so if you're feeling a little on edge today because stuff is not getting done, this card is for you.

It's one of my favorite Verve Plain Janes, and I used a two step stencil by Julie Balzer from The Crafter's Workshop.  The solid image was blended in with a couple ink colors and then I used Dreamweaver's Gold Paste on the outline portion.


Have a wonderful Christmas, and remember to give yourself some grace this season....it is after all the crux of the holiday isn't it?

Supplies Used
Paper/Cardstock:  Strathmore - Mixed Media Paper, PTI - True Black Cardstock;
Stamps:  Verve - Grace Plain Jane
Ink:  Versafine; CTMH - Gypsy; Hero Arts - Raspberry Jam Shadow Ink
Other:  The Crafter's Workshop - 4 Feathers 6x6 stencil; Dreamweaver's - Wendy Vecchi Metallic Gold Embossing Paste; AC - Foam Adhesive

Wednesday, November 26, 2014

For You


Sharing another gelli plate card today.

It is just so much fun!

For this one I created the gelli plate background using The Crafter's Workshop ___ 6x6 stencil.

I then added some stamped circles to the pattern using Ellen Hutson's Bokeh Dots stamps set.  I used both black and gold Delicata ink and stamped both circle outlines as well as some solid circle images.

The sentiment was created using Little B's Block Out Line Art and Lawn Fawn's Louie's ABCs dies.  I added some vellum beneath the negative cut of the 'for' as well as some gold foil cardstock at the bottom of the black sentiment strip.


That's all for today.  For all those stateside, have a safe and tasty Thanksgiving!!!

Supplies Used
Paper/Cardstock:  Avery Elle - White Cardstock; PTI - True Black Cardstock; Recollections - Vellum and Gold Foil Cardstock
Stamps:  Ellen Hutson - Bokeh Dots
Ink:  Versafine; Delicata
Other:  Gelli Plate; Little B -  Block Out Line Art Dies; Lawn Fawn - Louie's ABCs Dies; Acrylic Paints; Tombow - mono Adhesive; 3L - Foam Adheisve


Friday, November 21, 2014

Do You Gelli?


I have been dreaming of owning a Gelli plate for many many moons.  I got the sweetest package from my GI12 buddy Cheiron

a couple weeks ago, and inside, my very own Gelli plate!

I broke it out pretty quickly for a test drive, making a bunch of prints.  This one uses The Crafter's Workshop Web Doily stencil.  Once I had created my print I trimmed it down to create the center panel which is floated above a black mat adhered directly to the card base.

The print kind of reminded me of an explosion, and I thought this Mama Elephant sentiment paired really nicely with it.

I had a great time creating with the Gelli plate.  In fact, it was so much fun that I 'had' to run out and get some more paint colors.  You will definitely be seeing many more Gelli projects.  It's very kid friendly too!  Both girls have tried it out and been asking me when we can do the 'rolling thing' again.

Supplies Used
Paper/Cardstock:  Avery Elle - White cardstock; PTI - True Black cardstock
Stamps:  Mama Elephant - Lights Out
Ink:  Verafine
Other:  Gelli Plate; Acrylic Paints; The Crafter's Workshop - Web Doily 6x6 stencil; Tombow - Mono Adhesive

Friday, November 14, 2014

Batter Up! - For the Crafter's Workshop


Happy Friday!

I'm sharing this layout over at The Crafter's Workshop today for their One Stencil Four Ways series.

This month we're showcasing the Pinwheel stencil.

For my layout I used just half the stencil.

I traced the openings on one side with a pencil and then used a craft knife to cut those portions out to create windows.


Then I placed the pinwheel stencil back over the cut piece and used a sponge dauber to add black ink to the portions of the stencil with the circles.


I then pulled out another sheet of cardstock to use as a foundation, again tracing the openings and then covering them with cardstock and washi.


The cut out sheet was then adhered over the top of the base page.


After that it was just a matter of adding some photos, a title, and some journaling.

Please head over to the Crafter's Workshop and check out what the other ladies created with this stencil!

Supplies Used
Paper/Cardstock:  CTMH - White Daisy cardstock; AC - Sketchbook 6x6 pad
Ink:  CTMH - Black
Other;  The Crafter's Workshop - Pinwheel 12x12 stencil; AC - Thickers; Tombow - Mono Adhesive; Misc Washi

Monday, July 14, 2014

Stop & Toss Some Rocks - for The Crafter's Workshop


Hey everyone, I'm sharing a project that is up over at The Crafter's Workshop today as part of their One Stencil Four Ways series.

Today we are all working with the 12" x 12" Blazonry stencil.

I thought it would be the perfect stencil to use to create a layout from our vacation to Vermont last summer.

I first traced the design on my paper and then using a craft knife, cut out some of the shapes to create windows/frames for my photos.  This is obviously not the sheet I ended up using because I decided I liked the gray better, but it gives you an idea of how the layout came together.


I added some doodling around the cut out windows as well as on the insides of the negative cut pieces which I wanted to incorporate into the design as popped out pieces for some dimension.


To brighten the layout I also cut out some of the shapes from white cardstock and I used those for additional journaling spaces.

The photos were adhered to a base page, the stenciled/cut sheet was adhered over top and I added a stitched frame around the edges.

This was a really easy layout together, and I love how it focuses right in on the photos in a way that isn't overwhelming from a photo perspective....I was able to incorporate six 4x6 photos into this layout!

Please head over to The Crafter's Workshop blog to see how the other designers used the same stencil!

Supplies Used
Paper/Cardstock:  CTMH - White Daisy and Whisper cardstock
Other:  The Crafter's Workshop - Blazonry Stencil; American Crafts - 05 and 03 Black Journaling Pens, White Journal and Kale Wonder Thickers, Round This to That Foam Adhesive; CTMH - Craft Knife; Tombow - Mono Adhesive

Thursday, June 26, 2014

Guest Designing for Ronda Palazzari


Hey everyone!  I'm so excited to be guest designing for Ronda Palazzari today!  She designs some of my very favorite The Crafter's Workshop stencils.

I have two techniques that I want to share today that will allow you to stretch your stencils.  First, creating your own patterned paper with stencils.


I used the 12" x 12" Spinning Tops stencil to create the patterned paper for this card.  This is the simplest stencil technique possible - inking with a blending tool, but with a twist.  After inking the design, I slid the stencil over slightly and inked again.  I repeated this twice (so three inked images) to create a continuous row of the tops.


Then I slid the stencil down so that it was halfway between two inked rows, changed ink colors, and repeated the process.  Here you can see what the paper looks like after the first inking of the second row.  Note there is no requirement for the images to be perfectly spaced, you will get a wonderful new pattern regardless of spacing.


I added a large sentiment from Neat & Tangled which was stamped in black, then overstamped with Versamark and clear embossed.

It's such an easy technique, I wanted to show you how versatile it can be, change up the colors for a totally different look and feel.


Finally, another technique that is frequently used in stamping, but you might not think to use it for stenciling, paper piecing.


For this card I used the 12" x 12" Picture Perfect stencil, choosing just one of the camera images.  Then I used an extra fine Sharpie marker to color in the outline of the camera, and fussy cut around the image.  This was repeated for each of the major elements.  Here's what the pieces look like all cut out and ready to be assembled:


You could adhere everything directly to create a flat piece, but I love adding some dimension to my projects, so I popped a couple of the layers up.  I wanted to add a little heart to the center of the camera lens, so I free hand cut a heart and added some faux stencil lines around it.


I wanted the focus to be on the camera, so I just layered a few papers, added some stitching and a few sequins and a sentiment, but the camera is definitely the star of this card.

Thanks so much to Ronda for having me again!  I hope you've been inspired to stretch your stencils a bit with these techniques!

Supplies Used
Card 1
Paper/Cardstock:  CTMH - White Daisy cardstock; Avery Elle - White Cardstock; PTI - True Black Cardstock
Stamps:  Neat & Tangled - My Favorite
Ink:  Tsukineko - Versafine and Versamark; CTMH - Black; Distress Inks - Iced Spruce
Other:  TCW - Spinning Tops 12x12 Stencil; CTMH - Clear Embossing Powder; American Crafts - Glitter Tape; Tombow - Mono Adhesive; AC - This & That Foam Adhesive
Card 2
Paper/Cardstock:  CTMH - White Daisy; Avery Elle - White Cardstock
Stamps:  Winne & Walter - The Big the Bold and the Happy
Ink:  Versafine Smokey Grey; Hero Arts - Soft Pink; Distress Ink - Iced Spruce
Other:  TCW - Spinning Tops 12x12 Stencil; Neat & Tangled - Clear Sequins; Misc Doily; Tombow - Mono and Mono Aqua Adhesive
Card 3
Paper/Cardstock:  Avery Elle - White Cardstock; Fancy Pants - Wonderful Day 6x6 pad
Stamps:  Mama Elephant - Smitten
Ink:  Versafine
Other:  TCW - Picture Perfect 12x12 Stencil; Sharpie - Extra Fine marker; Neat & Tangled - Clear Sequins; Tombow - Mono, Aqua Mono, and Power Tabs

Monday, June 2, 2014

Gallery Idol Round 3 - Stencils


Hey everyone!  I was pretty excited about the challenge for this round of Gallery Idol, if you've followed me for a while, you know that I am a huge stencil fan.

I decided to use Ronda Palazzari's Citygrid stencil for The Crafter's Workshop to create my background.  This is a very simple, but time consuming process.  I laid the stencil over a panel of watercolor paper and then lightly traced around each opening with pencil.  Then I removed the stencil and watercolored each of the spaces.  I actually only used three colors:  Evergreen Bough and Iced Spruce distress ink, and Black ink from CTMH.  Black is tricky as the colors tend to separate in water, so that ended up looking more brown than black, but I actually love the shade that came out.  I ended up with a few dusty blue type spaces and that's when I knew I needed to change/clean out my water.

Here's what the watercolored stencil panel looked like when I was done, you can see that I didn't watercolor evenly, I wanted there to be a graduation in color in each of the spaces.


I thought long and hard about the sentiment, originally leaning towards using a travel theme, but in the end decided that my On the Corner set was too perfect a pairing to pass up.  Sometimes stamped lines seem very stark/hard in comparison, and I wanted to echo the watercoloring/painting in the background, so I ended up compromising.  I stamped the street sign/sentiments in a very light ink, and then traced over the lines with a VERY fine brush and some more of that 'black' ink.


I managed to not take a picture when I was doing it, but here's what it looks like.


To anchor the card, I cut another strip of the watercolor paper and clear embossed the sentiment.  Then I painted that 'black' ink over top until I got the darkness that I wanted.  Finally, the embossing was removed by placing a piece of copy paper over top and ironing it.


Lots of dimension on this one. I popped up the stenciled panel as well as the street sign and sentiment strip.  I love this one and I hope you do too!  And if you do, please head over to the Gallery and vote for me (entry #5), I'd love to get to the next round!

Supplies Used
Paper/Cardstock:  Canson - Watercolor Paper; Avery Elle - Truffle
Stamps:  Neat & Tangled - On the Corner and On the Corner Additions
Ink:  Ranger - Evergreen Bough and Iced Spruce Distress Ink; CTMH - Black and Parchment ink; Versamark
Other:  The Crafter's Workshop - Mini Citygrid Stencil; CTMH - Clear Embossing Powder and Dimensional Foam Tape; American Crafts - This and That Foam Adhesive

Saturday, May 17, 2014

Oh Happy Day for The Crafter's Workshop


I'm so excited to be sharing my first guest post for The Crafter's Workshop!  Today I am sharing a simple technique that doesn't require much in the way of supplies and allows you to stretch your stencils to get a totally different look from them.  This technique is especially applicable to more open stencils, and would also be perfect for Balzer Bits and Ronda's Fragments.  

This is the stencil I used, Julie Balzer's Stick Flowers:


While the pattern covers the entire 6x6 stencil I used just the bottom right corner to create my card.

After carefully studying the stencil and deciding which part I wanted to use, I placed it over my cardstock panel, taped it down and very lightly traced around the selected portions of the stencil, and then colored the image in with Copics.  This was a little more time consuming than I thought because you have to be very careful since you just have that very thin pencil line as a guide, but the results are well worth it.

I colored in stages since I wanted the inner sections to be completely dry before I colored the outer layer to prevent cross bleeding.  I first colored the inside of the flowers, then the inside of the leaves, then the stems/outer leaves, and then the outer flower layer.  If you don't have a lot of markers, no worries....I only used five on this card.  Two shades of red for the flowers, the inner portion was shaded and I used the lighter red for the outer layer as well, two shades of green for the inner leaves and one very light shade of green for the stems/outer leaves.


I love the clean Scandinavian feel of the card, and wanted to preserve that look with a simple sentiment and pale blue base.  I let it sit overnight and then went back and erased any of the pencil lines that were still showing.

Thanks so much for stopping by!

Supplies:
The Crafter's Workshop - Mini Stick Flowers

Avery Elle Oh Happy Day Stamp Set
Copics - R22, R24, G40, G43, G46
Memento Tuxedo Black Ink
Bazzill Card Shoppe and Crafter's Companion Cardstock
Tombow Mono Adhesive

Tuesday, May 6, 2014

Watercolor Class Day 1 Homework and some Good News


I'm taking the new Watercolor class over at Online Card Classes and had the chance to work on some cards last night.  This first one is a technique that Jen Rzasa shared where you 'dress up' a watercolor wash by using a stencil on the watercolor while it is drying to create a subtle pattern.

I really like this subtle technique, you can see it at the bottom right portion of the card, I used The Crafter's Workshops Mini Hourglass stencil here.  When it was done, I thought it might look neat to have a more defined image at the top right....so they kind of fade together in the middle.  I didn't want it to be really defined, just more defined, so I just replaced the stencil and lightly added color starting at the top right.  


That gorgeous sentiment is from Neat and Tangled and a bit of AC glitter tape finishes it off.  

My second card is a riff on Laura Bassen's card, using a block to create a blended/ombre effect.  I've done similar techniques before, mostly adding multiple ink colors onto a block simultaneously as opposed to one layer at a time.


I thought it would be neat to create thinner layers, so I used a 1" x 6" block.  I like how it almost created the look of marble/limestone albeit in different colors.  The full panel was a bit much, so I broke it, adding a blank space for the sentiment in the middle, popping the watercolor panels out, and adding some black cardstock accents.  


One little hint - depending on the thickness of your paper and how saturated you get it, it can really warp/start to break down.  I mounted my watercolor papers on some scrap cardstock to give it a little extra strength since I wanted to pop those panels up.

Oh, and I mentioned some good news right?  There was a little whiff of it above in that first card.  I'm so excited to share that I was invited to be a guest designer over at The Crafter's Workshop this term.  Here's the official announcement.  TCW has some of my very favorite stencil designs/designers and I'm thrilled to part of the guest crew for this term.

That's all for me today.  Please come back tomorrow for a very special post!

Supplies Used
Card 1
Paper/Cardstock:  PTI - Black Cardstock; Strathmore - Mixed Media Paper
Stamps:  Neat & Tangled - My Favorite
Ink: Versafine
Other:  The Crafter's Workshop - Mini Hourglass Stencil;
Derwent Inktense Pencils; AC - Glitter Tape; Tombow - Mono Adhesive
Card 2
Paper/Cardstock:  Strathmore - Mixed Media Paper; Crafter's Companion - White Cardstock; PTI  Black Cardstock
Stampe:  Winnie & Walter - The Big, The Bold and the Happy
Ink:  Versafine; Ranger - Pickled Raspberry, Salty Ocean; Evergreen Bough; and Iced Spruce Distress Ink
Other:  Tombow - Mono Adhesive; CTMH - Dimensional Foam Tape