Showing posts with label Sweet Stamp Stop. Show all posts

Wednesday, March 27, 2013

Guest designing for Sweet Stamp Shop


Hey everyone, I was so excited to be able to help Sweet Stamp Shop out with their release this month.  Today I'm being featured over at the Sweet Stamp Shop blog with a few more projects I created with this month's release.

I've got three projects to share with you today.

First a layout using the Calendar stamp set.


These photos are from several years ago when I took Ellie home to attend a friend's wedding.  We snapped these shots just before we left.  Ellie wasn't being cooperative with the photos, so I suggested that she and my mom clap, which worked a little better.

I used the Calendar stamp set to create my own patterned paper for this layout.  It's a pretty busy pattern, so I added a layer of vellum on the right hand side where the pictures were going to soften it a bit.  I love that I was able to highlight the month that I was scrapping with that wood veneer arrow (I added some black ink to it).  Some Studio Calico kraft heart stickers and SRM border stitch stickers finished the layout off.


My next two projects are cards that I created using Chalkboard Sign.

This first one also includes stamps from the Perfect Match set.


It doesn't come across that clearly in the photo, but added some pink/red highlights by using a Faber-Castell big brush pen.  After the initial stamping, I went over the selected portions with the pen, then stamped over top to give it that subtle color.


The frame for my chalkboard is a multi-step rather long process, but I think the results are worth it.

1) Cut the frame first (this one is 1/4" thick).
2) Use an embossing stylus and scoreboard to add the mitred corners on the backside of the frame.
3) On the right side of the frame, on a regular surface, use the stylus to score lines along the sides of the frame, lots of lines. 
4) Sand down the frame to reveal the lines/texture.
5) Add color back to the frame using a sponge/sponge dauber.

And finally another another CAS card.


For this card I created a small chalkboard sign that I could 'hang' on the card. The frame was created the same way as on the previous card, but I changed up the chalkboard technique a little bit.  After the initial stamping, Iused a Faber-Castell Stamper's Big White Pen to add some accents to the stamped imaged,  Then I stamped over top of that and added the smudging.  This is a good alternative to embossing if you want a bolder/whiter look but don't want to fiddle with embossing.

Thanks so much to Nicole for inviting me to design for Sweet Stamp Shop this month.  It was so much fun and I had a GREAT time!

Supplies Used

Layout
Paper/Cardstock:  CTMH - Black and Colonial White Cardstock; Recollections - Vellum
Stamps:  Sweet Stamp Shop - Calendar
Ink:  CTMH - Desert Sand and Black; Distress Inks:  Antique Linen and Vintage Photo
Other:  SRM - Border Stickers; Freckled Fawn - Wood Veneer Arrows; Studio Calico - Kraft Heart stickers; Pigma - Black Micron Pen; Tim Holtz Tiny Attacher; Tombow - Mono Adhesive; Doodlebug - Tiny Alpha Stickers; American Crafts - American Crafts - Black Amy Tangerine Sketchbook Journal Foam Thickers

Card 1
Paper/Cardstock:  CTMH - White Daisy, Black, and Cocoa Cardstock
Stamps:  Sweet Stamp Shop - Chalkboard Sign and Perfect Match
Ink:  CTMH - White Daisy and Chocolate
Other:  Faber-Castell - Red Stamper's Big Brush Pen; Embossing Stylus; Tombow - Mono Adhesive

Card 2
Paper/Cardstock:  CTMH - White Daisy, Black, and Cocoa Cardstock; MME - On the Bright Side One 6x6 pad
Stamps:  Sweet Stamp Shop - Chalkboard Sign
Ink:  CTMH - White Daisy and Chocolate
Other:  CTMH - Antiqued Copper brad, Dimensional Foam Tape; The Twinery - Maraschino Twine; Faber-Castell - Stamper's Big White Pen;Tombow Mono Adhesive




Wednesday, March 13, 2013

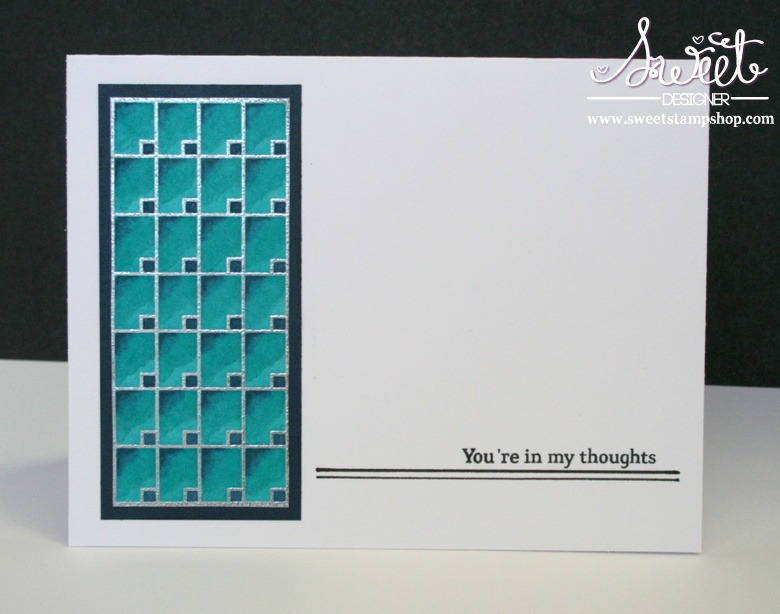
Sweet Stamp Shop Release - Introducing Calendar


I'm back to help reveal another new set for Sweet Stamp Shop today, Calendar.  This set is perfect for scrapbookers and particularly Project Lifers, but today I want to show you a way you can really stretch this set.

When I was looking at the calendar image, the center portion leapt out at me as a really fun, modern, geometric pattern. 


I embossed the image in silver and then cut out the center portion and added color with my Spectrum Noir markers. 


Since the colored image is so bold, you don't really need too much else.  I added a dark mat, a sentiment from Sweet Stamp Shop's Sentimental Birds set, and some hand drawn lines (using a ruler).


I love this design because you can customize it for pretty much any occasion or color scheme.  You could also really simplify the process, and mass produce these by embossing on colored paper.

Thanks so much for stopping by.  Be sure to head over to the Sweet Stamp Shop blog to check out some more amazing projects and find out how to win some sweet!  I'll have some more Sweet Stamp Shop projects to share with you later this month.

Supplies Used
Paper/Cardstock:  CTMH - White Daisy, Black, and Outdoor Denim cardstock
Stamps:  Sweet Stamp Shop - Calendar
Ink:  Versamark; Memento - Tuxedo Black
Other:  Spectrum Noir markers; CTMH - Silver Embossing Powder; American Crafts Marker; Tombow - Mono Adhesive


Tuesday, March 12, 2013

Sweet Stamp Shop Release - Chalkboard Signs


Hey everyone!  I'm excited to be helping out Sweet Stamp Shop this month with their March release.  Today, I'm helping reveal Chalkboard Signs.

The chalkboard crazy seems to have taken the stamping world by storm, and this new set is right on target.  Don't worry if chalkboard isn't your style, this set is SO versatile.

Here's a quick and easy card that I created using the new set:


The arrow is so easy to line up, I didn't even draw lines.  Probably could have left it as is, but a little glitter makes everything better, right?  This is just some AC glitter tape. 

Thanks so much for coming by!  Be sure to head over to Sweet Stamp Shop to check out Kiss Me, the other set that is being released, as well as all the rest of the projects from this month's designers.  There are some GORGEOUS things to be seen!

Supplies Used
Paper/Cardstock:  CTMH - White Daisy cardstock
Stamps:  Sweet Stamp Shop - Chalkboard Sign
Ink:  CTMH - Ruby; Memento - Tuxedo Black
Other:  American Crafts - Glitter Tape

Sunday, November 18, 2012

Busy, busy, busy!


Thanksgiving is on Thursday, seriously???  I guess that I'm not so concerned about that fact as I am that this means Christmas is just around the corner.

Anyway, I've been trying to wrap up projects before I have to actually clean up the craft/dining room....new things coming, but nothing I can share just yet, so I thought I would share this card that I made a while back.

Super CAS.

The spoon is from Sweet Stamp Shop's Cool Scoop stamp set.  It's colored with Spectrum Noir markers and I added some Liquid Glass to the little heart.

The letters are Basic Grey stickers.

Hope it give you a chuckle to start your week! 

Supplies Used
Paper/Cardstock:  Bazzill Card Shoppe - White Cardstock; CTMH - White Daisy cardstock
Stamps:  Sweet Stamp Shop - Cool Scoop
Ink:  Memento - Tuxedo Black
 
Other:  Basic Grey - White Alphabet Stickers

Friday, October 19, 2012

Owl You Doin?


Waiting til the last minute again!

Here's my card for the current Sweet Stamp Shop challenge, which was a sketch challenge. 

Isn't he cute?  I have to say I'm starting to enjoy the whole coloring thing.  I was so intimidated about it, but it's fun, and makes me feel like a kid again.

I'm using Melvin from Melvin and Vernie.

I stamped him four times, and cut away part of his feathers each time so I could stack him and create some texture/depth/dimension.  He's colored with Spectrum Noir makers.  I only adhered the pieces at the head so that there's some movement.  Here's a closeup so you can get a better idea of what I'm talking about. 


The branch was cut using the Cricut Art Philosophy cartridge and papers are from my 6x6 stash (MME, and Crate). and I added a little CTMH burlap ribbon for more texture.

Fun right?

Hope they think so over at Sweet Stamp Shop!

Have a great weekend.  I'm off today with Ellie since her school is closed.  We've been running around doing errands, but 'rest time' is almost over so I gotta run...

Supplies Used
Paper/Cardstock:  Crate - Pretty Party and Little Bo Peep 6x6 papers; MME - On the Bright Side One 6x6 papers; CTMH - White Daisy cardstock and Colonila White bulk card base
Stamps:  Sweet Stamp Shop - Melvin and Vernie
Ink:  Memento - Tuxedo black; CTMH - Chocolate and Sky
Other:  Spectrum Noir markers:  TN7, TN8, EB7, EB8, GB5; CTMH - Burlap Ribbon, Dimensional Foam Tape, Liquid Glass, Cricut Art Philosophy Cartridge; Foam Tool; CM - Corner Rounder; Tombow - Mono Adhesive; Sewing Machine

Friday, October 5, 2012

It's a Tree Pickin' kind of day for Sweet Stamp Shop Challenge


I'm playing along with Sweet Stamp Shop's challenge again today.  This time we needed to use embossing on our cards.

I must admit, that I haven't done a ton of embossing.  I've got lots of stuff, but somehow often feel like it takes too much time, to pull all the stuff out.  BUT, emboss I did on this card.  Tried not one, but two different thngs!

First, I used the letterpress technique to create that background.  It was easier and less messy than I thought it would be - really no mess at all.  Just used a brayer to roll ink onto one side of the embossing folder, stuck a piece of paper in, ran it through the Vagabond.  Don't know why it took me so long to get around to trying it!

The one thing I did learn is that it does weaken your cardstock.  This was supposed to be a bigger card, but when I was trimming the paper, it kept ripping...insert angry crafter here...so I ended up having to trim with scissors, thus, you see a 4x4 card instead of an A2.

I also embossed the sentiment with the craft gun that I have had for about 6 months and never used until now.  I have to admit, the embossing part was pretty fun.  It was neat to see the powder melt and then puff up.

Finally some piecing, because it's what I do.  I used CTMH's Christmas papers from last year, Believe, for the red mat as well as the two lighter trees, and then Topiary cardstock for the bigger trees.  The red and yellow accents were added with Spectrum Noir markers.

Hope your week is ending well, looking forward to a long weekend!

Supplies Used
Paper/Cardstock:  CTMH - Believe papers, White Daisy and Topiary cardstock
Stamps - Sweet Stamp Shop Tree Traditions
Ink:  CTMH - Chocolate and Topiary
Other:  Sizzix - Textured Impressions Embossing Folder, Scallops by Basic Grey, Vagabond; Tombow - Mono Adhesive; CTMH - Dimensional Foam Tape, White Embossing Powder, Craft Heater, Bonding Memories Adhesive; Versamark; Speedball - Rubber Brayer; Spectrum Noir Markers - DR5 and CT4

Thursday, September 13, 2012

Sweet Thoughts


Just a quick post to share this card for Sweet Stamp Shop's weekly challenge.

This week was a photo inspiration challenge - here's the inspiration photo.


I got the Jars of Sweets set a while back and (shame on me) haven't gotten to ink it up until now. The sentiment is from Sentimental Birds.

I really like how this turned out, and I got to work on my coloring a little more too.

Anyway, it's been a LOOOONG week (Carina is now outspokenly opposed to sleeping past 5), so I'm headed to bed. Have a great end of your week!

Supplies Used
Paper/Cardstock: Bazzill - Card Shoppe Licorice Twist; CTMH - White Daisy; Basic Grey - Paper Cottage 6x6 pad
Stamps: SSS - Jars of Sweets, Sentimental Birds
Ink: Memento - Tuxedo Black
Other: Spectrum Noir markers - BT1, BT4, BT7; Tombow - Mono Adhesive

Tuesday, August 28, 2012

You're Cool


Sweet Stamp Shop has a new weekly Flickr challenge. This week's challenge is paper piecing, and although there's a lot going on this week, I love Sweet Stamp Shop and I love piecing, so I pulled this together with one of my new sets, Cool Scoop.

The mint and pink papers are from my scrap bag, and I stamped the sentiment on a piece of pink vellum. I scored it just wider than the white base so that it stands up a little. Here are some closer profile shots.


Hope that your week is going well. My attempt to actually work has been hindered by a case of pink eye....(not mine).

Supplies Used
Paper/Cardstock: CTMH - White Daisy and Chocolate cardstock, various scraps; Michael's Open Stock Pink Vellum
Stamps: SSS - Cool Scoop
Ink: Black
Other: CTMH - Bonding Memories Adhesive; Tombow - Mono Adhesive

Tuesday, May 8, 2012

Second 2 Little Monkeys Layout - for Sweet Stamp Shop Scrapbooking Challenge


So here's the layout I've been proming.  This is my second Halloween layout.  The previous one is here.  As I mentioned in that post, to save time, when doing similar layouts for both girls, I try and batch process:  use the same theme/papers/embellishments, even the exact same layout.  But for this one, the pictures just wanted to do something different.  I used the same title and papers, but it's a totally different layout.

This is busier than I normally go in terms of patterns/design, but I like the results.  I used a large platter to create the round shapes, and I was able to use both cuts on the orange paper, one on the left and the other on the right. The papers are from Fancy Pants Designs It's the Little Things collection.

The title was made using CTMH's Solos 2 and Cocktail Alphabet sets which I then fussy cut....always a good chore during TV time and we're watching a lot of playoff hockey now.  The 2 was stamped in black on Creme Brulee cardstock, but I wanted it to look a little darker, so I carefully traced around the edges to make it stand out more.

I was working on this layout during National Scrapbooking Day, when Nicole at Sweet Stamp Shop issued a challenge to incorporate one of their stamp sets.  Well, what represents Halloween better than some candy?  So I inked up the Sweet Tooth stamp set.  I used the border stamp on the left and right borders as well as the large and medium candy stamps to create the clusters on each page. 

This layout was a lot of fun to put together, and I already showed it to my daughter who loved it.  Wish I could have gotten some more scrapbooking done on NSD, but this'll do.

Thanks for stopping by!

Supplies Used
Paper/Cardstock;  Fancy Pants - It's the Little Things Feathered and Shuffle papers; CTMH - Goldrush, Black, Creme Brulee, Holiday Red, and White Daisy cardstock
Stamps:  Sweet Stamp Shop - Sweet Tooth; CTMH - Solos 2, Cocktail Alphabet
Ink:  CTMH - Black, Goldrush
Other:  CTMH - Bonding Memories Adhesive ; CM - Photo Splits

Friday, April 27, 2012

A Match Made in Food Heaven


I had a quick little work trip this week, so I haven't gotten to craft for several days and was so happy to be able to do a little creating this evening.  This card is for Sweet Stamp Shop's April Challenge, and uses the Perfect Match stamp set.


I've had this idea rattling around in my head for a couple weeks now.  Originally I was going to pair the hot dog and ketchup stamps, but after playing with it for a bit, I decided that ketchup and mustard worked a little better. 

For mustard's outfit, I cut out both a white and black middle band.  On the black band I snipped just a bit in the middle, at the top, and then folded down the 'collar'.  Then I cut, very carefully, a tiny little bowtie.....a good pair of fine details scissors is so worth buying, just love mine!


For ketchup's outfit I cut a white center band and I layered some delicate crocheted lace that I got from Hydrangea Hippo over top.  For the head piece, I used the cap portion of the stamp (using white cardstock), and on the ridges of the cap I used liquid glass to adhere some small seed beads.  I put another thin layer of liquid glass over top of the beads to make sure they stuck and give it a little extra shine.

I got some tulle by the yard from Joann's and cut a very small piece for the front veil, and a larger piece for the train.  To adhere the train, I used a Dodz adhesive piece, and I used dimensional foam tape (two layers for the ketchup) to attach ketchup and mustard. 

I hand drew the mouths of the couple as well as some eyelashes for ketchup.  And, of course, ya gotta have some googly eyes for a card like this. 

So much fun, this one makes me smile and I hope you're smiling too.

Have a great weekend!

Supplies Used
Paper/Cardstock:  Stella and Fanfare scraps; Black, Cranberry and White Daisy cardstock
Stamps:  Sweet Stamp Shop - Perfect Match
Ink:  Black
Other:  Dodz adhesive; Dimensional Foam Tape; Liquid Glass; Seed Pearls; Tulle; Crochet Lace from Hydrangea Hippo; Googly Eyes; EK Success Black Zig Marker

Tuesday, March 27, 2012

A Perfect Match for Sweet Stamp Shop Challenge


I've been contemplating this card in my mind for about a week or so, and was finally able to get it done tonight. The inspiration is the matching worksheets that Ellie has in her workbooks. Sweet Stamp Shop's new A Perfect Match set was 'perfect' for this.

This is for Sweet Stamp Shop's new monthly challenge:


I'm not going to list all the papers I used for this card since I'm not exactly sure what they all were at this point - many of them came from my scrap bag. That's one of the big benefits of paper piecing, you can use up lots of those little bits of paper that you have lying around.

It was actually lots of fun to choose the paper bits for this card, and I also used my blending pen on a couple of the images (dip/hot dog).

The alphabet stamps are my very first stamps ever, a retired CTMH set that I love and which works so well with the SSS stamps.

I also used one of the sentiments from the A Perfect Match on the inside of the card.


Hope that you like the card...I'm off to bed!

Supplies Used
Paper/Cardstock - Various
Ink: Black
Stamps: Sweet Stamp Shop - A Perfect Match; CTMH - Playful Lowercase
Other: CTMH - Bonding Memories Adhesive; Kaiserkraft Tiny Alpha Stickers; EK Success - Red Zig Marker