Monday, December 26, 2011

The Boppy Layouts and What I got for Christmas

A belated Merry Christmas to all. Hope that you had a wonderful holiday! Ours was busy, but full of fun and family. Friday night we headed downtown to the Smithsonian National Zoo for Zoolights. The whole zoo is decorated/lit up. There's ice skating, a train, and of course animals. The girls had a great time, and we were joined by most of Andrew's family. Saturday we hosted Andrew's entire family for Christmas Eve dinner. There was a ton of good food, lots of kids, a whole lot of chaos, but a lot of fun as well. Sunday was much more subdued. We had a quite family morning, reading the Christmas story, opening stockings/gifts, a nice big breakfast, and lots of playing with toys. My parents and younger sister joined us just before lunch, and stayed until the girls went to bed.

It's been a hectic, at times stressful, loud, and crazy, but a wonderful season. I've even been able to do some scrapbooking. As promised in my last post, here are Carina's Boppy Layouts. This is an idea that I got from my friend Joe who took similar pictures of his girls each month. I wanted to try for weekly, and did this for Ellie too. I have to admit, that for Carina I wasn't as good about it. She was born on a Friday, and a bunch of these that actually got taken on Saturday/Sunday because I would forget on Friday morning. I completely forgot to take a picture Week 40 (more on that below), but I love the progression that these pictures show, not only size, but personality.


Here's a close up of one of the pages:


As for Week 40, I debated what to do, just skip it, show it, but put some text in the box about how I forgot, etc. Andrew came up with the best idea which is to take a picture of the chair with an empty boppy pillow, so that's what I've done...just need to order the print.


For all of you new or expecting parents, this is such a fun way to see your child grow. If weekly is too ambitious, try monthly is. I do think it's nice to get the same background/props so that you can more clearly see the development, but do what works for you.

NOW, onto a completely different topic. Do you want to see what I got for Christmas???? I was COMPLETELY spoiled by Andrew! Here it is:


I LOVE IT!!!!

I wanted an embossing machine, and was really thinking along the lines of a Cuttlebug, but one of my customers had been talking to me about the Vagabond (and Andrew overheard and started doing research on it), and this is what I got. Have I mentioned that I LOVE IT?!

Hope that you all had a wonderful Christmas, and that you're able to do some creating this week!

Supplies Used:
Cardstock: Creme Brulee, White Daisy
Ink: Garden Green
Stamps: Friendship Alphabet (large and small)

Friday, December 23, 2011

September Layouts


So I finally made myself sit down and get back to Carina's first year album. She turned one in September, and I've not given her album the attention it deserves of late. I should probably be cleaning my house for the big get together tomorrow night, but this is more fun.... Here are the September layouts.


I wanted to do something different with the background in this first layout. I created my own background paper (although only on half of the base) by using the center of the blue arrow outlines that I used for journaling (cut using the Cricut Art Philosphy cartridge). I used that center piece as a mask, moving it around the page, changing its orientation and sponging around it. It just adds a little more color, dimension, and interest to the page.


For the second layout I really wanted to focus on color. I must say that this cranberry paper from Creative Memories is my all time favorite red. I just love how vibrant and saturated it is. I used this past July's Stamp of the Month, American Celebration as well as Solos 1 for the stamping.


The photos on the left are from the girls' joint birthday party (their birthdays are only two and a half weeks apart, so we'll do this until they start complaining about it).


The photos on the right are from the little birthday celebration we had for Carina on her actual birthday. She's wearing a little Chinese outfit for a tradition that takes place on a child's first birthday. We put a bunch of stuff on a table that symbolizes different occupations (calculator, sewing kit, crayons, etc.) and whatever they pick up first is an indication of what they will be when they grown up. Carina went for the little maracca, so I guess we have a musicion on our hands.


I'm not quite done with the album. I still need to do the front page as well as the the Boppy layouts (which I've already started). What are the Boppy layouts? You'll see soon (fingers crossed)!

Suplies used
Calendar layout: CTMH - Pacifica, Gypsy, and White Daisy cardstock, Pacifica ink, Cocktail and A A Typeface Alphabet stamps, Cricut Art Philosphy Cartrdige; Creative Memories - Calendar pages.
Second layout: CTMH - Holiday red ink, Creative Memories - Cranberry cardstock and Sunny printed paper.

Tuesday, December 20, 2011

O Christmas Tree


We've been busy, busy, busy getting ready for Christmas. This last weekend we finally got the last piece of the puzzle in terms of decor. The tree! This year we went to a local garden center to pick out our tree (thanks to a great Groupon I picked up in the fall). It was a great experience, and the girls had lots of fun walking around, checking out the beautifully decorated trees inside the garden center, and eating the free snacks they had.

Here are a few photos of our expedition.


And another shot of the fully decorated tree.


Ellie was a great help this year. Last year she put all her ornaments up in about a 2' x 2' square. This year she was very good about spreading the love around, and there was minimal readjustment after bed. ;)


There's very little left on our list to do. A few stocking stuffers to pick out, one more gift card to order, a bit of cooking/baking (and of course some cleaning - blah). I'm ALMOST starting to feel relaxed...

Sunday, December 18, 2011

Quick and Easy Tags


Despite a whirlwind of familial visitations this weekend (literally someone new has arrived since Friday, although they have also all now departed), I was able to get a quick project completed, kind of.

We're giving the girls' teachers Saltine Toffee this year. In Ellie's class there is a class gift for Christmas, but not in Carina's class, so her teachers are also getting a giftcard to Target.

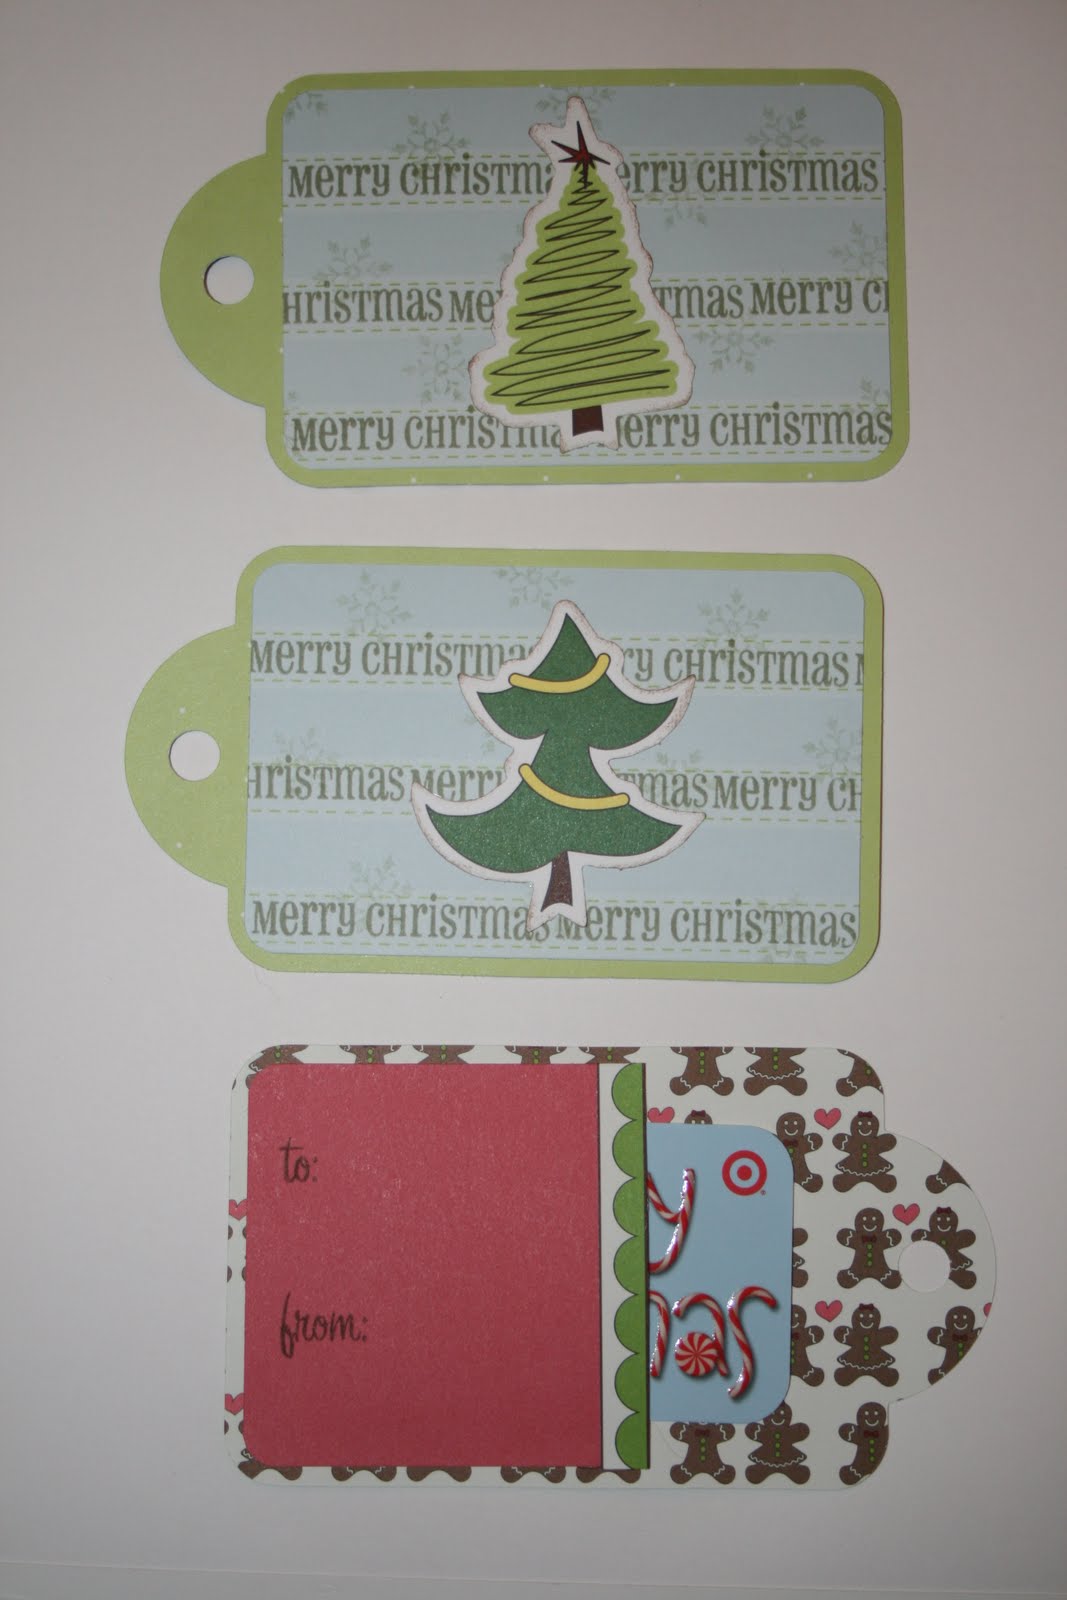
I wanted to be able to easily distinguish between the two sets of teachers, so I created different tags for each class. I did use the same stamp sets for both (October's Stamp of the Month, Holiday Magic, and the sentiment from Say it In Style). Both sets of tags were cut using the Cricut Art Philosphy Cartridge (Tag #3 at 5 1/2 inches).


For Ellie's class, I used the Believe Level 2 Paper Pack. The tag base is Topiary cardstock. The green star pattern is cut to 2 7/8" by 4 1/2", finished with a corner rounder. The red ribbon was picked up from a local craft store and it actually has a pattern of snowflakes in the center. I adhered this to the patterned paper and wrapped the edges around adhering them to the back of the tag. The white cardstock for the sentiment is 1/2" x 2 7/8". For the back of the tag, I cut white cardstock the same size as the green star pattern pieces. Since Ellie is now printing, she'll be able to address/decorate those piece and then I'll adhere them to the back of the tag. I used some Maraschino twine form the Twinery and a Kraft button to finish them off.

For Carina's class I went with a very differnt color scheme. The papers are from Nikki Sivlis Scrapbooker's Gingerbread Land line, which I was lucky enough to win last week (yay!). The light blue paper on the front of the tag kind of reminded me of kid's writing paper, so I stamped the sentiment between the thin lines, and then second generation stamped some snowflakes to add a little more interest. The trees are die cuts from the Gingerbread Land collection that I sponged with chocolate ink.


The back of those tags has a pocket for the gift certificate. The pink cardstock was cut 2 7/8" x 2 7/8", and I used a trim piece from Nikki's collection to add some definition to one end while corner rounding the other. The 'to' and 'from' come from The Craft's Meow's All the Merry Best stamp set. I'll use some green/blue Twinery twine (haven't quite decided which color yet) and a Kraft button on these tags too.

These really were a quick, easy project. Now I just need to make that toffee!

If you'd like to make some toffee too, here is the recipe (so easy, and so GOOD!)

Ingredients:

* 40 saltine crackers
* 1 cup butter
* 1 cup dark brown sugar
* 2 cups semisweet chocolate chips

Directions:

Preheat oven to 400 degrees.

Line cookie sheet with foil and spray with non-stick cooking spray. Line cookie sheet with saltine crackers in single layer.

In a saucepan combine the sugar and the butter. Bring to a boil and boil for 3 minutes. Pour over the crackers.

Bake for 5-6 minutes, or until bubbling. Remove from oven and sprinkle chocolate chips over the top. Cool and break into pieces.

Supplies Used
Christmas Tree Tag (all CTMH unless specified): Topiary and White Daisy Cardstock, Believe Level 2 Paper Packet, Holiday Magic and Say it In Style stamp sets, Cranberry, Topiary, and Chocolate inks, Kraft Button, Cricut Art Philosphy Cartridge; The Twinery Maraschino twine, Ribbon from Michael's.
Gingerbread Gift Tag: Nikki Sivlis Gingerbread Apron and Gingerbread Love Papers, Gingerbread Border Strips and Ginberbread Love Punch outs; CTMH Tulip cardstock, Say it In Style and Holiday Magic stamp sets, Garden Green and Chocolate Inks, Cricut Art Philosphy Cartridge; The Craft's Meow All the Merry Best stamp set.

Friday, December 16, 2011

Bad, bad, blogger

I've been somewhat MIA this week, but not for lack of trying. I was working several projects at the beginning of the week, but they just weren't turning out they way I wanted to. Don't you hate that?

So, I decided that it was a sign and that I needed to force myself into some self-imposed challenge exile to take care of some other things...it's that time of year...there are just so many things going on, and while it would be great to craft away all evening, there's stuff to get done! Here's what I've been up to:

1) Finishing up our family Christmas cards. This is the first year that I actually made them (link to a photo of what folks are receiving from us), but it was fun, and I'll do it again next year. I also like to write a little note inside each, so it takes a little longer than just stuffing and addressing and mailing.

2) Working on Carina's first year album. I was convicted that I've been having so much fun with the cards, I've been neglecting this very important project. I ordered the last set of photos I need, and I'm hoping to have that wrapped up soon!

3) Shopping, I try and get most of mine done in November, but there are always those last minute items, stocking stuffers, and a few stubborn individuals for which the perfect gift takes much longer to determine.

4) A class! I was fortunate enough to win a spot in Karen Grunberg's Reclaiming my Time class at Big Picture Classes. This is the first class I have taken there, and I'm really enjoying it. So far we've done a series of exercises evaluating what we think and what we actually spend our time on. This week is a fun week, it's all about what we WANT to be spending time on. It's been a great way for me to step back and evaluate the things that I do with my time. The end result will be a mini album that documents what we've learned and goals. It's a great time of year to be taking this class, and I'm excited to start working on the actual album.

5) Planning for next year - I'm trying to put together a basic roadmap for next year in terms of workshops that I want to do. I want to get a good mix of card, scrapbooking, and even mini album workshops together.

6) Enjoying the season. It really is nice to be able to do some fun things with the kids this season (mostly Ellie since Carina doesn't quite get it yet). I got Ellie a Christmas craft activity set last year during my after Christmas shopping. I pulled it out last week, and we've been doing crafts each night after Carina goes to bed. It's lots of fun, and we have been decorating her room with her handmade creations. We also do Advent each night. She has a calendar with doors and there is a little candy treat and a sticker which goes on a Christmas scene. Then we read an entry from the Advent Storybook which I highly recommend. It's been a great time to relax and think a little about what the season means. Next week we're planning on a few outings, the National Zoo has something called Zoolights in the evenings during the Christmas season, I want to do an evening drive with the girls to look at lights, watch a few Christmas movies, stuff like that. Having the girls really helps me to be intentional about this season I think, and it really is neat to experience Christmas with little ones.

So that's what I've been up to. I should have some more projects to share next week, but while I wish I had a little more time for crafting and blogging, I'm giving myself permission to take it easy, relax, enjoy my family and friends, and contemplate the holiday. I hope that you will too. Have a wonderful weekend!

Friday, December 9, 2011

A card for many occasions/challenges: H2H, RCC32, SSD #105, Moxie Fab Trigger Tuesday


This is another one of those cards where there was a perfect storm of challenges....partially owing to the holiday season. The challenges at H2H and Ribbon Carousel both had inspiration photos which you can see below. I was inspired by the colors and the candy stripes at RCC32 and all the all ornaments an polka dots at H2H.


Moxie Fab World's Tuesday Trigger also had lots of those round metallic ornaments, and while I took my color cue from H2H and RCC, I was inspired by the lovely line of the scattered ornaments on the grounds, and tried to get some of that feel in my card.


Finally, I followed the sketch at Skipping Stones Design for the layout of the card.

This was a fun card to make. I used the Happy Clusters stamp set, which is one of my favorite. I've pulled it out on so many occasions, and the truth is I haven't even made a star/tree card using it yet. I just love all the little circle elements that are included.

For the little green squares, I used three of the larger circles, random stamped them onto the cardstock using Topiary ink, and then mounted them on two larger squares of Topiary cardstock.

The piece with the sentiment is a little trickier. It's NOT die cut (hope for all of you who don't have a machine yet). The 'Merry' was hand drawn and then cut out using my CTMH cutting knife--a great cutting knife that gives you tons of control. If you don't like your writing or don't think you can do it, not to worry. A simple solution is to use alphabet stickers. Just adhere them to the cardstock, and then cut them out in the same fashion. You could also trace a dimensional element in pencil. You don't have to have the fanciest/most expensive tools to achieve the same look!

After I cut my letters out, I used Cranberry and Topiary ink and random stamped all those circles onto the cardstock. As I mentioned before, I was trying to get a feel similar to that from the Moxie Fab trigger photo. Then I added the solid circles. I have two hol3 punches. They're about 3/8" and 3/16". I punched a bunch of circles out and then adhered them to the sentiment piece. Then I adhered the whole thing to an old piece of Bazzill scrap.

For the ribbon/twine element, I cut a very thin piece of cardstock (thinner than the 3/8" grosgrain ribbon, so it looks like it's just the ribbon there. Then I added two strips of twine (I wanted it to look a little like wrapped present). The little bow is so easy to make. Just wind the twine around two of your fingers a bunch of times. Remove, cut a small piece of twine and tie it tightly around the middle and fluff. I added the green bow on top for a little added contrast.

Hope you are having a great weekend and getting to do some crafting too!

Supplies Used:
Stamps: CTMH - Happy Clusters
Paper: CTMH - White Daisy, Topiary, Cranberry; Bazzill - Scrap of Red paper
Ink: CTMH - Topiary, Cranberry
Other: Twinery - Maraschino/Peapo twine; CTMH - Cranberry Grosgrain, cutting tool, Misc - Hole punches

Wednesday, December 7, 2011

The Craft's Meow November/December Sketch


Here's my take on this month's Craft's Meow sketch. This card uses The Merry Best stamp set. It also features my favorite print from Close to My Heart's Wonderland Level 2 Paper Pack. I love the soft pattern with very faint doilies and snowflakes. It's just a gorgeous sheet of paper.

I also created some paper for this card. The rectangular pieces on the left side of the card are stamped with the large snowflake from the stamp set. The white cardstock is second generation stamped with Chocolate ink, and the piece underneath is Kraft cardstock which is stamped with White Daisy ink.

The square and blue circle are edge distressed and sanded, and the white circle with the star stamped on it has chocolate ink sponged around the outside using my large sponging tool.

It was fun to make non-traditional Christmas card as I generally tend towards red, green, Christmas trees/holly, etc.

Wednesday's over...the weekend is coming!! Have a great night all.

Supplies Used
Stamps: The Craft's Meow - The Merry Best
Ink: CTMH - Chocolate, White Daisy
Paper: CTMH - Wonderland Level 2 Paper Pack, Chocolate, White Daisy, Indian Corn Blue, Kraft
Other: CTMH - Cocoa Grosgrain, Sanding Kit, Sponge Tool, Distressing Tool