Saturday, March 31, 2012

A couple more cards for the Craft's Meow Birthday Celebration


A couple cards to share today for The Craft's Meow's birthday bash.

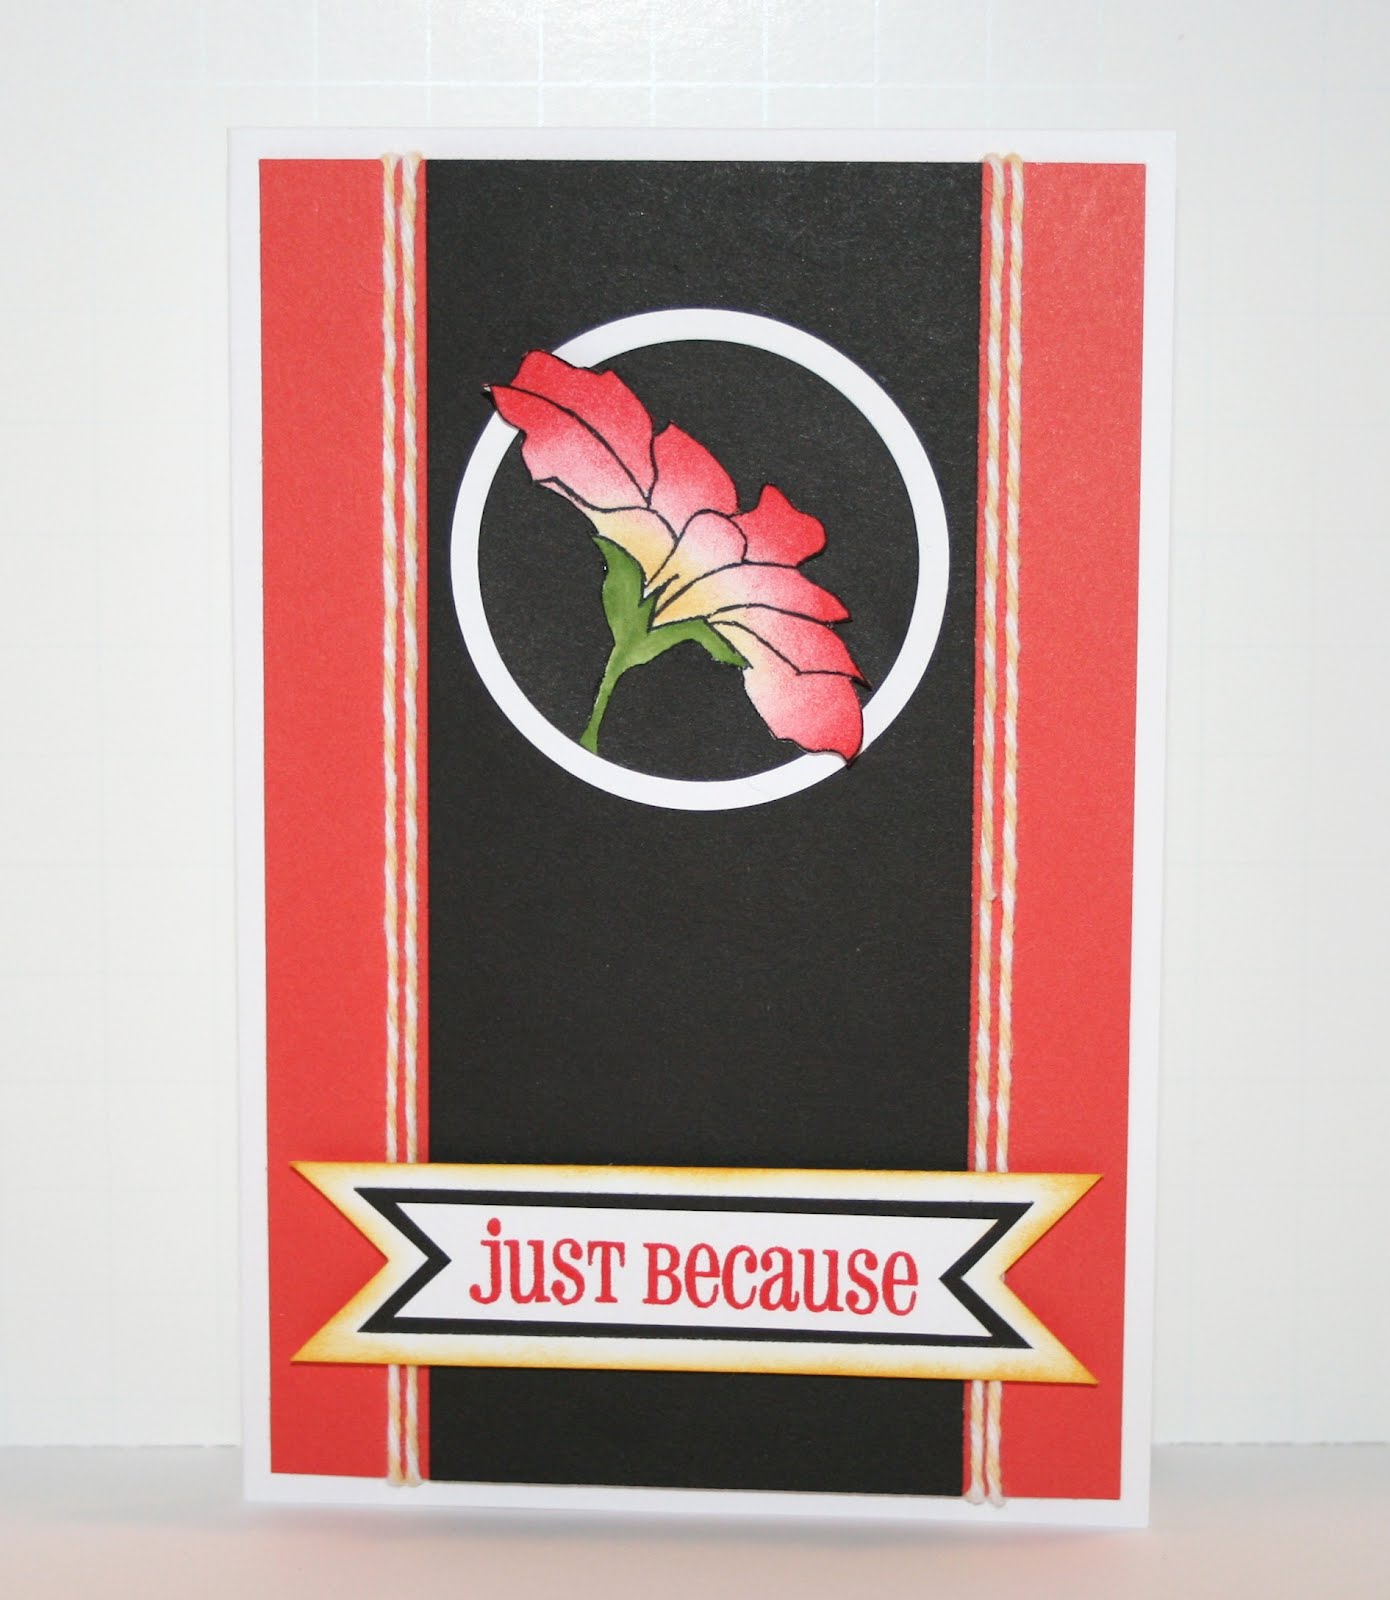
This first card is for the sketch challenge.


I used one of the free digital stamps that Karen Baker designed for this card, but opted to use only a portion of the image, the large bloom. I printed the digital image multiple times, so I had an extra. I cut out an extra stem to use as a mask. Then using sponge daubers, I added Honey and Holiday Red ink to the image. Once I had the color intensity where I wanted it, I cut the image out.

The lines didn't print as crisply as I expected, but this could be because I don't actually have photoshop (I just inserted the .jpg into powerpoint and printed it from there), so I went over the lines with a black marker and also added some definition along the cut edges. I knew that I wanted to curve up the edges of the flower for some extra dimension, so I used the sponge dauber to add the Holiday Red to the back edges of the flower also. I colored the stem in using my blending pen and Topiary ink.

The rest of the card is pretty self explanatory. I'll list all the supplies I used at the end of this post.

My second card is for the Birthday Celebration Challenge. Here is the inspiration photo:


I was really inspired by the colors and the banners in the photo, and I just love how the card turned out. Can you tell what stamp I used for the banner? It's one of the Christmas trees from The Merry Best set. I have lots of fun papers, and could have die cut the banner pieces, but I love being able to get more bang for my buck with my Christmas stamps.


This was an easy card to put together. I knew I wanted to layer/overlap the banners, so I actually freehand stamped the two that are in the background. I used second generation stamping for this card to get a softer effect. The string that holds the banner together in those two background banners is drawn on using a blending pen.

For the banners in the foreground, I stamped more trees and pieced them. The row on the bottom was adhered directly to the card, and I used Lemondrop twine from the Twinery to string it together. I popped out the banner at the top using dimensional foam tape and also added some twine to that one. The sentiment is from the Elemental Workshop on the Go kit (kind of perfect for the occasion, right?) and was stamped in first generation.

Thanks for stopping by. Hope you like the cards and are having a great weekend!

Supplies Used

Sketch Card
Paper/Cardstock: Black, White Daisy, and Holiday Red Cardstock
Stamps: TCM - Grateful Flower free digi; CTMH - Say it in Style
Ink: Honey, Holiday Red, Topiary
Other: EK Success Black Zig Marker; CTMH - Sponge Daubers, Dimensional Foam Tape, Bonding Memories Adhesive; Tombow adhesive; The Twinery - Buttercream twine; Creative Memories - Custom Cutting System, Circles

Birthday Celebration Card:
Stamps: TCM - The Merry Best; CTMH - Elemental Workshop on the Go set
Ink: CTMH - Goldrush, Twilight, Sorbet
Other: CTMH - Blending Pen, Dimensional Foam Tape, Bonding Memories Adhesive; The Twinery - Lemondrop Twine

Friday, March 30, 2012

Flashback Friday 22.0 - First Die Cut Card


I'm very honored to be the guest designer for Flashback Friday 22.0, which is a special Flashback Friday because we're doing a hop. You should have come here from Sylvia's blog (this week's sponsor). If you get lost, I have the hop order listed below.

If you've never played along at Flashback Friday before, the premise is this: you go back to the beginning of your blog and find your first creation that fits the challenge and repost it. Worried that the project isn't your best work? Chances are it isn't, but half the fun is seeing how far you've come/grown. So what are you waiting for, come play along!

If you need a little more motivation, how about a prize?

This month's sponsor is

Sylvia's Corner http://www.etsy.com/shop/sylviascorner


The prize is composed of a Stampin'Up! Sale-A-Bration package she put together. There is a Everyday Enchantment Tote, a 12"x12" package of Everyday Enchantment Designer Paper(12pieces), 10 card bases, two of each of these colors, Calypso Coral, Pool Party, Lucky Limeade, Island Indigo, and Wisteria Wonder, 20" of Baja Breeze satin pleated ribbon, 2yds each Everyday Enchantment Organdy Ribbon Lucky Limeade and Calypso Coral, 10 Everyday Enchantment brads and 10 shaped clear buttons, and the Sale-A-Bration Fresh Vintage stamp set(wood mount, unmounted). This collection is sponsored by Sylvia's corner Etsy shop, where she sells her handmade cards, banners, gift bags and albums.

Ready to play? This month's challenge is to post your first project using a die cut.

Here is mine:


I made this shortly after getting my Cricut Expression and was experimenting with it and learning the ropes. Needless to say, I made a lot of unintended cuts (not that I still don't do that....). I put this card together for several challenges using some of my 'mistakes' as well a a few intentional cuts. I even put the card to good use, it went to my grandfather-in-law after he had been in the hospital.

Now it's your turn, find your first project using a die cut and link up over at Flashback Friday. Can't wait to see what your projects!http://www.blogger.com/img/blank.gif

Now you're off to your next stop on the blog hop, Jessi.

Here's the full list in case you get turned around:

Flashback Friday blog: http://flashbackfridaychallenge.blogspot.com/
Sponsor: Sylvia http://syviastamps.typepad.com/sylvias_stamping_corner/
Miriam: http://mprantner.blogspot.com/
Jessi: http://onecraftymama-onecraftymama.blogspot.com/
Nance: http://soulstampin.blogspot.com/2012/03/flyin-by-flashback-friday.html
Amy: http://tsurutadesigns.blogspot.com/

Thanks for stopping by and have a GREAT weekend!

Tuesday, March 27, 2012

A Perfect Match for Sweet Stamp Shop Challenge


I've been contemplating this card in my mind for about a week or so, and was finally able to get it done tonight. The inspiration is the matching worksheets that Ellie has in her workbooks. Sweet Stamp Shop's new A Perfect Match set was 'perfect' for this.

This is for Sweet Stamp Shop's new monthly challenge:


I'm not going to list all the papers I used for this card since I'm not exactly sure what they all were at this point - many of them came from my scrap bag. That's one of the big benefits of paper piecing, you can use up lots of those little bits of paper that you have lying around.

It was actually lots of fun to choose the paper bits for this card, and I also used my blending pen on a couple of the images (dip/hot dog).

The alphabet stamps are my very first stamps ever, a retired CTMH set that I love and which works so well with the SSS stamps.

I also used one of the sentiments from the A Perfect Match on the inside of the card.


Hope that you like the card...I'm off to bed!

Supplies Used
Paper/Cardstock - Various
Ink: Black
Stamps: Sweet Stamp Shop - A Perfect Match; CTMH - Playful Lowercase
Other: CTMH - Bonding Memories Adhesive; Kaiserkraft Tiny Alpha Stickers; EK Success - Red Zig Marker

Monday, March 26, 2012

Brown paper packages tied up with string for TCM Birthday and RCC45


Just a simple little card to share with you today.

The Craft's Meow is celebrating their first birthday, and as part of the celebration they are hosting a bunch of challenges. This is for the color challenge. Here is the inspiration picture:


I love those great spring colors, and was also inspired by those baskets which kind of reminded me of kraft paper.

That little group of gifts is from TCM's The Merry Best stamp set, and while the set is a holiday one, that present stamp can be used for any occasion you would give a gift to someone.

As I started contemplating the card, 'My Favorite Things' from the Sound of Music started running through my head, and what better to wrap a brown paper package with than some baker's twine? Which makes this card perfect for this week's Ribbon Carousel Challenge, RCC45, 'Baking with the Twinery'.

I thought about using multiple gift images, but I opted for the clean and simple look, and I like how it turned out. The twine is from the Twinery: Buttercream, Peapod, and Denim, and I used Liquid Glass to adhere it. I first put the small strip that goes around the gift on, and then tied a tiny bow to match the bow on the stamp and adhered that separately.

I'm off to do a little more stamping before bed tonight. Hope your week is off to a good start!

Supplies Used
Cardstock/Water: CTMH - Kraft, White Daisy, Chocolate cardstock
Stamps: The Craft's Meow - The Merry Best; CTMH - A Typeface
Ink: Desert Sand
Other: CTMH - Desert Sand Marker (used to add a little extra definition to the edges of the gifts), Liquid Glass; The Twinery - Buttercream, Peapod and Denim twine

Friday, March 23, 2012

Meant to be Friends Layout for Courtney Walsh's Sweethaven Scrapbooking Challenge


I've been following Courtney Walsh for a while now. She's a fellow scrapbooker who recently published her first novel, A Sweethaven Summer. As part of her publication celebration, she challenged her readers to complete some layouts based on ones that her friends created using themes from her book.

I planned to complete a few layouts for her challenge, but am only managing to squeak one in under the wire. I could not for the life of me find the other photos that I wanted to use for the other layouts....I know exactly what the envelope they are in looks like, but I clearly should never try and clean because then I lose things.

Anyway, one of the inspiration layouts/topics was about friendship, and there was one titled 'Friendship that was meant to be."

This layout is about my daughters, who, at 4 1/2 and 1 1/2 are actually wonderful friends and playmates. I'm praying that this will continue to be the case and that they will only become better friends as they grow up. I love to see the two of them together (they do fight, but for the most part, they get along really well), and this layout celebrates the first 18 months of their friendship.


I wanted to use a kind of color/quilt blocking technique here, and to give it a little extra emphasis. I used my sewing machine to 'stitch in the ditch' between the photos and the cardstock pieces.


I really like how it emphasizes each of the elements. The papers are some of my favorites from CTMH's Spring/Summer catalog, Stella, and I used the Just a Note stamp set as well as my large and small Friendship alphabets.


I'd write more, but I actually have to clean my house because the cleaning ladies are coming tomorrow....I know, I have to clean so they can clean, crazy, but it's really just straightening up and putting things away.

Thanks for stopping by. Hope you had a great end to your week and enjoy the weekend. Ours is crazy with all sorts of activities, but should be fun.

Supplies Used:
Paper/Cardstock: CTMH - Stella Level 2 Papers, Sunset, Tulip, Cocoa, Colonial White, and Lagoon cardstock
Stamps: Just a Note, Friendship Large and Small Alphabets
Ink: Cocoa
Other: Pigma Micron Brown pen, Sewing Machine, Cocoa Grosgrain Ribbon, Cricut Art Philosophy Cartridge

Wednesday, March 21, 2012

CAS-ual Fridays 1-2-3 Challenge with CSS


This week's challenge at CAS-ual Fridays is a 1-2-3 challenge: create a project using a pattern, an image, and a sentiment. Clear and Simple Stamps is the sponsor. I recently won their Love Cupid set and wanted to ink it up and play along.

I stamped the cupid (which has a pattern on it, but I didn't know if you could double count something, so I'm also using a patterned paper), and then used my paper trimmer to cut from the top and bottom just down to the image. Using my cutting knife, I then did the delicate trimming around the cupid image...LOVE my cutting knife, gives me a ton of control and the confidence to cut out even the tiniest areas (like the inside parts of the bow) without worrying about slipping.

The sentiment/frame are also from the Love Cupid set. That piece I just cut using my CTMH scissors which are also great for precision cutting.

Once I had those pieces completed, the card came together very quickly. I was originally going to put the cocoa and white pieces right up against each other, but when I was assembling it, I liked seeing that bit of the patterned paper peeking through, so adjusted the design a little.

Thanks for stopping by, hope your week is going well!

Supplies Used
Paper/Cardstock: American Crafts Hollyday Whiskers paper; CTMH - Cocoa and White Daisy cardstock
Stamps: Clear and Simple Stamps Love Cupid
Ink: CTMH Cocoa
Other: CTMH - Cutting Knife, Scissors, Bonding Memories Adhesive

Monday, March 19, 2012

I Want Candy for RCC and Paper Issues


Sweet Stamp Shop, one of my favorites companies is sponsoring a sketch challenge at Ribbon Carousel, RCC44 this week. By sheer happy coincidence, Paper Issues' theme this week is "Welcome to the Candy Shop" so I'm linking this card up there too.

I love this card, because it was so much fun to put together, and it's so true. I do want candy, all the time. It's often the first thing I eat in the morning and the last thing I eat at night. I know where all the candy jars are at the office, and my colleagues have learned that I am easily bribed/appeased with tasty treats. I have a total sweet tooth....which I am sure is not why you are here, so let's get down to business.

There are a bunch of companies selling eye chart stamps (which I love, but haven't gotten a chance to purchase yet), and I wanted to do something similar with this card. I played around in Microsoft Word, trying out different fonts/sizes/spacing until I got the right look.

The glasses are from Sweet Stamp Shop's Spectacle set, which just came in the mail on Saturday and I was psyched to ink it up so soon. I also used their Sweet Tooth stamp set for the candy piece as well as to create the pattern on the circle piece. That was created with the bubble border stamp. I wanted it to be a little more solid, so I stamped inside the larger circles with the closest small round thing I could find....the end of a crayon. Kind of neat, huh?


This is for the Ribbon Carousel challenge and I used two trims. First, some Lemondrop Twinery twine. I pierced holes in the corners of the Lagoon cardstock piece and then threaded the twine through. For straight lines, this is a great way to 'adhere' the twine since you don't actually need to use any adhesive. I often find when I'm working with twine that it gets rather messy....I get adhesive in all sorts of places I don't want it, or the twine gets stretched/twisted too much or too little, so eliminating the need for adhesive is a big deal for me.


I also used some red grosgrain ribbon with white accents that I got at Christmastime from Michael's. I used red thread to tie the ends to kind of mimic the wrapping on a piece of candy.


So there you have it. What do you think? Make you want to have some candy too? I'm in trouble since I just finished my bag of Haribo Peach Gummies.....must get to the store.....

Supplies Used
Paper/Cardstock: CTMH - Cranberry, Lagoon, and White Daisy cardstock; Creative Memories - Red cardstock (candy piece); Bella Blvd - Winter Wonder, Icy
Stamps: Sweet Stamp Shop: Spectacle, Sweet Tooth
Ink: CTMH - Cranberry, Black
Other: The Twinery - Lemondrop Twine, Michael's - Red Grosgrain ribbon; CTMH - Dimensional Foam Tape, Piercing Tool