Friday, February 22, 2019

Concord and 9th Stitched Turnabout


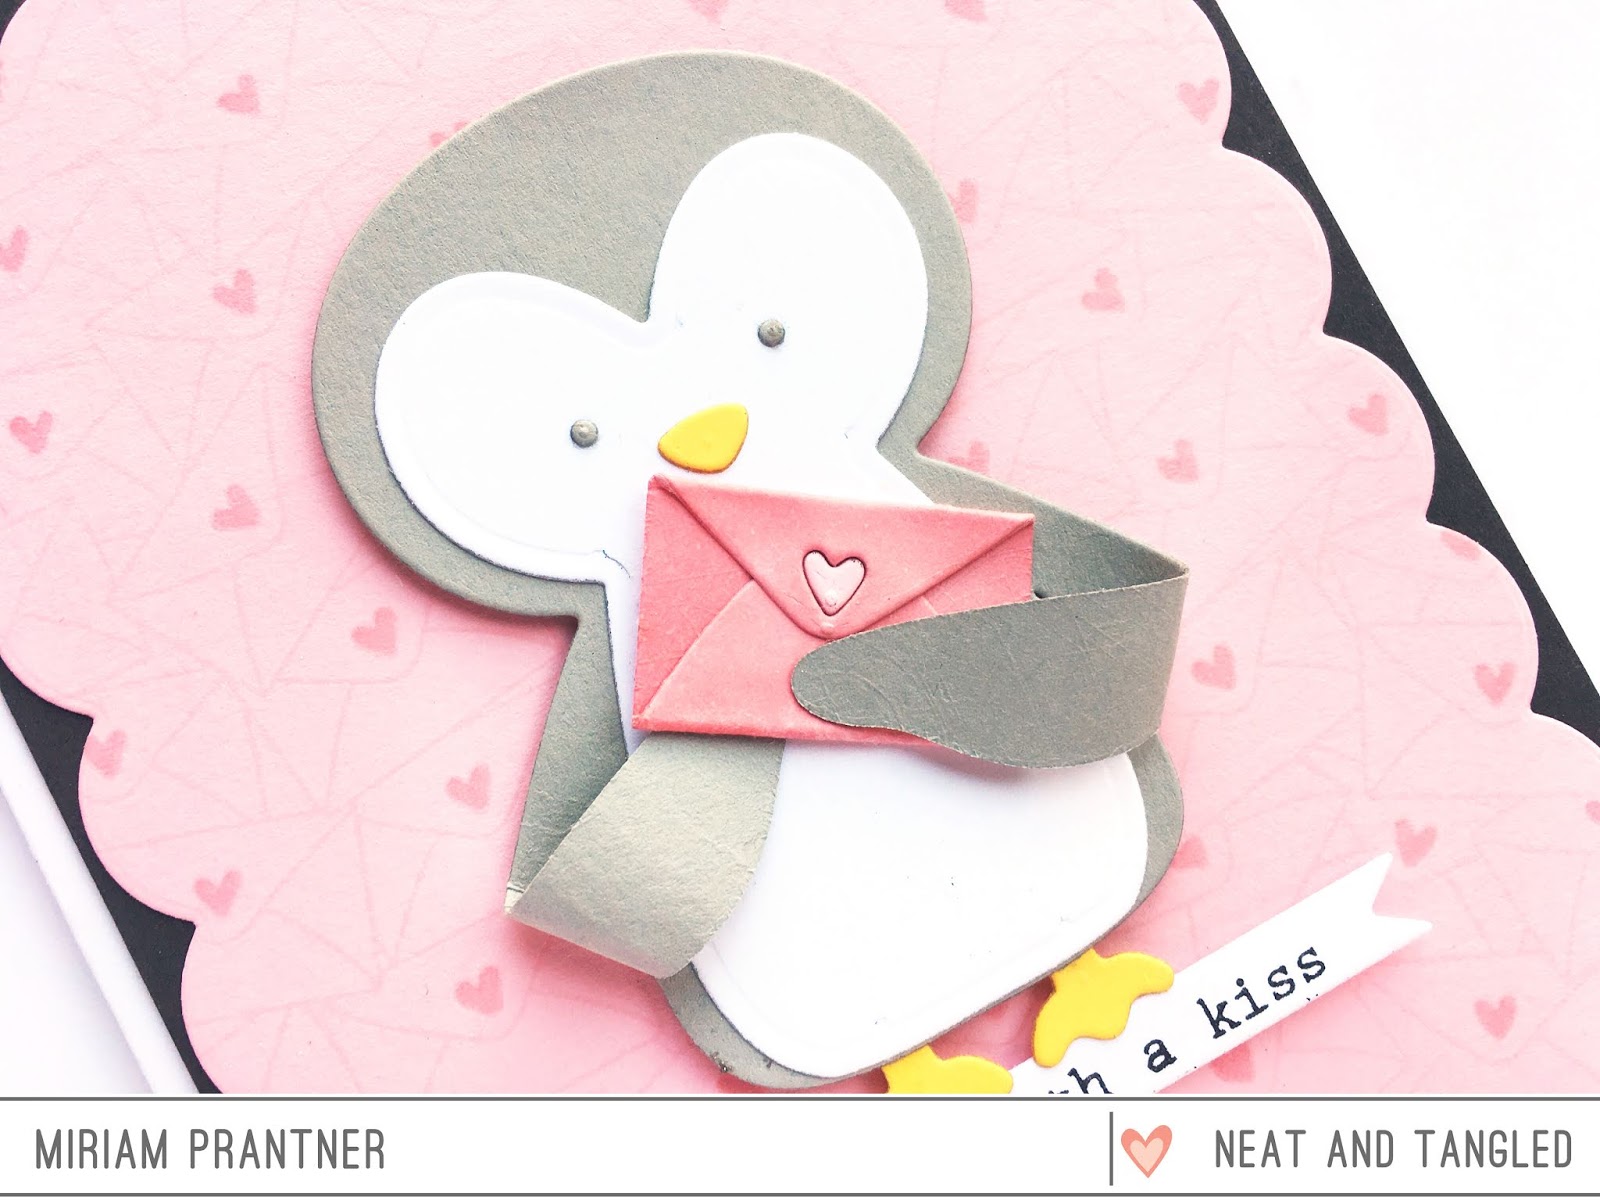
I love Concord and 9th's turnabout stamps.  I just think they are so cool and you get such a great look with minimal effort.  This Stitched Turnabout is one of their newer offerings and one of my favorites.

C9 has come out with some new aids to help with the positioning of these turnabouts.  Each turnabout now includes a guide, and you can also purchase a Turnabout Jig that you place your cardstock on as opposed to creating your own from cardboard.  

I used C9's new Turnabout Jig to create my panel.  Note that when you are placing your stamp on the stamp platform, be sure to have the jig out and in place and then line up alignment guide with the jig.  If you just line the guide up in the corner it will be off and you'll have to stamp your panel again (ask me why I know this...lol).

I used Altenew inks for my card: Mountain Mist, Lagoon, Industrial Diamond, and Andromeda.  Because I did have to stamp my panel twice and because I apparently didn't do a fantastic job cleaning off the stamp, the Mountain Mist layer is a bit variegated as there was some Andromeda residue on it.  I actually love the look, but it might not be the greatest thing for your ink pads.


Once I was done stamping the background, I added the large heart from the set in the center of the card using Mountain Mist, and then stamped the sentiment, also from the set, with Andromeda.

To add a little more interest and texture, I used a Versamark pen and went over the Andromeda portions, embossing them with Ranger Frosted Crystal Antiquities embossing powder.  Similarly, I used the pen on the Mountain Mist portions and embossed those with Holographic embossing powder.

It's hard to see in the photo, but in real life it adds a bit of shine and texture, and I like the fact that there's a tactile element to the card too.  I've started using that Frosted Crystal embossing powder more after I noticed my youngest daughter totally engrossed in 'petting' a card I had created.  I do think it's fun that there's a 'feel' to a card.

I trimmed the panel down just a touch, so that the card base frames it.

Also, just a heads up that Ellen Hutson has a sale on this weekend for 25% off all Altenew products.  Altenew inks are my favorite and this is a great time to pick those up as well as anything else that might be on your list.  (I know mine is pretty long!)


Thanks for visiting and have a great weekend!

*Affiliate Links Below

Thursday, February 21, 2019

Dream Big with Pinkfresh


We had a snow day yesterday, so I had some unexpected time to craft.  I decided to pull out some sets that I haven't gotten to use yet, and this Lost in the City set from Pinkfresh was at the top of the list.

I really love this image.  I have lots of ideas for it, but I thought I would start with something pretty straightforward.

The image was stamped on some Neenah Solar White cardstock, and the buildings were then colored with Copics.  I decided to go with a rainbow color scheme, To add some interest and dimension, I stamped a second panel, and the buildings that are towards the front were fussy cut and popped up. over the original panel.


The sentiment is also from the set and was stamped in the center, and then I added a die cut black frame to set it off and sharpen the focus on the image.

This one was a little more time consuming to create, but not difficult to execute.

Thanks for visiting!

*Affiliate Link Below

Friday, February 15, 2019

Spellbinders February Small Die of the Month Kit


Happy Friday all!  I've got a card to share today featuring the latest Small Die of the Month kit from Spellbinders.  I'm always so impressed at the value of the Spellbinder kits.  For $12.50, you get one very large die that can be used to create a gatefold front for your card as well as several smaller dies that can be used to accent the main die.

For the card I'm sharing today, I decided to do a little 'editing' of the large die.  I cut the die twice using wood veneer paper, but instead of using the entire piece, I trimmed off the edges to create two smaller pieces.  which were then adhered to a pice of very subtle white woodgrain patterned paper.

I also die cut some of the accent pieces - the flowers and butterfly detail from the same wood veneer paper.  I wanted to use a darker shade, but I couldn't find it (not shocking given the state of the craft area), so I used a couple of brown Copics to color those pieces instead.  The butterfly was colored with E15, and the flowers with E13, although I used two layers of color on the larger flowers to provide a little more variation.


I added a cardstock mat in a coordinating color, and a simple sentiment stamped on the same subtle woodgrain patterned paper and popped up.

If you're interested in signing up for the Small Die of the month club, you can get all the details here.  In addition, you might want to stop by and check out the past kits section.  Spellbinders just restocked some of their most popular kits, and there are some really great sets available.

Hope you have a wonderful weekend!


Tuesday, February 12, 2019

i love you


Hey everyone!  I started this card last week, but didn't end up finishing it in time for release week.  Luckily I had a bit of time over the weekend to get it done.

I started by stamping the Mail Background on some white cardstock with Silver Stone Altenew ink. 

The heart is from the Love Mail die set and was cut from some Hero Arts paper.  I also cut a mat for the background using that paper.

The sentiment is from the new Typed Sentiments set and was stamped on the smallest of the banner dies from the Skinny Strips set.  I also cut one of those in a light gray cardstock to set it off a bit.


Finally, I stamped the bunny from the Jump for Joy set using Copics (Warm Grays) and fussy cut him.  I have the dies of course, but I still like fussy cutting from time to time.

That's all for me today.  Thanks for visiting!


Friday, February 8, 2019

Neat & Tangled February Release Review and Winners

Hi all!  The February release is now available in the N&T store! Here's a look back at this week's projects:


This was a really fun release to work with, and hopefully you guys founds some inspiration!  I have some winners to announce too:

@rabunalscrap wins the Mail Background stamp
Loly Borda wins the Love Mail Dies
@hobbitnoll wins the Skinny Strips Dies
Lynda wins the Typed Sentiments set

Congrats ladies!  Please shoot me an email with your mailing information and I'll get these goodies sent out.  

If you didn't win this month, never fear - it's a short month, and the March release is coming quickly!  And if there's something you must have, head on over to the store.  Have a great weekend all, and thanks for all your sweet comments this week!

Thursday, February 7, 2019

Neat & Tangled February Release & Giveaways - Day 4


It's the final day of February release reveals at Neat & Tangled, and this mini set from Elena is one of my very favorite images from her ever.  This sloth and turtle just make me laugh.  They are quite the couple aren't they?

I stamped the image on a panel of white cardstock and colored it with Copics.  I added a ground line using Antique Linen distress ink and some masking tape.

I had a bit of fun with the image too, adding a 26.2 in the little flag, because really, what are the odds these two are going to finish a marathon?


Then I finished things off with one of my favorite sentiments from the new Typed Sentiments set which was stamped and embossed on one of the new Skinny Strip dies. 

I added several patterned paper mats to finish things off, and popped up the sentiment piece for a bit of dimension.

OK, head over to the N&T blog to check out the rest of the DT's creations and to enter to win this new set. 

Be sure to leave comments here this week also - I'll be selecting some winners for my new release products.  Winners will be announced tomorrow!

Wednesday, February 6, 2019

Neat & Tangled February Release & Giveaways - Day 3


It's Day 3 of the Neat & Tangled February release, and today we're showing off the last of my new products for this release, the Skinny Strips dies and the Typed Sentiments stamp set. 

The nice thing about being a product designer is that you can create the stuff you want to have in real life.  I've been needing a set of thin strips for sentiments for a while now.  There are 12 different strips. four each 1/4" wide in lengths from 2 1/2" to 4" in a rectangle and banner style.  Then there are two each in rectangle/banner that are 3/8" wide. 

For the Typed Sentiments set, I tried to provide a good mix of basic sentiments, but also ones that are a little more unusual.  I think you'll get a good giggle out of a few of them!

You've been seeing these skinny strips pop up in a lot of projects already this week, so I thought I'd use them in a different way.  I cut all four of the skinniest rectangle strips from five different shades of cardstock - just pieces that I found in my scrap bin.  Then I arranged them along the bottom of a panel of white cardstock.  Once i was done, I die cut the piece using the 4" x 5 1/2" rectangle from the Card Front Dies set.


The sentiment is of course from the Typed Sentiments set.  Super quick and easy. 

I did basically the same thing using the banner style strips and five colors of pink/red cardstock, but adhered them on an angle for this next card. 


The panel was again cut using the smaller rectangle from Card Front Dies, and I added another sentiment from the Typed Sentiments set.


These cards are really so easy to create and I love that you can use your scraps for them. 

Be sure to head over to the Neat & Tangled blog to check out what the rest of the team created, and to enter to win these new goodies. 

Leave a comment here as well as I'm picking some commenters from this week's posts to win some of my new products.  You'll want to stop by my Instagram account as well (@mprantner) as there are extra chances to win there.  Winners will be announced Friday morning.

See you back here tomorrow for our final reveal day!

Tuesday, February 5, 2019

Neat & Tangled February Release & Giveaways - Day 2


Ready for Day 2 of the Neat & Tangled February release?  Today we're showing off a new set from Elena called Jump for Joy.  I really love this one, it's just such a cute set with lots of possibilities.  

This jumping squirrel is my very favorite critter from this set, so I really wanted to showcase him.  He was colored with Copics (I used the Warm Grays) and die cut.  I also die cut and colored the trampoline (using Cool Grays).  

For the background I used the Heart Duo stencils to softly ink some hearts using Altenew Frosty Pink ink.  I also inked a very soft ground line using Silver Stone Altenew ink.


The sentiment is also from the Jump for Joy set.

OK, you'll want to head over to the N&T blog now to see the rest of the team's projects and enter to win today's set.

Leave a comment here also, I'll be picking some winners from my release week posts to receive some of my new products.  I'll see you back here tomorrow!

Monday, February 4, 2019

Neat & Tangled February Release & Giveaways - Day 1


Hi friends!  It's the first day of this month's Neat & Tangled release week!  I've got several new products to share with you this week, starting with today's featured products, Mail Background and the Love Mail dies.  The Mail Background is also a new product type for Neat & Tangled - a red rubber background!

I started out by stamping the background in a very soft pink ink (Frosty Pink from Altenew) on a light pink cardstock.  The little hearts on the envelopes stamp just an outline, but I went in with a very light pink Copic marker (RV11) and colored them all in.  I then used the largest scalloped frame from the Scalloped die set to die cut the background piece, and adhered it to a dark gray panel to give it a bit of definition.

I knew I wanted to use the faux envelope die from the Love Mail set on my card, and I needed someone to hold it.  The Penguin Treat Holder die was the perfect candidate.  I cut the penguin from a light gray cardstock for the main body and used a lighter yellow for the feet and nose/beak.

Next, I cut the envelope from the same pink cardstock I used for the background, coloring the envelope with the same pink Copic I used to color in the hearts on the background (I left the heart uncolored).  Since this is a faux envelope, you just fold the top and bottom flaps in to create the look of an envelope, but it doesn't actually hold anything.  Once the envelope was assembled, I used glue dots to adhere the penguins wings and the envelope.


The sentiment is from a new set I have that you'll see later this week.  

Both the penguin and sentiment strip were popped up over the base.

That's all for me today, but be sure to head over to the Neat & Tangled blog to see what the rest of the team created.  You can also enter to win today's featured products there.

Leave a comment here as well.  I'll be selecting some commenters to win some of my new release products at the end of the week.  For extra chances, head over to my Instagram account (@mprantner) and follow the directions there.  See you back here tomorrow for Day 2!