*This post contains affiliate links to Simon Says Stamp

Hi all! I'm really excited to share today's cards. My last two posts featured some of the new embossing folders from the Handmade Holiday release, and today I have a new technique that shows off these folders in a different way.
I recently picked up a package of Simon Hurley Stamping Foam, and thought it would be really fun to use it in conjunction with my embossing folders to create a block print look.
The foam is so easy to use. You just heat it up with your heat gun, and press it into something dimensional for about 10 seconds. I've seen people use rubber stamps, clear stamps, a piece of lace, a placemat, really there are so many possibilities. Then you apply ink and stamp. So easy. It's reusable, when you reheat it, the design disappears and you can stamp it into something else. If you don't reheat it, you can continue to use that impressed image for quite a while. You'll see in the photos that you can still see the design, and these photos were taken several days after I created the cards.
This is so addictive! You could spend hours making these prints. For this first set, I used the Christmas Floral Embossing Folder. I used the latest release of Simon Says Stamp Pawsitively Saturated Inks for all of these backgrounds.


I really loved that bold green color, but thought the Latte wasn't quite Christmasy enough.
Solution: I went back and stamped over top the Latte with the ink that was left on the Stamping Foam from the Field stamping.

The sentiment is from the XL Christmas Greetings set.
Next up I created a couple of cards using the Snowflake Visions Embossing Folder. Again, I used a sentiment from the XL Christmas Greetings set.

For these cards I first stamped with Cadette. Then, leaving the remaining ink on the stamping foam, I swiped around the edges with Royal ink and stamped again.
I created two versions of this card because 1) it is such a quick and easy process - perfect for mass producing, and 2) I wanted to show how this is not a perfect science. Each stamping is unique and has its own variations.


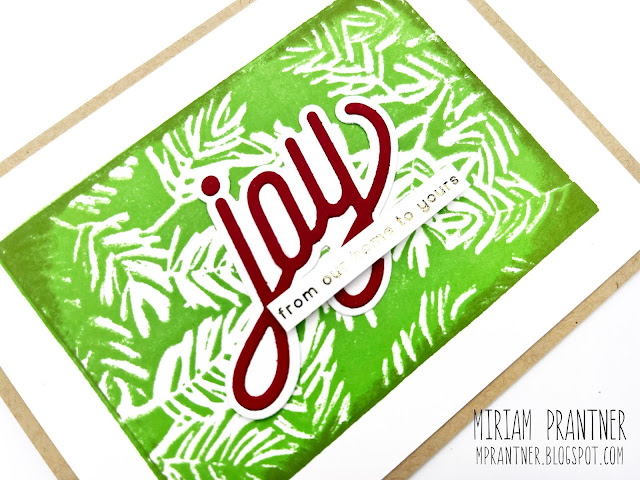
Next up, one of my very favorite embossing folders, Delicate Pine Branches.

Similar to the last two cards, I started by stamping with a lighter color, swiped the edges with a darker color (this time I went a little bolder with my swiping), and then stamped again.

The joy sentiment is an older retired die which was adhered directly to the stamped panel, and I added a foiled secondary sentiment from the From All of Us Sentiment Strips.

This time I used three ink colors for the stamped print. I started with Marine, the lightest of the new blue inks. Then I added Cadette around the bottom and sides and over maybe the top fifth of the image. Finally, I finished off with a bit of Royal at the very top.
Again you can see that the inking doesn't have to be perfect and each 'print' will be unique.

The sentiment for this first card is from the Snowflake Edges set, and on the second card it's an older sentiment from a retired Neat & Tangled set.

It was so much fun creating these panels. I really enjoyed working with the Stamping Foam. I loved that you get four foam blocks in a package, and not only can you press a different design into each side of the foam, you can also reheat the foam and use it on a different design. And, of course, it is great to have another way to use all these amazing new embossing folders.


No comments:
Post a Comment