Wednesday, February 29, 2012

Pumpkin Decorating Layout


This is another project for the Bella Blvd challenges that are currently going on.

The challenge was to use patterned paper as an embellishment.

I had a great time putting this together. I used two different Bella papers from the Winter Wonder collection. The first is that yellow chevron paper. It's an allover pattern, and I just cut it after one 'zig', and then into smaller pieces. Similarly the second paper with the blue stripes was cut vertically where the pattern is offset.


I took four of the chevron pieces that I cut and put them together to create those flower/burst elements which kind of remind me of a quilt. I thought about putting an embellishment in the middle, and tried a couple things, but in the end I like seeing the color underneath peeking through.


The gingham strips are Love My Tapes fabric tape...SO easy to use and it adds some great texture and pattern to the page.

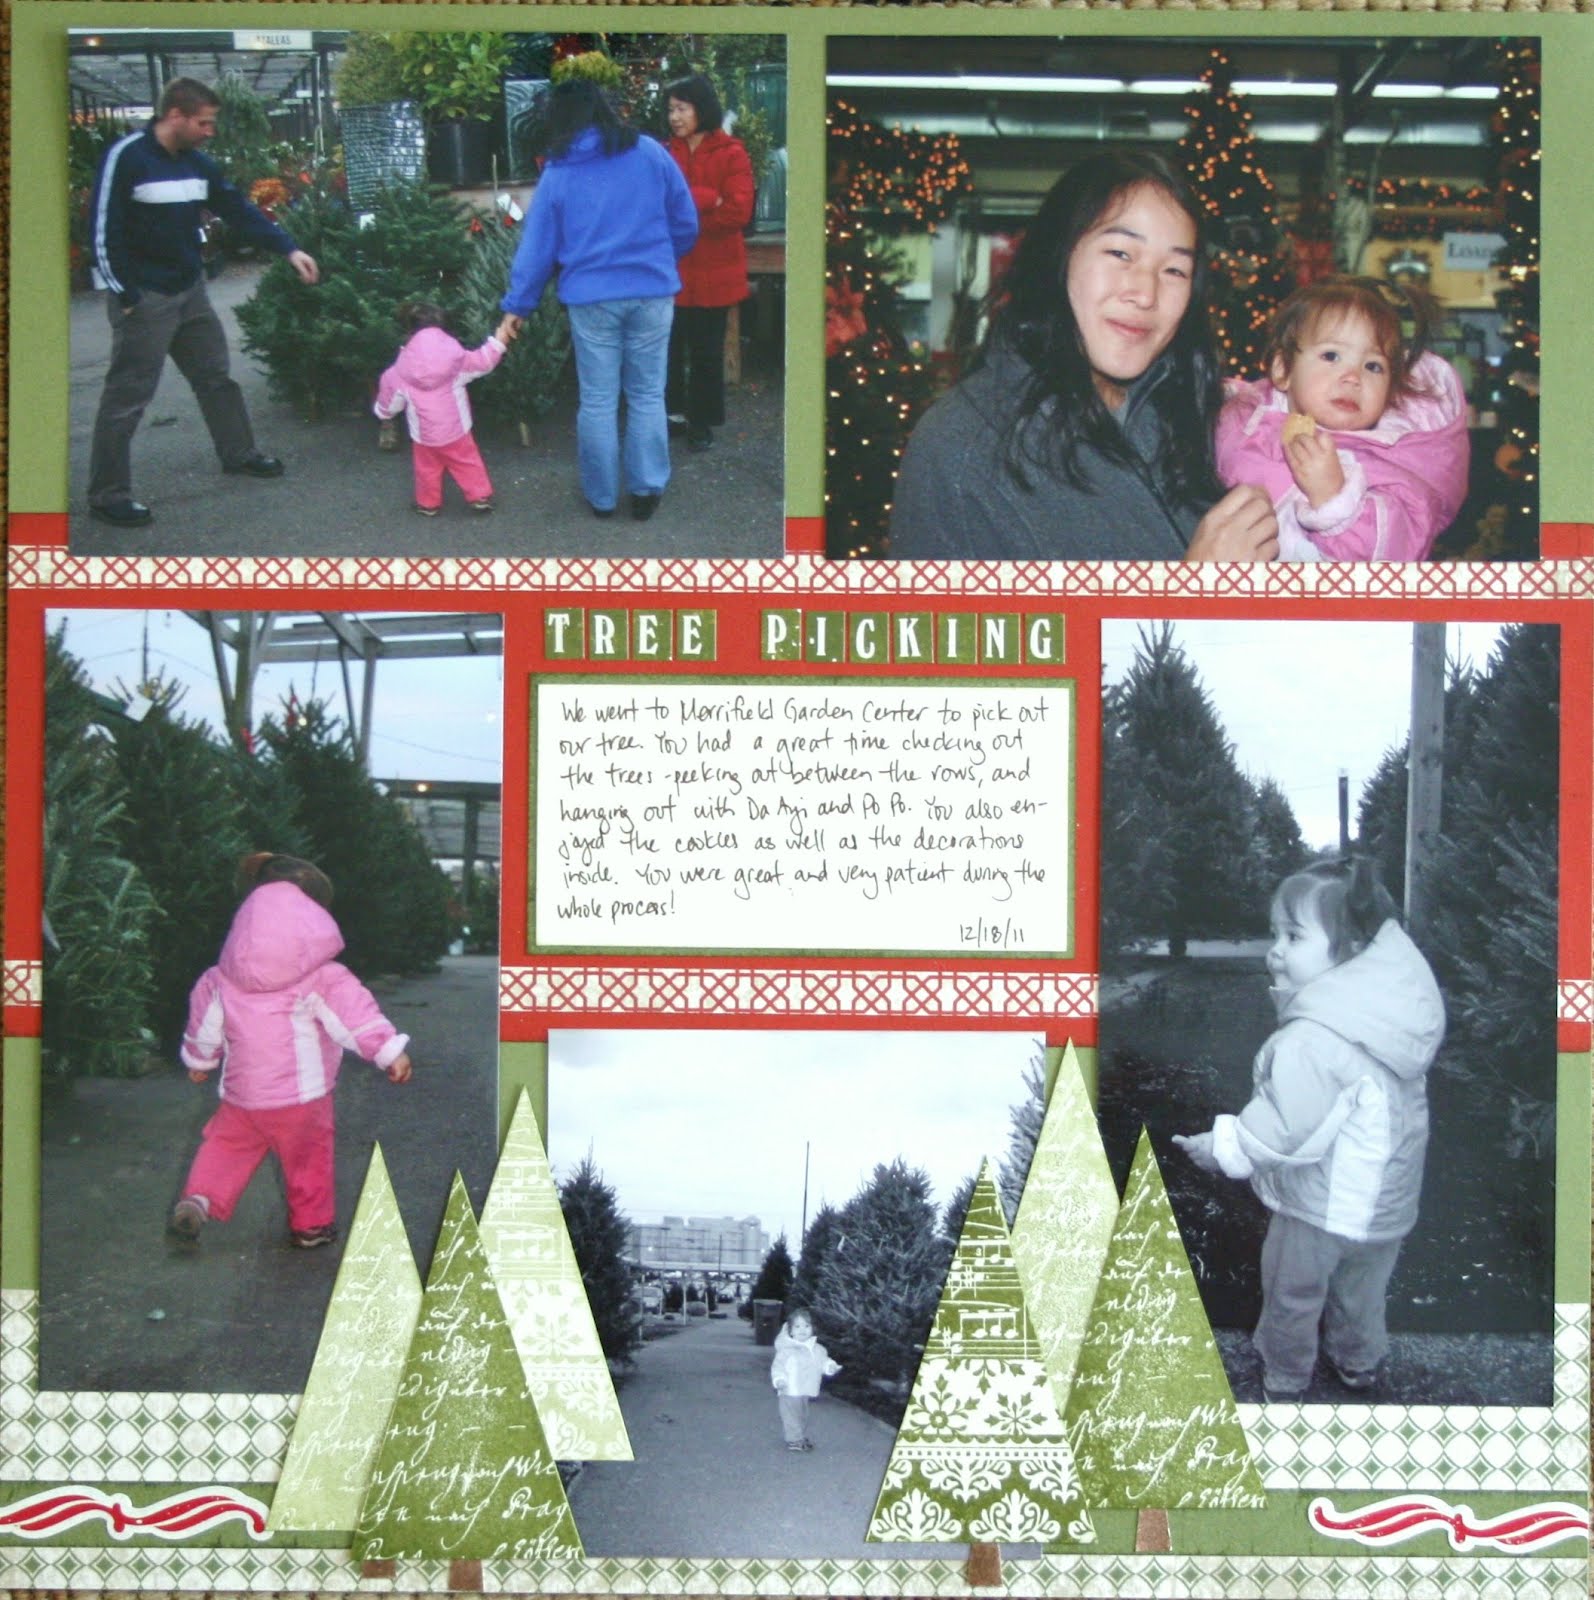
I 'gulp' did the title free hand using Zig chalk markers and a white gel pen. I want to try doing more of my titles freehand, and working on lettering. This method is quite forgiving. I used the chalk marker first, and then traced around it using the gel pen. This lets you fix some things...make certain areas a little lower/wider, etc.

This is the darkest background I've ever used for a layout, but I really like how the embellishments, photos, and text stand out. Definitely something I'll be doing again!

Hope you are enjoying your extra day!

Supplies Used
Paper/Cardstock: Bella Blvd - Winter Wonder Icy and Ski Slopes papers; CTMH - Chocolate cardstock
Other: Zig Yellow Chalk marker, Love My Tapes Yellow Gingham Fabric Tape, White Gel Pen, CTMH Bonding Memories Glue

Tuesday, February 28, 2012

i heart u card for Bella Blvd and RCC42


Bella Blvd is hosting a series of challenges on their blog right now. I was so fortunate to have received a Winter Wonder collection pack a while back, and put together this card to play along.

This is for Thursday's challenge which was to use border strip papers in your project.

I really liked the border strip with the Christmas/pine trees on it. This card is 4x6, so once I cut the piece for the card, I still had 6" left. To create dimension/depth on the card, I cut out some of the tree shapes from the 6" strip I wasn't using to layer over the base piece.

Since I'm a crafter on a budget, I've got to make choices. Most of the time I go for papers and stamps, so my adhesive supply is pretty minimal. I have my Tombow, Bonding Memories Liquid Adhesive, and dimensional foam tape. I wanted the trees to pop up, but not too much. I thought the foam would be too high, plus it's hard to cut really itty bitty pieces like I needed for some of the trees.

Instead, I cut tiny pieces of cardstock - smaller than the shape I was adhering, and then sandwiched those between the base layer and the cut out. I actually did this in two levels, so some of the trees have just one layer of cardstock, and some have two layers so that stand up a bit higher.


I really liked the mesh border strip also. To stretch it a bit, after cutting it in two 6" strips, I cut one along the center to create two thinner pieces. The thinner ones went above and below the tree border strip, and the other balances that element at the bottom of the card.

There's one more border strip on this card. Can you spot it? It's the red polka dot paper. I freehand cut a heart from it, layering it over another heart cut from chocolate cardstock to use as part of the sentiment.

I loved that pop of red, but I felt like the card needed a little more red to balance it. As so often is the case, a little bit of twine was just the right touch. I added some above and below the tree border strip. I also tied a little around the u, stringing it through that cute little xoxo sticker tag from the miniatures sheet. Just perfect, and it allows me to enter it into this week's Ribbon Carousel Challenge (RCC42 Anything Goes) too. Providential!


Hope you like it. I have at least one more Bella challenge entry up my sleeve....maybe more....

Supplies Used:
Cardstock: CTMH - White Daisy, Olive, Chocolate
Paper: Bella Blvd Winter Wonder Border Strips
Other: Bella Blvd - Ciao Chip Alphabet in Simply Simona Brownie, Winter Wonder Miniatures, Twinery - Maraschino Twine

Monday, February 27, 2012

It's Award Season

I was so humbled yesterday morning when I found out that my little blog had been honored with Brenda Frerichs 'Cute as a Button' award.

Brenda is a fellow Close to My Heart consultant, and though we've never met in person, I am doubly honored because she is such a sweet, gracious, and creative lady. We consultants have a bulletin board where we can exchange ideas and information, and both on those boards and on her blog Brenda is thoughtful, caring, and quick to share. Her words, attitude, and work have been an inspiration and encouragement to me.

As part of this award, I get to gift someone else with the same honor. Let me tell you, this was so difficult. There are so many talented individuals out there whose blogs I follow. I spent a great deal of time deliberating and wondering, and trying to decide who should get the award. It was not an easy choice!

I've decided to send the award to Joelle H. of Scrapbook Snippets
Joelle's work is beautiful. She has a ton of talent and wonderful ideas. I love how polished her stamping is, and how clean and well designed her cards and layouts are. As a testament to her skills - she was recently published in PaperCrafts 365 cards issue.


Joelle, you may take this award and paste it in your blog. And, if you choose, you can give it away to just one lucky person whom you feel deserves a little recognition for his/her paper crafting talent. If you do, please come back here and let us know who you picked so we can visit too.

And another thanks to Brenda, the creator of this award. You made my week!

Sunday, February 26, 2012

TSG Animal Theme Card


Just getting this card in under the wire. This is for this week's TSG challenge which is to create a project with an animal theme. It's also my first time playing along with them.

I'm using TSG's Little Moments stamp set which I was fortunate enough to win a couple months back. The images are so sweet, and even though I'm not a cat fan, I think this one is awfully cute.

I deliberated over the composition for a while. Part of me thinks that it's too stark, but another part of me loves the simplicity of it.

To create the lighting effect, I used a scrap piece of cardstock, and lined it up along the edge of the shade. I used a sponge dauber to add ink along the edge of the scrap piece of paper, shading from the scrap piece in, and from the bottom of the shade down. For the light beams at the top of the shade, I just estimated where I thought the angle should be, and did the same thing. It's a really easy technique that adds a lot to the image.

The papers for the cat and lamp shade are from the retired Dreamin' paper pack and the 'carpet' pieces are from the Stella paper pack.

Another little tip for piecing. Since I overlapped the base of the lamp with the cat image, I added a small piece of cardstock to the back of the cat so that the image sits evenly on the card. The small piece of cardstock doesn't need to match the cat exactly, it's just there for some added stability and to make sure that when you adhere the top piece it doesn't look uneven.

Hope you are enjoying what remains of your weekend!

Supplies Used:
Paper/Cardstock: Dreamin and Stella Level 2 Paper packs, Chocolate and Colonial White cardstock
Stamps: TSG - Little Moments
Ink: Cocoa, Honey

Saturday, February 25, 2012

Carina's Tree Picking Layout


Here's Carina's tree picking layout. The base of this layout is a piece of Olive cardstock, like with Ellie's layouts, but since hers is a single layout, I decided to take a little more time with it and added some stamping. I also used CTMH's Elemental papers on this one.

I cut some thin strips of the cranberry pattern from Elemental to accent the large strip of Cranberry cardstock in the middle of the layout. Similarly, I added a 1/2" strip of Olive cardstock at the bottom of the layout over the Olive patterned paper.

To add a little extra color and definition to the cardstock pieces, I used a direct to paper technique where you just swipe the ink pad against the edge of the cardstock. It provides texture and really defines the edge of the cardstock.

The trees are from last October's Stamp of the Month, Holiday Magic. I stamped some in first and some in second generation. The stickers come from Echo Park's Seasons Greeting collection.


It's a very full page, and I usually like to have a little more white space on the page where the eye can rest, but I like the balance of the layout, and my plan is to pair this layout with one that is a little less full.

Supplies Used:
Paper/Cardstock: Elemental Level 2 Paper Packet, Cranberry, Olive and Colonial White Cardstock
Stamps: Holiday Magic
Ink: Olive, Chocolate
Other: Echo Park - Seasons Greetings Stickers

Thanks for Everything Card


Just a quick post/card to share this morning. This is another card from my March workshop. I find that a lot of my cards are more girly, or at the very least not particularly masculine, so I was trying to create some cards that would work for guys as well.

This card uses the new Cruisin papers which have a travel/retro theme. I really like the argyle print, and added some cranberry cardstock to the mix for a pop of color. The arrow was cut using the Cricut Art Philosophy cartridge.

Hope you're having a great weekend!

Supplies Used:

Cardstock/Paper: Black, Cranberry, and Gray Flannel cardstock, Cruisin papers
Stamps: For Every Occasion, Adventure USA
Ink: Black
Other: Cricut Art Philosophy Cartridge, White Daisy Value Pack Cards/Bases

Friday, February 24, 2012

Flashback Friday 20.0 - First Black and White card


I recently learned about the Flashback Friday Challenge blog. They pick a topic/challenge, and you re-post your first project that fits. This is their 20th challenge and the topic is black and white cards.

I'm at a bit of a disadvantage since I have only been blogging since last June, and after reviewing all my posts have discovered that I have NO solely black and white cards. Apparently I like color.

I'm reposting this card that I made not that long ago....it's not purely black and white, but it's the most black and white that I have right now, and a few other folks have posted cards with a splash of color, so I'm hoping it's OK.

Have a great Friday!

Supplies Used:
Paper: CTMH - White Daisy cardstock; Creative Memories - Black and Cranberry cardstock
Stamps: CTMH - Say it in Style
Ink: CTMH - Cranberry
Other: CTMH - Cricut Art Philosphy Cartridge, Bonding Memories Glue

Thursday, February 23, 2012

Taylored Expressions Sketch Challenge #152


These days I find myself in the enviable position of having more stamps than time! I've had this stamp set for a while, and had planned to play along with the last sketch from TE, but ran out of time, so I was determined to get a card done this go round.

I love TE's Animals in Love series and received a couple of them about a month ago. I thought the whales were perfect for this sketch. All the papers are from CTMH's retired You & Me kit. I've slowly been whittling away at those papers with a bit of a heavy heart because once they're gone, they're gone, but I just couldn't not use them on this one.

The sentiment is from Clear and Simple Stamps Love Cupid set which I received from CSS just last week (many thanks to CSS!). I thought it was just perfect for the image.

It's a pretty simple card, I really didn't deviate from the sketch at all. The stamped image is completely pieced using the You & Me papers. The ovals were cut using CM's custom cutting system. I had planned to use chocolate cardstock for the oval mat, but it didn't look warm enough, so I ended up using Vineyard Berry which I toned down using a sponge dauber with chocolate ink around the edges.

The sentiment is stamped on a 1/2" wide piece of cardstock. The center portion is 1 3/4". I scored on both ends of that center portion, and then at another 1/2" to create the fold. To pop it out, I glued the strip together where that 1/2" overlaps beneath the center portion on each side. Then, when I adhered the entire sentiment strip to the card, I only put adhesive on the ends, and not the center portion. This allows you to move the ends in a smidge so that the center doesn't lie flat. You can play with it and get more, or less, arc in that center piece depending on your personal preference. I also used the sponge dauber with chocolate ink to add some definition to the edges of the sentiment strip. Here's a close up that hopefully shows what I just tried to explain.


Just a couple more days to the weekend!

Supplies Used
Paper/Cardstock: Kraft, Colonial White, Vineyard Berry, You & Me Kit
Stamps: Taylored Expressions - Animals in Love - Whales, Clear and Simple Stamps - Love Cupid
Ink: Cocoa, Chocolate
Other: Kraft borders, Sponge Dauber, Creative Memories custom cutting system

Wednesday, February 22, 2012

Peeps Window Card


A simple card to share today using the 'My Peeps' stamp set.

The base for this card is one of CTMH's value pack cards. I cut the window using the Cricut Art Philosophy cartridge and the cricut 'Centerpoint' function. Although using the centerpoint function requires a little bit of math, it's easy to do (you could also just eyeball it, but I'm a little picky about these things).

Depending on the size of your card, figure out what the center point is. So, for a 4 1/4" x 5 1/2" card, the center point would be at 2 1/8" x 2 3/4". Place your card at the top right corder of the mat and load. My expression doesn't always load the card at the exact corner, so you will have to estimate here. If the edge of card loads past the blade's starting point, then you'll want to add a little to the length/width. But, the screen will show you the position of the blade, use those numbers as a guide and add 1/4" or 1/8" as necessary.

For this card, I cut the initial opening at 3" and then I cut the frame a 3 1/4". Making the frame larger allows you to adhere it to the front of the card, otherwise it would just sit inside the opening. This also allows gives you a little wiggle room....if the opening on the card itself is a little off-center, you can cut the frame even a tiny bit larger, and center it to hide that error.

For a more finished look, cut two frame pieces and put one on the inside of the front of the card. I also used a sponge dauber to add a little ink/shading to decorative edge of the frame to make it stand out some more.

For the inside of the card, I stamped and cut out four peeps. The grass is a Taylored Expressions die. To position the inside elements, I placed the grass die cut down first. The die is about 8", so it hangs off either side of the card. Once I got it where I wanted it, I lightly marked the edge with a pencil. I also lightly marked the edges of the opening, so I could keep the peeps in the window.

Then I adhered all the pieces and added the sentiment.

It's really an easy card to make, and a great way to get acquainted with the centerpoint function on your Cricut.

Note: This is one of the cards we'll be making at my Card Workshop March 10th. If you're in the Northern Virginia area, and interested in attending, please contact me directly.

Supplies Used
Cardstock: Cotton Candy, Sweet Leaf, Buttercup
Stamps: My Peeps
Ink: Black, Honey
Other: Cricut Art Philosophy Cartridge, Sponge Dauber, Taylored Expressions Grass Border Die

Sunday, February 19, 2012

Starting the Christmas Layouts - Tree Picking and Trimming for Ellie


It's mid-February and I'm finally getting around to scrapping our Christmas photos. I've got older stuff to scrap, but Christmas is what I'm in the mood for, so Christmas is what I'm scrapping (one of my scrapbooking resolutions for this year).

Since I'm not ready to go digital, and I have not one, but two girls to scrap for, I'm experimenting with the level of detail/time required for a layout. I still want to be able to have fun pushing myself, trying new things, and creating some of those detailed/labor intensive spreads, but they can't all be like that. So, I am working on finding that delicate balance between lots of labor intensive work and taking the help where I can get it.

The patterned papers and stickers are from Echo Park's Seasons Greetings collection which I was fortunate enough to have won back in December. I haven't used a lot of stickers in my scrapbooking in the past, but I'm sold. I love stamping on my layouts, but it takes time to figure out what to stamp, then to actually stamp/cut out, etc. Using embellishments from a collection really simplifies and speeds up the process.

I'm working on a similar layout for Carina using the same papers, which I hope to have ready to share later this week. Hope you are enjoying the long weekend, and getting to do some scrapbooking of your own!

P.S. in case you're wondering, we didn't clone Ellie, that large picture at the bottom right is actually two put together, but I love the way the image works as a whole, and it really reflects the motion and the mood of the event. Ellie was literally dancing around the tree when we were decorating.

Supplies Used
Paper: Echo Park Seasons Greetings papers; CTMH Olive, Cranberry, and Colonial White cardstock
Other: Stickers - Echo Park Seasons Greetings collection

Friday, February 17, 2012

Just for You cards


I created this card last month using the new Stella papers and Just for You stamp set. It's one of the cards we'll be making at my workshop next month as well as at a card workshop I'm holding for my mother-in-law this weekend.

I wanted to highlight how versatile the Just for You stamp set is, so I used the same card design, but substituted papers from the Pemberley and Roxie Level 2 paper packs to create two additional cards.


I was having so much fun, I created one more card using just cardstock. The stem/leaf piece was cut using the Cricut Art Philosophy cartridge and sanded just a touch to add some texture and interest. I love how one stamp set can take on such different moods/looks depending on how you use it.


What do you think? Which do you like best?

Supplies Used (all cards use the Just for You stamp set):
Card 1 - Stella Level 2 Paper Pack, Cocoa, Lagoon, Tulip, and Olive inks, Colonial White card base.
Card 2 - Pemberly Level 2 Paper Pack, Outdoor Denim, Honey, Desert Sand, and Pacifica inks, Colonial White card base.
Card 3 - Roxie Level 2 Paper Pack, Black, Desert Sand, Smoothie, and Sorbet inks, Colonial White card base.
Card 4 - White Daisy, Black, Topiary and Creme Brulee cardstock, Black and Cranberry inks, Cranberry Grosgrain ribbon, Sanding Kit, Cricut Art Philosophy Cartridge

Monday, February 13, 2012

CAS-ual Fridays Paper Piecing Card


I recently received Sweet Stamp Shop's The 'Core' of it stamp set from LizScraps for one of her birthday blog candy giveaways. She still has two more giveaways planned, so you want to head over to her blog to check it out.

I was pretty excited since this is one of the sets from SSS that I don't yet have and have been wanting to get, and it's just perfect for this week's CAS-ual Fridays challenge.

I wanted to create the idea of movement/progression of time in this card, so you go from the whole apple, to one with a slice taken out, to just the core. The first two apples are created using the same stamp, I just wiped away the ink on the inside portion of the stamp that has the slice.

I never thought that I would, but I actually love paper piecing. It's time consuming, and slightly tedious (especially when you're cutting out stuff like seeds), but a great TV watching activity and I love how the pieces look when they come together.

Thanks for stopping by. Hope your week is off to a good start!

Supplies Used
Paper/Cardstock: Bazzill - Red; Echo Park - Seasons Greetings; Creative Memories - Black; CTMH - Topiary, Chocolate, White Daisy
Stamps: Sweet Stamp Shop - The 'Core' of it
Ink: CTMH - Block
Other: CTMH - Bonding Memories Adhesive

Sunday, February 12, 2012

Argyle for Play Date Cafe


I loved this week's color combination at Play Date Cafe, and knew I wanted to play along, but wasn't exactly sure what I wanted to do. So, I cut a bunch of little squares from some scraps, started moving them around into different configurations, and this is what happened.

The squares were tacked down with a tiny bit of Bonding Memories adhesive before I did the sewing. I love how this turned out, and it was surprisingly easy to do. The most tedious part of the process was tying off and hiding all the loose threads, but the actual sewing part was quick and easy.

The sentiment is from Paper Smooches' Hot Concoctions set and since argyle evokes images of socks and sweaters, I thought it was appropriate (plus after an oddly warm winter, it has been CHILLY here the last couple days).

Hope you are all staying warm and enjoying what remains of your weekend!

Supplies Used
Cardstock: CTMH - Moonstruck, White Daisy; CM - Turquoise, Yellow
Stamps: Paper Smooches - Hot Concoctions
Ink: Pacifica
Other: CTMH - Bonding Memories adhesive, 3-D Foam; Sewing Machine

Saturday, February 11, 2012

Mojo Monday 227


I haven't played along with the Mojo Monday sketch in a while, but when I saw this week's I knew exactly which stamp set I was going to use.

I just love the notebook paper stamp that is part of Verve's Blue Skies set and thought it would be perfect here. When I stamped the image, I had a little bolt of lightening. CTMH's new Card Word Puzzle set has 57 words on it that you can use to create all sorts of phrases, and the words are exactly the right size for the notebook paper.

After that, the card just started to come together. The 'ribbon' is actually off-white grosgrain that I got from Michael's after Christmas. This is an idea that I got from Laurie Schmidlin, where you fray the ribbon to undo it. It was also a great way to use the grosgrain since it actually has a snowflake pattern on it. The pattern still shows up after you fray it, but it's much lighter and less distinct. I actually used the backside of the ribbon to soften it even further.

The oval and frame for the sentiment are cut using the Cricut Art Philosophy cartridge, and the papers are from Echo Park's Times and Seasons collection.

I used Twinery Denim twine on the large and medium buttons (for the medium ones just two strands), and off-white thread on the small ones. This is actually the most buttons I have ever used on a card, so I'm not quite sure if I overdid it or not.

This card is a little out of my comfort zone. It's a little more dimensional than I usually do, and the patterned paper on the bottom is a little busier than my norm, but I'm pretty happy with how it turned out.

Hope you enjoy it and are having a wonderful and relaxing weekend!

Supplies Used
Paper/Cardstock: Echo Park Times and Seasons, CTMH bamboo cardstock, CM navy blue cardstock
Stamps: Verve Blue Skies, CTMH Card Word Puzzle and Happy Clusters (heart)
Ink: CTMH Outdoor Denim
Other: Michael's Printed Grosgrain Ribbon; CTMH Kraft Buttons, Art Philosophy Cricut Cartridge, Dimensional Foam Tape, Liquid Glass; Twinery Denim Twine

Wednesday, February 8, 2012

Valentines with Ellie - 2012


One of my favorite developments over the last six months is Ellie's new found interest in doing arts and crafts. Last year at this time arts and crafts mostly consisted of her taking a stack of white paper, scribbling a few lines on one, and moving onto the next piece of paper.

These days she's so much more coordinated. She loves to do projects. She has a great fondness for scissors, but is only using them on paper now and not her hair. She can color in the lines, and draws lots and lots of pictures of our family.

Last year she helped with her school valentines treats. We got the store-bought ones, Dora the Explorer. I labeled them, she added some extra color, and then helped to stuff the bags.

This year, since she is so into all things crafty, I wanted to do something more ambitious.

It involved my trusty Cricut, my new toy (5" creative station courtesy of Beth Kingston/Xyron - thanks Beth!),


and Pinterest. I found this idea on Pinterest and wanted to do something similar.

I pulled out my Art Philosophy cartridge book and flipped through settling on Flower 8, which I thought was perfect since the petals resemble hearts. I cut the flowers at 3" and then a bunch of hearts at 1". I ran the hearts through my new Xyron to create this lovely carpet of heart stickers.


I used Leaf 4 from the AP cartridge, cut at 4 1/2". The sentiment is two stamps from Say it in Style. It's a little bit large, and if it was just for me, I would have cut them a little smaller, but since Ellie was going to be doing all the writing, I thought she could use a little more space.


If you have a gypsy, you can add a little circle in the center of the heart and corner of the leaf for the lollipop stick - it needs to be bigger than the stick so it can make it over the wrapper. I don't have a gypsy yet, so I just used my piercing tool to approximate the center and then pierce a circle around it, it really doesn't have to be exact. (I tried using my hole punch, but it wasn't long enough to get in there....a cropodile would work well too.)


We had a GREAT time making these, and Ellie is SO excited to take them into school next week. I picked up this little metal bucket and a styrofoam ball at Michael's the other day, so this is how she's going to be taking them into school.


This was so easy to do, with just a little bit of prep time. If you have more time or your kids are older, you can always add some additional stamping to the mix, but this was just the right level of effort for us this year.


Supplies Used
Cardstock: Recollections, various colors
Stamps: Say it in Style
Ink: Black
Other: Xyron 5" Creative Station, Cricut Art Philosophy Cartridge, Piercing Tool

Saturday, February 4, 2012

Second Charlotte Layout


Here's the second layout from our outing to Charlotte. I used the same papers as on the first layout, and also mimicked to some extent the way the pages were laid out with the large strip of patterned paper running all the way across the two pages.

I did want to distinguish the layouts though, so instead of using that strip of pennants, I pulled out my Creative Memories 12" Custom Cutting tool and used that to cut the curved pieces of cardstock. The negative and positive curves that were created are then layered to create that wavy border. On the back layer of waves, I used a spray pen with Twilight reinker. I wanted a very fine mist, so rather than spraying directly onto the cardstock, I sprayed over it.


I also continued to experiment with using my sewing machine on this layout. This time, I wanted to try using a zigzag stitch. I wasn't sure how it was going to look, but I really like the results.


Thus ends scrapbooking week. I want to do a better job of working on cards and layouts at the same time, and my goal is to be able to churn out more than two layouts in a week. It's always difficult to find that balance. Hope you are having a great weekend. Me, I'm hoping that Carina doesn't decide to wake up at 5 in the morning again....

Supplies Used
Paper: CMTH - Bamboo cardstock, You & Me Papers; CM - Maroon, Blue and Sand cardstock
Ink: Twilight Reinker
Other: Cricut Art Philosophy and Wild Card cartridges; Spray Pen, Sewing Machine; corner rounder