Showing posts with label CAS-ual Fridays. Show all posts

Monday, April 29, 2013

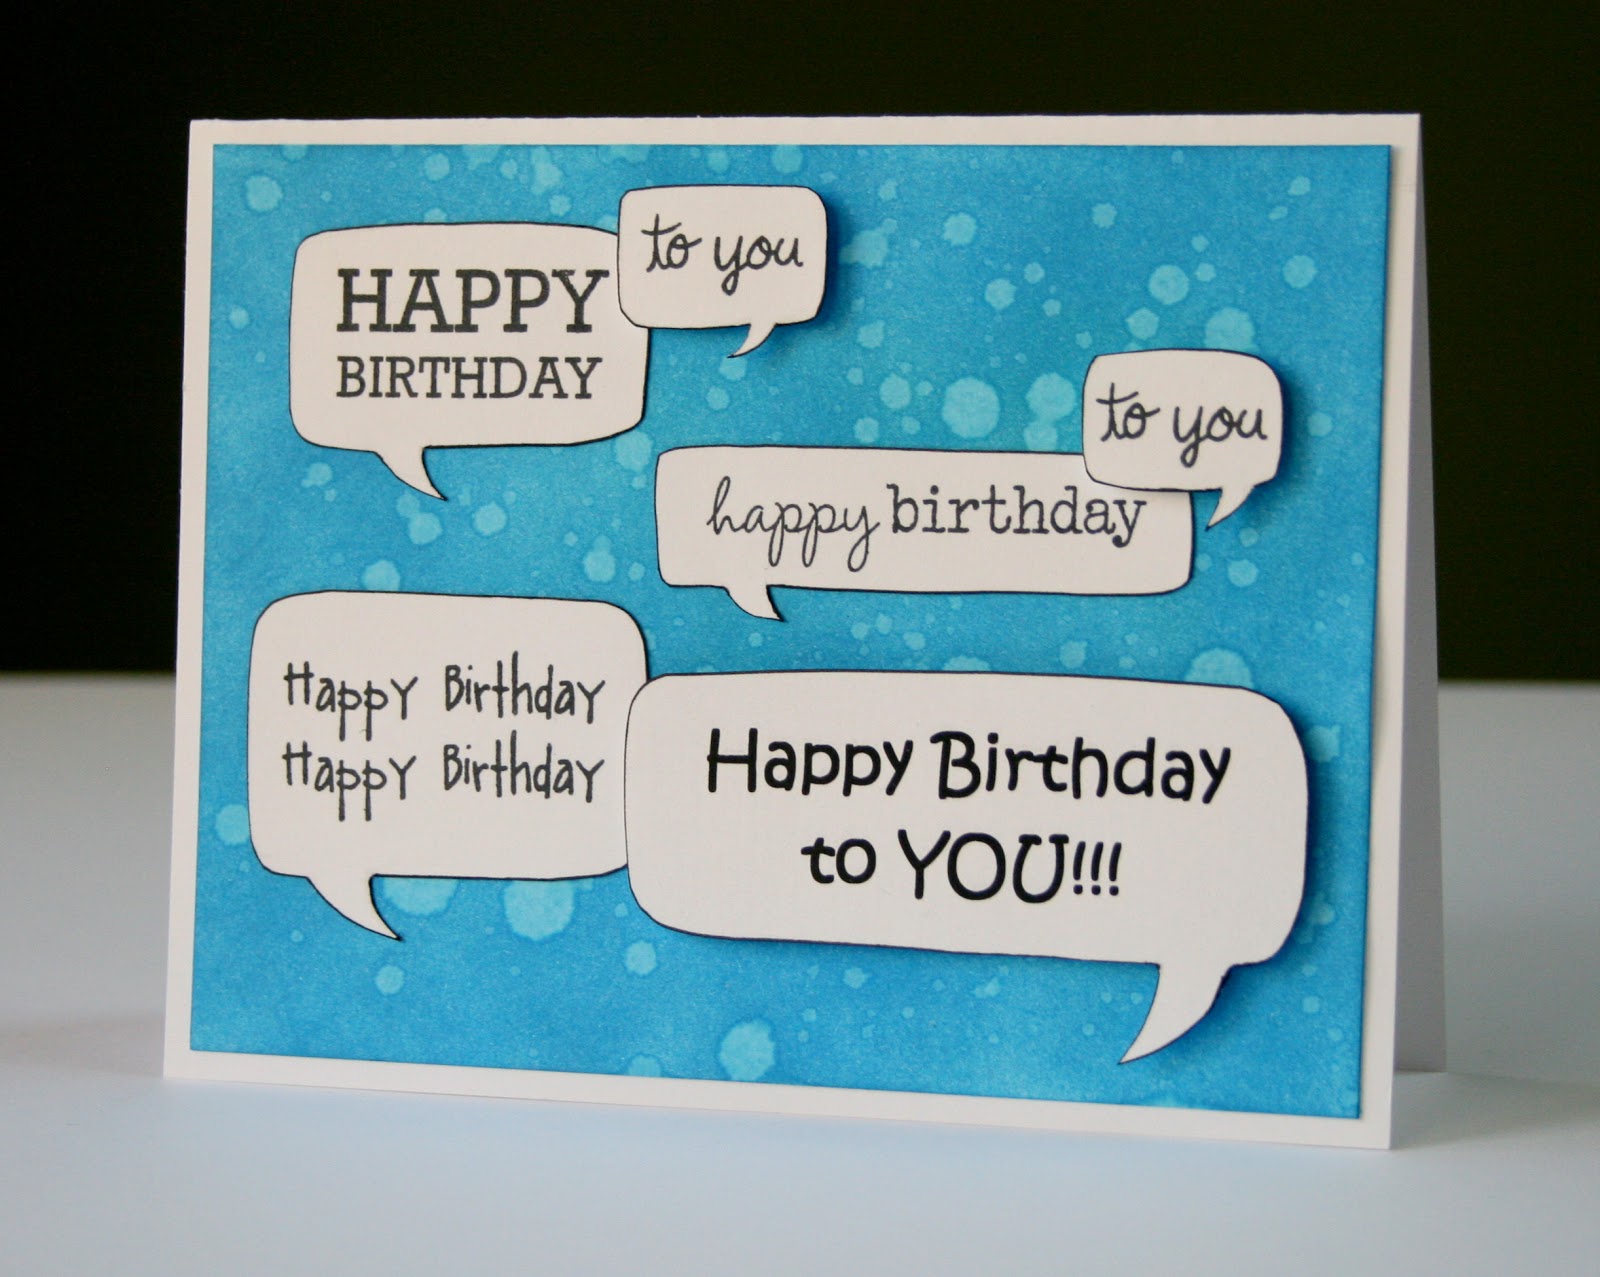
Happy Birthday to You! For CASual Fridays and Simon Says Stamp


Popping in quickly to share a birthday card for CASual Friday's Birthday Bash challenge.  I'm also linking up at Simon Says Stamp for Anything Goes week.

This one makes me sing ;)

For the background I used Salty Ocean distress ink, and then flicked water on it.  Easy, but such a fun effect.

The word bubbles were all hand cut.  You could always use dies/die cuts, but I kind of like the more organic look for this one.  The sentiments are from a variety of sets, and the last one was actually done on the computer.  I used the edge of a Zig marker to get the outline around the edge of the bubbles, and popped a couple out for dimension.


Hope you had a good start to your week! 

Supplies Used
Paper/Cardstock:  CTMH - White Daisy
Stamps:  Waltzingmouse - Half Pint Heroes; Avery Elle - Blooming Banner; Lawn Fawn - Check This Out; Jane's Doodles - Just Dad; Digital Sentiment using Kristen ITC font
Ink:  Distress Inks - Salty Ocean; Memento - Tuxedo Black
Other:  CTMH - Dimensional Foam Tape; Tombow - Mono Adhesive; EK Success - Black Zig marker


Monday, December 3, 2012

Glory to God Tag


Glory to God is one of my go-to Christmas sets.  I love the images:  they are classic, and reflect the reason for the season

I'm linking this tag up with this week's CASual Friday's tag challenge.

It's an easy tag to create and mass produce.

The tag was cut using the Cricut Art Philosophy cartridge.  I embossed the sentiment/star with clear embossing powder, and the sponged Pacifica ink over the tag until I got the saturation that I wanted.  Then I stamped the wise men in Cooca.  The twine is Maya Road.

Hope that your week is off to a good start!

Supplies Used
Paper/Cardstock:  CTMH - White Daisy
Stamps:  CTMH - Glory to God and Pear & Partridge cardmaking kit stamp set
Ink:  CTMH - Pacifica, Cocoa; Versamark
Other:  CTMH - Clear embossing powder, Cricut Art Philosophy Cartridge; Maya Road - Slushie Blue Twine
 

Sunday, October 14, 2012

Trust in the Lord With All Your Heart


Quick post today to share this card for Unity's monthly challenge which is to create a project with a pennant/banner, and for CAS-ual Friday's challenge to use hearts on your project.

I'm using the Trust With Your Heart Itty Bitty.  There's this great little row of hearts, within the stamp.  I wanted to make a little banner with them, so I masked the stamp with tape and stamped it.  Then I stamped again to get the hearts.

I colored the hearts with my watercolor pencils (using Cranberry and Holiday Red) and then cut them out.

It was a little tricky to create the banner - used my Tim Holtz Tiny Attacher - just need a steady hand.  Then I added a little dimensional foam tape under the hearts.


Actually a relatively simple and quick mini card (finished size is 3" x 3").

Have a great end to your weekend!

Supplies Used
Paper/Cardstock:  CTMH - White Daisy and Cocoa cardstock
Stamps:  Unity - Trust With Your Heart Itty Bitty
Ink:  Cocoa
Other:  CTMH - Watercolor Pencils; Dimensional Foam Tape, Liquid Glass; May Arts - Burlap Twine; Tombow - Mono Adhesive; Tim Holtz Tiny Attacher

Monday, May 7, 2012

Deconstructed Birthday Card for CASual Friday, Simon and Love My Tapes


I've been wanting to try our both the Deconstructed Sketches and Simon Says Stamp Challenges for a while now, and this week provided a perfect storm of challenges for me.  The challenges at Simon Says Stamp, CAS-ual Friday, and Love my Tapes are all birthday related, and you can see the Deconstructed sketch above.  Here's my take on the sketch:


When I saw the sketch, I immediately thought of candles, but I wasn't quite sure what to use for them.  I considered paper and washi tape, but when I saw this ribbon (which came in an Express the Moment bulk ribbon sale bundle) I was sold.  The ribbon is 1/2" wide, so I cut pieces of cardstock 3/8" to adhere the ribbon to and so I could just fold the top and bottom over to get a finished look.

The flames as well as the bracket/oval/letters were all cut with the Cricut Art Philosophy cartridge.  The flames are actually a leaf shape.  I cut them from Buttercup cardstock and then used my blending pen with Honey and Goldrush ink to add shading.


Normally, when I think of CAS, I think it's got to be a white card, but I really wanted to amp up the color on this card, so I used that great turquoise cardstock.  I love how saturated the colors on the card are.  What do you think?  Still CAS?  I'm kind of on the fence, but I'm gonna link it up at CAS-ual Friday's and see what they think.

I know I promised another layout, and it's coming.  Tune in tomorrow to see it.  Have a great night!

Supplies Used
Cardstock:  CTMH - White Daisy, Black, Buttercup; CM - Turqouise
Ink:  Honey, Goldrush
Other:  Ribbon from Express the Moment bulk bundle; CTMH - Cricut Art Philosophy Cartridge, Blending Pen, Bonding Memories Adhesive; 3L - Small Dodz, Black adhesive foam; Tombow adhesive runner

Wednesday, March 21, 2012

CAS-ual Fridays 1-2-3 Challenge with CSS


This week's challenge at CAS-ual Fridays is a 1-2-3 challenge: create a project using a pattern, an image, and a sentiment. Clear and Simple Stamps is the sponsor. I recently won their Love Cupid set and wanted to ink it up and play along.

I stamped the cupid (which has a pattern on it, but I didn't know if you could double count something, so I'm also using a patterned paper), and then used my paper trimmer to cut from the top and bottom just down to the image. Using my cutting knife, I then did the delicate trimming around the cupid image...LOVE my cutting knife, gives me a ton of control and the confidence to cut out even the tiniest areas (like the inside parts of the bow) without worrying about slipping.

The sentiment/frame are also from the Love Cupid set. That piece I just cut using my CTMH scissors which are also great for precision cutting.

Once I had those pieces completed, the card came together very quickly. I was originally going to put the cocoa and white pieces right up against each other, but when I was assembling it, I liked seeing that bit of the patterned paper peeking through, so adjusted the design a little.

Thanks for stopping by, hope your week is going well!

Supplies Used
Paper/Cardstock: American Crafts Hollyday Whiskers paper; CTMH - Cocoa and White Daisy cardstock
Stamps: Clear and Simple Stamps Love Cupid
Ink: CTMH Cocoa
Other: CTMH - Cutting Knife, Scissors, Bonding Memories Adhesive

Monday, February 13, 2012

CAS-ual Fridays Paper Piecing Card


I recently received Sweet Stamp Shop's The 'Core' of it stamp set from LizScraps for one of her birthday blog candy giveaways. She still has two more giveaways planned, so you want to head over to her blog to check it out.

I was pretty excited since this is one of the sets from SSS that I don't yet have and have been wanting to get, and it's just perfect for this week's CAS-ual Fridays challenge.

I wanted to create the idea of movement/progression of time in this card, so you go from the whole apple, to one with a slice taken out, to just the core. The first two apples are created using the same stamp, I just wiped away the ink on the inside portion of the stamp that has the slice.

I never thought that I would, but I actually love paper piecing. It's time consuming, and slightly tedious (especially when you're cutting out stuff like seeds), but a great TV watching activity and I love how the pieces look when they come together.

Thanks for stopping by. Hope your week is off to a good start!

Supplies Used
Paper/Cardstock: Bazzill - Red; Echo Park - Seasons Greetings; Creative Memories - Black; CTMH - Topiary, Chocolate, White Daisy
Stamps: Sweet Stamp Shop - The 'Core' of it
Ink: CTMH - Block
Other: CTMH - Bonding Memories Adhesive

Sunday, November 27, 2011

Card for CAS-ual Friday and Ribbon Carousel (RCC30) Challenges


I'm so excited to share this card with you!

I had a great time creating it...it was a bit of an 'aha' moment for me.

A few months ago a won some clear Hero Arts stamps from the Simon Says Stamp blog. I've been waiting for just the right time to use them. The stamps I won were a promotional set that contains images from several different stamp sets, but I did a quick search on Hero Arts' Holiday catalog, and the ornament is included in the 'Decorate Your Holidays' stamp set. I didn't see the sentiment in the Holiday catalog, but there are plenty of sentiments we all have that would be appropriate.

This is really a simple, easy card to make, just takes a little care in the doing.

I stamped the ornament on a piece of white cardstock. Then I cut a strip of cardstock the same width as my grosgrain ribbon (3/8") to use as a guide. I made sure everything was square and marked the top and bottom of the guide on the edges of the ornament. Using my cutting knife, I carefully traced around the ornament (on the inside of the border line) between the hashmarks. Then I fed the ribbon through. You need to be careful in doing this so that you don't tear the slit. Then I threaded through the twine, and secured both to the back of the cardstock using my tombow.

Really easy!

For the bottom piece, I first stamped the sentiment. Then I ran the tombow over my twine so I could shape it onto the cardstock, and followed up with some Liquid Glass at a few points to make sure it was secure. The white pieces of cardstock were mounted onto Cranberry cardstock using dimensional foam tape, and then those pieces were secured to the card base.

I love the look of this card, and am planning to use this technique a lot more.

Thanks for stopping by!

Products Used:
CTMH - Cranberry Ink, Cranberry and White Daisy Cardstock, Cranberry Grosgrain, Dimensional Foam Tape, Cutting Knife, Liquid Glass
Hero Arts - Decorate for the Holidays stamp set, miscellaneous sentiment stamp
Twinery - Maraschino twine

Monday, November 7, 2011

Embellish Die Cut and CAS Over the Edge Card


I've been mulling this card over in my brain for some time, and finally had the opportunity to create it this week. In addition to shapes, letters, borders, cards, envelopes, and boxes, the Cricut Art Philosphy cartridge has a number of rolled flowers you can make.

I haven't actually made any of those yet, but I just love the shape of the die cut before it's rolled. There's something very graphic and beautiful about the swirls, and I wanted to showcase those in this card.

To create the background, I loaded some Petal paper into the Expression, and moved the blade in from the edge to cut the first spiral shape. I cut three of these shapes out, moved the blade a little each time to get a random pattern, and I varied the size from 1 1/2" to 2".

I then cut three corresponding spirals from White Daisy cardstock. These were adhered to the petal cardstock. The large 2" spiral I actually used three times since each time I only used a portion of it since it was on the edge/corners.


It's hard to tell from the photo, and you can see it a little better here, but the play between negative and positive cut outs makes for some interesting texture/dimension to the card.

Then I just added a little flag/pennant with sentiment and a little twine. This is the first card I've made that's 'over the edge' and I do like the look of it.

I'm really pleased with the abstract pattern that I was able to create using this shape, and encourage you to take a look at the different shapes on your cartridges and consider out of the box ways to use them too.

CTMH Supplies Used:
Stamps: Pair a Phrase
Paper: Petal, White Daisy, Desert Sand, Topiary
Ink: Topiary
Other: Hemp, Cricut Art Philosphy Cartridge

Wednesday, October 26, 2011

Card for CAS-ual Friday and Play Date Cafe


I had so much fun putting this card together (probably because it involved getting to use the Cricut and my AP cartridge)!

Most of my projects of late have involved fall/Christmas colors, so it was nice to break out of the box a bit and think in a different color palatte -- thanks Play Date Cafe!

The CAS-ual Friday challenge for this week involved adding color to a stamped image. I chose to use my trusty blending pen. I just LOVE the blending pen! It's such an inexpensive way to have the whole rainbow at your fingertips (or at least the part of the rainbow that you own in ink pads).

Hope you enjoy it!

CTMH Products Used:
Stamps: Celebration stamp set that came with the AP cartridge, Solos '9'
Ink: Smokey Plum, Honey, Olive
Paper: Smokey Plum, Honey, Olive, White Daisy
Other: AP Cartridge, Blending Pen

Monday, October 10, 2011

You put a song in my heart, card for SSD and CAS-ual Friday


This week I decided I would play along with the Skipping Stones Design challenge. The card also works for this week's CAS-ual Friday challenge which was a tribute to Operation Julie's Smile, an amazing blog hop to raise money for Julie Ranae.

I actually printed out the sentiment on the front of the card (the inside is stamped and says 'and a smile on my face'). This is the first time I've tried doing that, and it was easy and quick. I used Brenda Frerich's cloud technique on the paper with the sentiment (http://brendafrerichs.blogspot.com/2011_08_01_archive.html), and on the mat I just sponged a piece of white cardstock until I got the color I was looking for.

The tag was cut with the AP cartridge (2") in White Daisy and Kraft, using just the top and bottom of the tag as accent pieces for the tag. And I used my trusty Blending Pen to add a little depth to the birdie.

Hope you enjoy it. More Christmas cards tomorrow!

CTMH Supplies Used:
Stamps: Hot Diggity
Ink: Twilight, Black, Chocolate
Paper: White Daisy, Kraft
Other: Blending Pen, Cricut Art Philosophy, Hemp, 3-D Foam tape

Monday, September 26, 2011

Four in One Card


I have another card for you today. It's for my grandfather-in-law and I'm entering it into three challenges. I love it when things come together like that!

The Heart2Heart Challenge from three weeks ago was a die-cut challenge, a perfect way to practice with my new Cricut and AP cartridge; this week's Mojo Monday challenge is a sketch challenge featuring rectangles and squares; and this week's CAS-ual Fridays challenge is to use three shades of a monochromatic color plus brown.

I knew that I wanted to use some frames cut with the Cricut, and that easily lent itself to the Mojo Monday sketch challenge. Since I'm just getting used to the Cricut, I often end up thinking that the size I'm entering is the reverse of what I end up cutting, i.e. I enter 2" because I want the rectangle to be 2" tall, and instead it is 2" wide. This ended up working out well for this card since I ended up with a number of frames/shapes that I could layer until I got the look I wanted.

It's a simple card, and one you could easily make using scraps. For the two top frames, the Cricut shape I wanted to use originally didn't have the right dimensions, so I ended up just cutting the square and rectangle with the trimmer, and using a single hole punch to round the corners, a trick I saw just today here: http://danieladobson.blogspot.com/.

Thanks for stopping by!

CTMH Products Used:
Ink: Outdoor Denim
Stamps: Say it in Style, Notice the Details
Paper: Colonial White, Indian Corn Blue, Lilac Mist, Chocolate