Showing posts with label Origami Map. Show all posts

Monday, November 16, 2015

The 25 Days of Christmas Tags


I'm happy to be participating in Tracey McNeely's 25 Days of Christmas Tags event.

Today some of the Neat & Tangled and Little Tangles DT members are sharing tags.

I really enjoy making tags, and once I got started, it was hard to stop!  I ended up with three.


I used the new Classic Tag 1 die for each of these.  For this first one I clear embossed Origami Map on  a tag cut from watercolor paper.  The map was colored with Inktense pencils using a pencil to brush technique (where you just pick up color directly from the pencil using a paintbrush).


The embossing was ironed off, and then the sentiment, using Christmas Journaling and Bible Journaling Companions was stamped using Versafine and clear embossed.  I used Kuretake gold paint to color in the Joy.
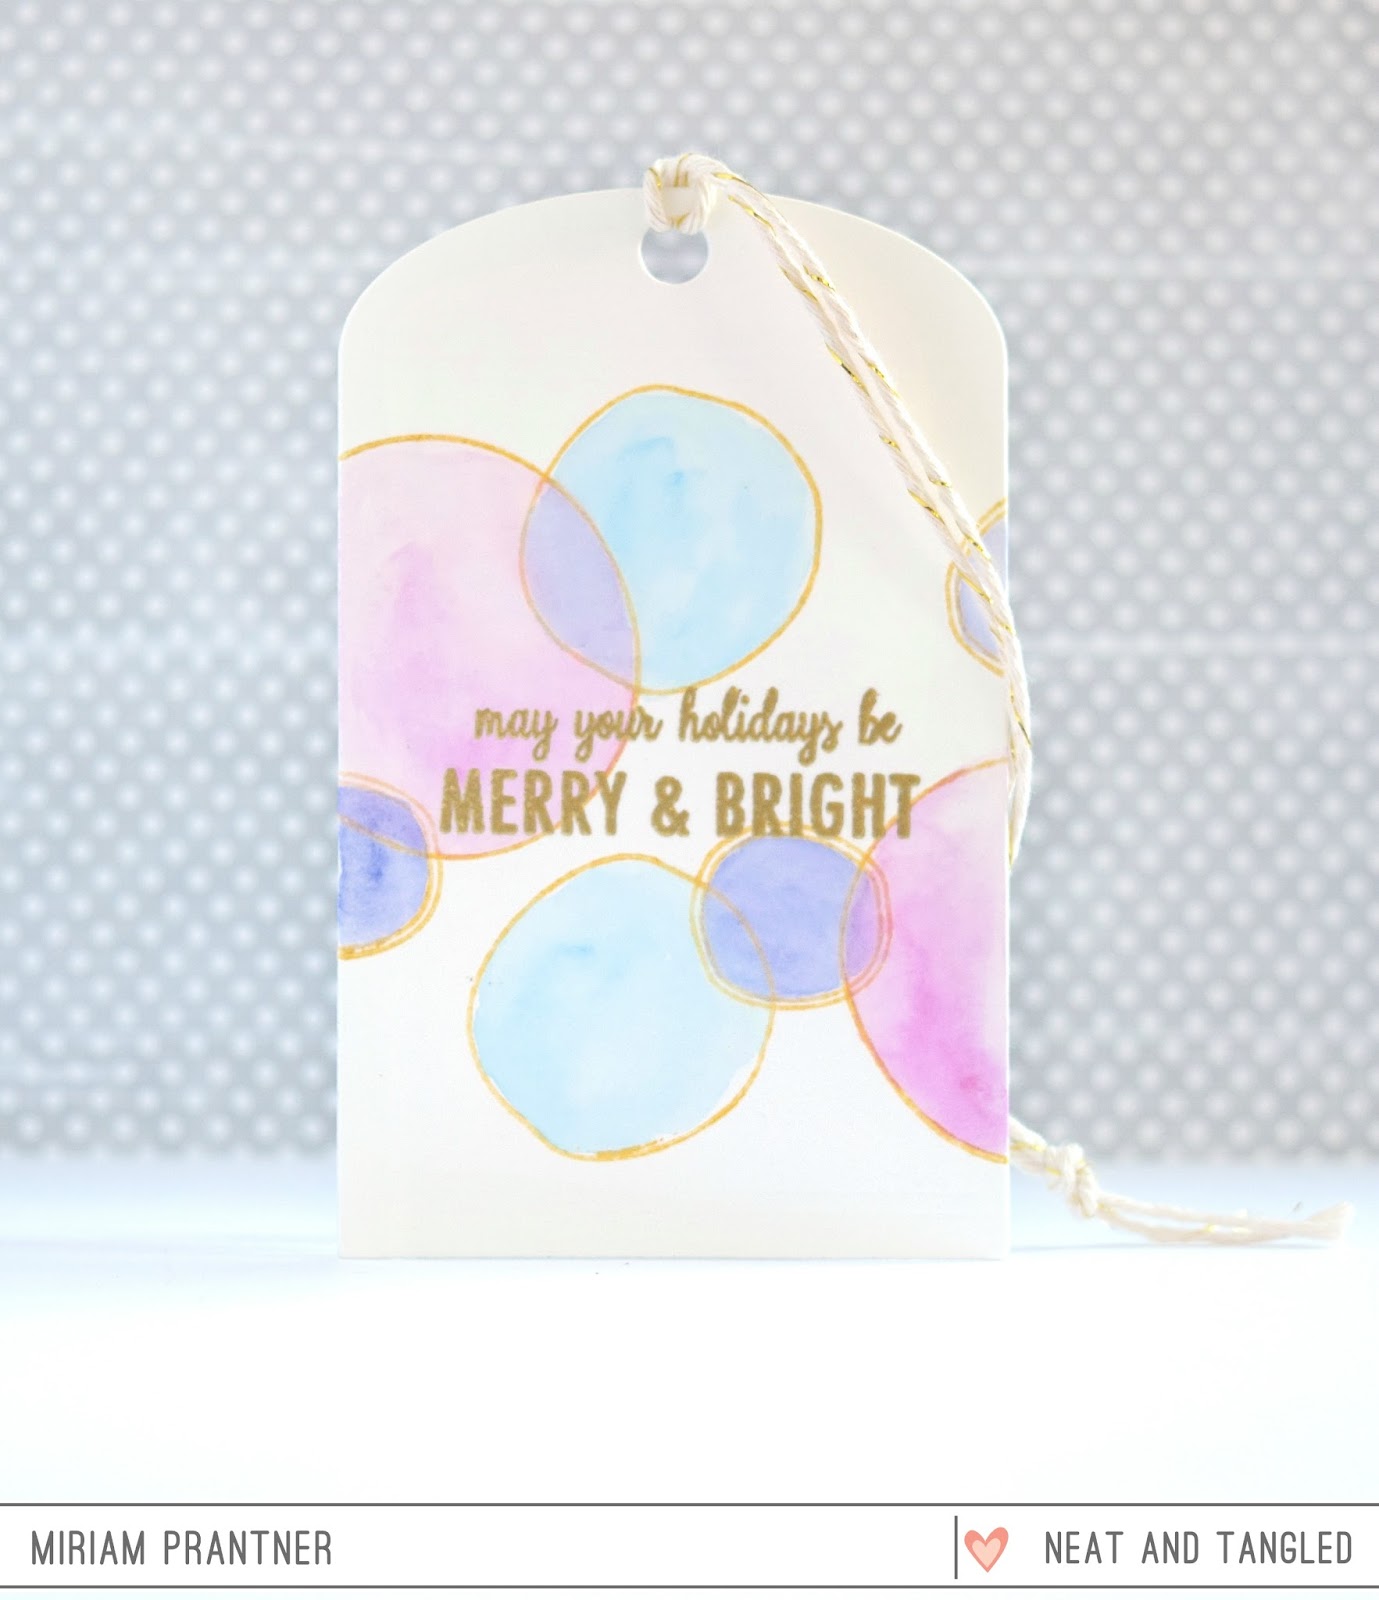


Next up a super simple tag design that is perfect for mass producing and easy enough for your kids to help.  I used watercolor paper again, and randomly stamped the circles from Dala Horse in Delicata ink.  The circles were watercolored with Inktense pencils again using the pencil to brush technique.


The sentiment is from Bright Baubles and embossed in gold.


Finally, I had to pull out the Dala Horse Dies.  I created a tag for the N&T release with the Dala Horse stamp set here, but I wanted to show how perfect the dies are for Christmas too.  This was pretty simple.  The tag was die cut from a panel created using the Graduated Stripes Cover Plate.

The Dala Horse was popped up with some foam tape and then the sentiment, from Happy Holidays, was added.


Hope this gives you a few ideas for Christmas.  Be sure to stop by the Neat & Tangled blog, Danielle has a tag up there, and of course stop by Tracey's blog as well.  There are a whole lot of sponsors for this event.  You can leave comments on her 25 Days posts to enter as well as link up a tag.  Good luck!

Monday, July 6, 2015

I Would Travel the World With You


I'm up over on the Neat & Tangled blog today sharing this card.

I was in the mood to watercolor a bit, so I pulled out Origami Map.

The map image was clear embossed and then I colored it in with Distress Markers.  I used two shades of green for the land masses:  Mowed Lawn and Forest Moss, blending them with a water brush.

I also used a very light application of Stormy Sky for the water.


Once the watercoloring was complete, I removed the embossing with some printer paper and an iron, and then stamped the sentiment in Versafine.

Quick post today, there's lots going on as I'm getting ready for Neat & Tangled July Release Week next week.  I've got a couple new things in this release that I'm really excited about!

Tuesday, April 14, 2015

Neat & Tangled / The Cut Shoppe Blog Hop


This week Neat & Tangled is hopping with The Cut Shoppe.

I must confess that I have sorely neglected my Silhouette the last several months, so I was excited to dust it off and pull it out to create some cards.

We were able to select several files to use for this week's collaboration.  I really love background cut files, and one of the great things about the Cut Shoppe is that you get the backgrounds in both 12" x 12" and 8 1/2" x 11" formats.  The 8 1/2" x 11" is perfect to create card backgrounds.

I've got carried away and ended up with three projects to share today.


This first card features the Geometric Graffiti background.  I cut the background, and then leaving it intact on the cutting mat stamped the Origami Map image.  I then used ink blenders to apply a rainbow of colors to the design.

The map image was then stamped onto a card base.  Then I started removing the die cut triangles and adhering them to the card base by lining up the stamped images.

The sentiment was embossed on a black strip of cardstock and popped up over some bits of vellum and punchinella.


My second card uses the Hip2BSquare background.  Again I used the 8 1/2" x 11" version shrinking it down to A2 size.  Once it was cut, I removed the cut from the sheet leaving the negative pieces intact.

I used my detail scissors to snip out a frame/opening within the die cut.  I placed the altered die cut over my cardstock panel and lightly traced around the opening with a pencil.  Then I removed the die cut piece and stamped around the opening with the large solid flower image from Paper Cut Flowers using several colors of ink.  I also stamped a sentiment from Paper Cut Flowers.


The die cut piece was then adhered to the stamped panel.  For some extra interest, I removed some of the negative cuts and colored them using the ink pads I used for the stamping and then placed them into the die cut background.


My last card is very CAS.  The focus is the Hope Anchors stamp and Arrows with Attitude Background die cut.  I simple die cut the background and just tacked it down a bit on the card base.  

The sentiment was embossed on some vellum and the then stitched to the card base/die cut.  I didn't actually use any adhesive on the vellum as I wanted it to kind of float over the die cut piece.


A few Crystal Clear sequins finished it off.

OK, you definitely want to head over to the Neat & Tangled and Cut Shoppe blogs.  There are prizes to be won, all you need to do is leave comments on both blogs all week, so make sure you check in each day.

Tuesday, February 17, 2015

Neat & Tangled and Cosmo Cricket


Neat & Tangled is collaborating with Cosmo Cricket this week.  I'm so excited about this team up!  Cosmo Cricket is one of my favorite paper companies, and their Just Add Watercolor line is amazing!  I'm working with the 12x12 paper pad which includes full size sheets as well as several cut apart sheets.  I could not stop at just one card, so I've got three to share today!


The top and bottom strips of this first card were created using one of the cut apart sheets.  I used Kuretake Gansai watercolors on all my projects today, and used a couple shades of blue and pink to create the pattern.

For the main panel I masked off the So Very Blessed sentiment and stamped it with dye ink, then stamped over top with Versamark and clear embossed.  Using a not too wet brush and just a touch of soft blue, I added a wash over the sentiment.

Then I added a couple of torn pieces of vellum beneath each of the watercolor patterned pieces to soften them and stitched them down.


For the next card I wanted to see if you could emboss over the embossed patterns.  Happily, you can! I embossed the sentiment, on one of the 4x4 cut apart pieces and added some watercoloring and then let it dry.  The secondary sentiments were embossed in gold and popped up.


Finally, I had to pull out Origami Map since it lends itself so well to watercoloring.  For the background I chose one of the 12x12 patterns and added a rainbow of watercolors to it.  Then I stamped/embossed/die cut the Origami Map and added rainbow watercoloring in the reverse direction.


I layered the map over a black die cut and popped the entire piece up as well as the sentiment.


These were so fun to make.  Playing with that Cosmo Cricket watercolor pad was addicting, don't be surprised if you see some more of these cards here!

Be sure to head over to the Neat & Tangled blog today.  Two DT members are posting each day this week, and we'll draw a comment from over there for someone to win a 12x12 paper pad at the end of the week.  You'll want to stop by the Cosmo Cricket blog too as they are giving away a $25 credit to the Neat & Tangled store!

Neat & Tangled Supplies Used:

Origami Map


Origami Map Die
 

All My Heart


 So Very Blessed


Tuesday, January 13, 2015

New Products for Neat & Tangled


It's Day 2 of Neat & Tangled release week, and I'm up to bat today.

For those of you who love Origami Map and hate fussy cutting, you'll be happy to hear that we're releasing a coordinating die.  Origami Map is one of my very favorite sets and the die just makes it that much more versatile.

Secondly, a new standalone die that I have been kicking around in my head for months now.  It took a little longer to perfect than I originally hoped, but I think you will love the result.  There is a coordinating stamp set for it too.  

Please head over to the Neat & Tangled blog to check out all the projects!

Wednesday, October 8, 2014

Last two SC WCMD Projects


Just a couple more WCMD projects to share for the Studio Calico challenges.  This first card is based on this pin from Shanna Noel.


I loved the look of it with all the brushstrokes, the symmetry of the horns, the flowers, so I pulled out my Kuretake watercolors and just played a little.

This was such a fun card to put together, I loved the painting process and wanted to keep that image the focus, so I opted for a very simple little banner and sentiment.

Last project a quick journaling card I whipped up.


This is 4x6 and uses my Origami Map set.  I wanted a little white space at the bottom where someone could write, and for balance I added a little bit of washi up top.

There are a few other WCMD challenges I want to try and play along with, but I think I'm done with the SC challenges.

Thanks for visiting!

Supplies Used
Card
Paper/Cardstock:  Avery Elle - Speckled Cardstock; Canson - Watercolor paper
Stamps:  Paper Smooches - Many Thanks
Ink:  Versa fine
Other:  Kuretake - Gansai watercolors; Recollections - Foam Adhesive
Journaling Card
Paper/Cardstock:  PTI - Kraft cardstock; Canson - Watercolor Paper
Stamps:  Neat & Tangled - Origami Map
Ink:  WPlus9 - White Pigment Ink; Versafine
Other:  Misc Washi; Tombow - Mono Adhesive


Thursday, September 25, 2014

Neat & Tangled Release Week Day 4


Hooray!  I'm so excited about today's set!

Some of you will recognize this right away.  It's based on my Open Round Gallery Idol card which was based on this pin that I found.

I loved making that GI card, but boy was it labor intensive and when it was done, I remember thinking, sadly, that I really wouldn't be able to recreate it because of the time consuming nature of the process.

BUT then I thought....if I had a STAMP, I could use the image over and over again and try all sorts of cool techniques.

And so.....tada!!!!


I really went back and redid the whole design when I created this set.  I had to simplify the lines and the sizes in my GI card to make it doable, but for a stamp, I thought why not add more detail, and make it a little more map like (after I finished my GI card, I kept thinking Australia looked like a fish).  So I pulled up a bunch of map images, studied them, decided which islands were really too small to include (sorry my Hawaii friends!), and this is what happened.

It's a nice size, takes up just about the length of an A2 card, and would be great for creating 4x6 PL cards or use on traditional layouts.

I created two cards to share today.


This first one I snuck on FB last week.  It's embossed in clear on watercolor paper, and then I just went in with Distress Markers and a water brush adding colors in rainbow order.  So easy to do!

Next, I wanted you to see that it's a really flexible set too. I masked it off and stamped just Africa.  For the past couple years Andrew has gone on a mission trip to Rwanda during the summer.  It's been a life changing experience for him, and we are committed to sending him every year for as long as possible.  I thought this card would be great to create for all the folks going this coming year.


Some simple coloring with copics and a little heart, really easy to mass produce.


Please head over to the Neat & Tangled blog to see what the DT created (and to enter to win a free set from Danielle), I know you won't be disappointed, and remember that someone commenting on my release week posts this week will win a free set from me....I'll close comments tomorrow night and post a winner over the weekend.

Supplies Used
Card 1
Paper/Cardstock:   Bristol Watercolor Paper; PTI - Black Cardstock
Stamps:  Neat & Tangled - Origami Map
Ink:  Versamark and Versafine
Other:  CTMH - Clear Embossing Powder; Ranger - Distress Markers, Waterbrush; American Crafts - Dimensional Adhesive
Card 2
Paper/Cardstock:  CTMH - White Daisy cardstock; Avery Elle - Cherry cardstock; PTI - True Black yardstick
Stamps:  Origami Map
Ink:  MFT - Black Hybrid Ink
Other:  Copics; CTMH - Dimensional Foam Tape and Liquid Glass; Tombow - Mono Adhesive