Showing posts with label SSD Sketch. Show all posts

Monday, November 26, 2012

Joyeux Noel


Hey everyone!  I'm exciting to be participating in the reveal of a new stamp set at Skipping Stones Design today.

It's a really beautiful, vintage set called Victorian Christmas.

I went very glittery with this one!  I used Coredinations Glitter Silk for the base.  I cut the frame and added 'mitres' in the corners with a scoring tool, and then lightly colored it using a gold Gelato.


The tag was cut using the Cricut Art Philosophy cartridge.  I embossed the tree in white and then added color using Topiary ink and a sponge.  Then I added some red glitter sparkles and metallic gold trim for extra sparkle.  Finally, I cut the little banner using the Cricut Artiste cartridge and stamped the sentiment.


This one totally put me in the Christmas spirit!  Thanks to Katie and Heather over at SSD for inviting me to take part in the big reveal!

Hope your week is off to a great start. 

Be sure to stop by the Skipping Stones site to check out the full reveal of the new set!

Supplies Used
Paper/Cardstock:  CTMH - Colonial White cardstock and bulk base, White Daisy cardstock:  Coredinations - Red Flash Glitter Silk
Stamps:  Skipping Stones Designs - Victorian Christmas
Ink:  CTMH - Cranberry and Topiary
Other:  CTMH - Cricut Artiste and Art Philosophy cartidges, Dimensional Foam Tape, Red Glitter Sparkles; Misc - Gold trim; Bone Folder; Faber Castell - Gold Gelato; 3L - Large Dodz Adhesives; Tombow - Mono Adhesive

Tuesday, October 30, 2012

Fabulous Dahling! SSD #152


This is my last guest post for Skipping Stones Design.  I can't believe how quickly the month has flown by!

This week's retro sketch was designed by Jen Del Muro, and I'm using Birthday Purses again, I just love this set!

Most of the papers I'm using are from Simon Says Stamp's August card kit, which includes a lot of My Mind's Eye Indie Chic.

The focus here is really on that great purse.  I stamped it on that chevron pattern which I used as a base for my piecing.  Then I stamped it twice on black cardstock, once for the sides/top/bottom of the purse and the second time for the straps.  I also stamped on the pink pattern for the bow.


Besides the piecing on the purse this card came together very quickly. 

I want to thank Heather and Katie for giving me the opportunity to guest design this month.  I had a blast, and was especially excited when I saw that the other guest designer for the month was my buddy JJ

Please head over to Skipping Stones Design and play along this week!

Supplies Used
Paper/Cardstock:  Simon Says Stamp August Card Kit (MME Indie Chic papers, and base cardstock); CTMH - Autumn Terracotta and Black cardstock
Stamps:  Skipping Stones Design - Birthday Purses
Ink:  CTMH - Black
Other:  Kuretake - Glue Pen; Tombow - Mono Adhesive; CTMH - Craft Knife; Hydrangea Hippo - Black Trim; EK Success - Black Zig marker (for inking pieced edges)

Tuesday, October 23, 2012

Snowman Poop - SSD #151


This week's retro sketch at Skipping Stones Design is by Amy Sheffer.

I pulled out my Sassy Snow set and stamped the blue background with the snowflakes from the set.  The snowflake ribbon came from Michael's. 

I stamped the snow woman, colored, and fussy cut her, then cut the circle and adhered her to it.  I stamped the bottom of the snowman again on a longer piece of cardstock to create the snow border.  Then I added some additional 'snow' lines at the top of the border.

I added some more ribbon below the snow border and floated the snow on top with dimensional foam tape.


Hope you are having a great week, stop by Skipping Stones Design and play along with this week's sketch!

Supplies Used
Paper/Cardstock:  CTMH - Pacifica and White Daisy cardstock, White Daisy bulk card base
Stamps:  Skipping Stones Design - Sassy Snow
Ink:  Memento - Tuxedo Black; CTMH - White Daisy
Other:  Spectrum Noir Markers - BT1, GB5, CR10, CR11; Michael's - Red Snowflake Grosgrain; CM - Custom Cutting Circles; CTMH - Dimensional Foam Tape; Tombow - Mono Adhesive

Tuesday, October 16, 2012

Skipping Stones Design Sketch #150


Halfway through my guest month at Skipping Stones Design, and I'm having lots of fun!

Today's sketch is from Heidi Van Laar, and today the SSD DT and guests are all using Fangs or Fur. 

I used the round image from the set to create the background paper for the top half of the card as well as for the round element on the sketch.  I really like how the background piece turned out, kind of subtle and graphic.

I also really like to mix trims, and had fun doing that here.  I've got that brown velvet paired with the light blue velvet circles and then the natural ric rac.  Kind of fun and unexpected. 


Want to win some stamps of your own?  Head over to Skipping Stones Design and play along with the sketch!

Supplies Used
Paper/Cardstock:  CTMH - Desert Sand and Colonial White cardstock, Colonial White bulk card base; Basic Grey - Paper Cottage 6x6 pad
Stamps:  Skipping Stones Design - Fangs or Fur
Ink:  CTMH - Desert Sand
Other:  CTMH - Foam Tool, Dimensional Foam Tape; Hydrangea Hippo - Brown Velvet Trim; Helmar - Quick Dry 450; Tombow - Mono Adhesive; Misc - Blue Velvet Trim and Natural Ric Rac

Tuesday, October 9, 2012

Skipping Stones Design Sketch #149


I'm back with another great sketch from Skipping Stones Design!

Last week I used my very first SSD set for my card.  This week (since it's a retro month and SSD is using some of their old sketches), we are actually using the very first sketch that I played along with at SSD (and the one where I won the stamp set I used last week), by Cristina Kowalczyk.

This time I'm using some of my newer SSD sets:  Pumpkin Seed Sentiments (to create the background pattern on the horizontal strip), and Birthday Purses.

I stamped the purse on some paper from BG's Paper Cottage collection, cut it out, and squeegeed Liquid Glass over it to get that patent leather shine.  It's so shiny I had a really hard time getting a good photo! 


Hope your week is off to a great start!  It's back to work for me.....

Supplies Used
Paper/Cardstock:  Bazzill Card Shoppe - Licorice Twist; CTMH - White Daisy and Lagoon cardstock; Basic Grey - Paper Cottage 6x6 papers
Stamps:  SSD - Pumpkin Seed Sentiments, Birthday Purses
Ink:  Memento - Tuxedo Black; CTMH - Lagoon
Other:  CTMH - Cricut Art Philosophy cartridge; Cutting Knife, Liquid Glass; Tombow Mono Adhesive; Helmar - Zapdots; Michael's - Black Ribbon


Tuesday, October 2, 2012

Skipping Stones Design Guest Designer for October and Sketch #148


I'm so excited to be a guest designer over at Skipping Stones Design this month!  If you're not familiar with SSD, they have some of the funniest sets around, and as a slightly sarcastic individual, I'm a big fan.
 
Today I'm using my very first SSD stamp ever, Gray Hares. 
 
I wanted to make a really bright, fun, happy card.  Echo Park's Happy Days collection was perfect. 
 
I cut 3/4" strips of three of the patterns and mounted them to a base piece of cardstock.  I added some Charcoal twine from the Twinery, and popped the whole thing up with dimensional foam tape.

That cute little bunny was fussy cut, very subtley colored with my Spectrum Noir markers, and then attached using tombow on his torso (so he sticks to the piece with the strips) and then some dimensional foam tape on his bottom.


Did I mention that I won Gray Hares when I participated in this very sketch contest?  I didn't?  Well it's true.  You too could win a stamp set of your choosing by playing along!  Head over to the Skipping Stones Design for all the details!

Supplies Used
Paper/Cardstock:  Echo Park - Happy Days 6x6 Paper Pad; Bazzill Card Shoppe - Sour Lemon; CTMH - White Cardstock
Stamps:  Skipping Stones Design - Gray Hares
Ink:  Memento - Tuxedo Black
Other:  The Twinery - Charcoal Twine; CTMH - Dimensional Foam Tape; Tombow - Mono Adhesive; Spectrum Noir Markers - BT1, FS6


Sunday, May 6, 2012

Fire up the Grill Card for SSD#126


I haven't played along over at Skipping Stones Designs' challenge in a while, but when I saw the sketch this week, I knew it would be the pefect challenge to try out one of my new toys.  I recently won Nina Yang's birthday blog candy - an American Crafts' Knock Outs set.  It's a really neat little system, and allows you to cut a variety of borders.  I've been playing around with it, so expect to see lots more fun edges and borders on stuff.

Anyway, I thought I would put the scallop insert to good use and created this simple card.  I used a couple stamps from CTMH's Summer Days set, some Christmas ribbon from Michael's, and a little Twinery twine. 

I did actually get to do a little bit of scrapbooking yesterday (National Scrapbooking Day) a well as tonight, so I should have another layout to share soon.

Hope you all had a great weekend!

Supplies Used
Paper/Cardstock:  CTMH - White Daisy and Black Cardstock; DCWV - Green cardstock (from mini stack)
Stamps:  CTMH - Summer Days
Ink:  CTMH - Black
Other:  American Crafts - Knock Outs Scallop Border Punch; CM - Custom Cutting System - Circles; The Twinery - Peapod Twine; Michael's - Gingham Ribbon

Monday, January 23, 2012

Card for Market Street Paint the Town Color and Skipping Stones Design Challenges


We had a crazy busy weekend that involved a lot of running around, and not a whole lot of sleep. Add to that the fact that Ellie's been a bit of a pill lately. I'm pretty sure she's going through a growth spurt, which tends to just make her ornery and not that much fun to be around if you aren't doing things her way. Anyway, imagine my delight to find that the federal government had a delayed start this morning. I really needed a little quiet crafty time at home, so I dropped the girls off a little late, and headed home to work on some cards.

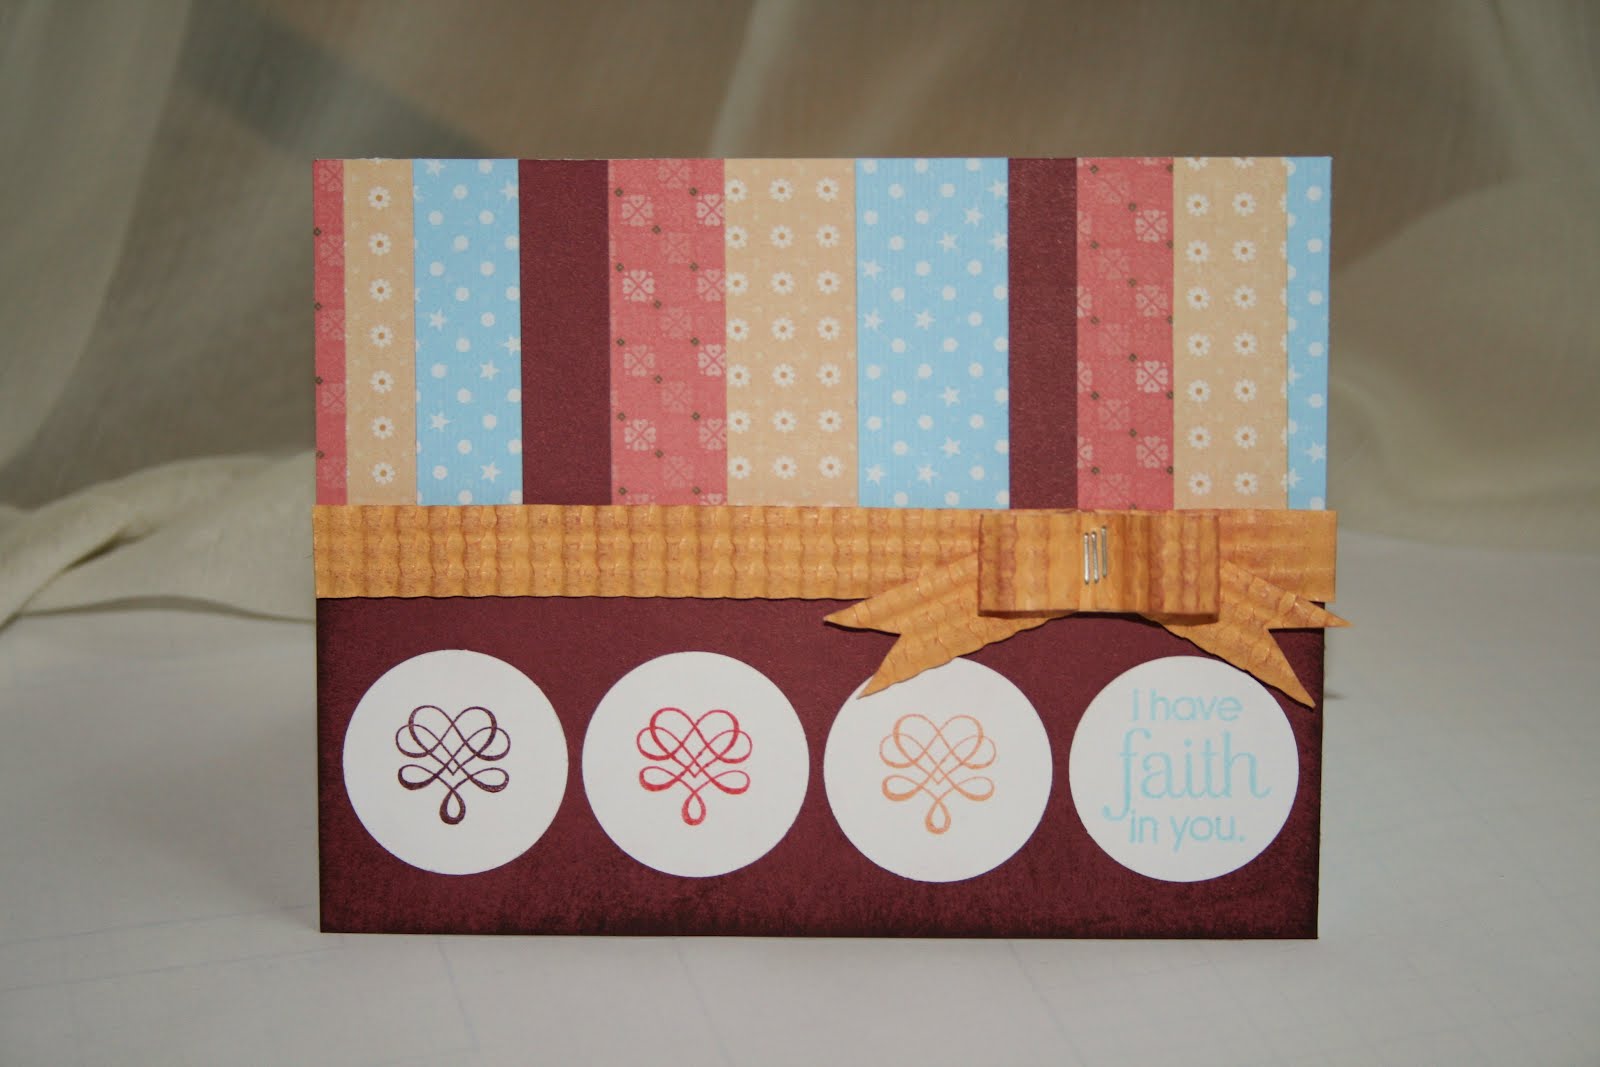
Here is the first one. The stamps are from the Faith in You set from Market Street Stamps which I was lucky enough to win last month. It's a great little set with some very sweet sentiments.

This was a bit of a technique card for me, i.e., I got to try some new things:

1) To create the top portion of the card, I cut a piece of white cardstock 2" wide, and then the patterned papers and Vineyard Berry cardstock at 2 1/2". Then I cut those 2 1/2" strips into smaller strips at random widths. I adhered those to the 2" piece and then trimmed the whole thing to 2". It's a little easier to do it this way since you don't have to worry about lining up the top and bottom edges of the little strips you are adding....just need to get that one edge butted up to the piece next to it.

2) Basketweave paper ribbon. I wanted to try Teri Anderson's basketweave technique seen here , which involves running your cardstock through a paper crimper twice. You run it through once, turn 90 degrees and send it through again. I sponged a little bit of ink over the entire piece to give it some more depth. I created a little bow as well, and used my brand spanking new Tiny Attacher (I think we are going to become good friends) to secure the bow.

For the bottom of the card, I accented the edges by swiping my stamp pad directly on the paper. The sentiment came out a bit faint for my liking, so it's double stamped.

All in all a fun way to spend some found time this morning. Hope your weeks are off to a creative start, and Happy Chinese New Year!

Supplies Used:
Cardstock/Paper: CTMH - Mayberry Level 2 Paper Packet, Believe Level 2 Paper Packet, Vineyard Berry, Creme Brulee, and White Daisy cardstock
Ink: CTMH - Garnet, Heavenly Blue, Creme Brulee, Smoothie
Stamps: Market street Stamps - Faith in You
Other: Tim Holtz Tiny Attacher; CTMH - Liquid Glass, Dimensional Foam Tape; Creative Memories - Circle Punch

Friday, December 9, 2011

A card for many occasions/challenges: H2H, RCC32, SSD #105, Moxie Fab Trigger Tuesday


This is another one of those cards where there was a perfect storm of challenges....partially owing to the holiday season. The challenges at H2H and Ribbon Carousel both had inspiration photos which you can see below. I was inspired by the colors and the candy stripes at RCC32 and all the all ornaments an polka dots at H2H.


Moxie Fab World's Tuesday Trigger also had lots of those round metallic ornaments, and while I took my color cue from H2H and RCC, I was inspired by the lovely line of the scattered ornaments on the grounds, and tried to get some of that feel in my card.


Finally, I followed the sketch at Skipping Stones Design for the layout of the card.

This was a fun card to make. I used the Happy Clusters stamp set, which is one of my favorite. I've pulled it out on so many occasions, and the truth is I haven't even made a star/tree card using it yet. I just love all the little circle elements that are included.

For the little green squares, I used three of the larger circles, random stamped them onto the cardstock using Topiary ink, and then mounted them on two larger squares of Topiary cardstock.

The piece with the sentiment is a little trickier. It's NOT die cut (hope for all of you who don't have a machine yet). The 'Merry' was hand drawn and then cut out using my CTMH cutting knife--a great cutting knife that gives you tons of control. If you don't like your writing or don't think you can do it, not to worry. A simple solution is to use alphabet stickers. Just adhere them to the cardstock, and then cut them out in the same fashion. You could also trace a dimensional element in pencil. You don't have to have the fanciest/most expensive tools to achieve the same look!

After I cut my letters out, I used Cranberry and Topiary ink and random stamped all those circles onto the cardstock. As I mentioned before, I was trying to get a feel similar to that from the Moxie Fab trigger photo. Then I added the solid circles. I have two hol3 punches. They're about 3/8" and 3/16". I punched a bunch of circles out and then adhered them to the sentiment piece. Then I adhered the whole thing to an old piece of Bazzill scrap.

For the ribbon/twine element, I cut a very thin piece of cardstock (thinner than the 3/8" grosgrain ribbon, so it looks like it's just the ribbon there. Then I added two strips of twine (I wanted it to look a little like wrapped present). The little bow is so easy to make. Just wind the twine around two of your fingers a bunch of times. Remove, cut a small piece of twine and tie it tightly around the middle and fluff. I added the green bow on top for a little added contrast.

Hope you are having a great weekend and getting to do some crafting too!

Supplies Used:
Stamps: CTMH - Happy Clusters
Paper: CTMH - White Daisy, Topiary, Cranberry; Bazzill - Scrap of Red paper
Ink: CTMH - Topiary, Cranberry
Other: Twinery - Maraschino/Peapo twine; CTMH - Cranberry Grosgrain, cutting tool, Misc - Hole punches

Monday, December 5, 2011

Skipping Stones Design Sketch #104 (Two more stocking ideas)


One more card tonight...Andrew's off playing hockey, so I have a little extra craft time. :)

First, a big thank you to Jingle! I was the lucky recipient of Sassy Snow from the blog hop that SSD had a couple weeks ago.

As soon as I saw this week's sketch, I knew I wanted to put my snowman in a snow globe. I wanted it to almost look like the snow globe wasn't there...blend it into the sky/snow around it. I think it turned out pretty well. To create the globe, I used a sponge dauber and two shades of blue around the edges to create a sky effect (I did create a mask for the snowman to make sure I didn't get any blue on his body).

Then I put the snowman together. The scarf and mittens are the red plaid fabric from CTMH's Believe Level 2 Paper packet and I used a white gel pen to fill in the polka dots.

For the base of the snow globe, I cut a black piece of cardstock 3/4" wide, and then kind of eyeballed how long it should be. I sanded the cardstock pretty heavily until I got the texture/feel I was looking for. Then I measured off 1/4" at the top on either end, marked it with a pencil, and cut from the pencil mark to the bottom corner.

For the background, I used the sponging tool you see here: https://blogger.googleusercontent.com/img/b/R29vZ2xl/AVvXsEg72nLhWCMmox44ipJQ9wjnJu0RcPAlShrdgfCb_0sCMg2Da_2Lb2RpaZw6DZ07G6JyNOSYgzWv_MnV-bVyILLtfWHxmRAUxf0QRyKqoVvgV4AUSt-DxMqPYPIhf5WnOwysJrH8TYroENI/s1600/IMG_9567.JPG I traced lightly around the circle first so that I could see how far to go, and starting from the top corners, worked my way in.

For the snow, I used the small snowflake from the Sassy Snow set with White Daisy ink on the background. This is pigment ink and against the blue you get kind of a transparent look. On the inside of the snow globe, I used Heavenly blue ink to stamp the snowflakes.

I used two of the fun sentiments from the stamp set to create the little banners and added some cranberry grosgrain to finish it off.

It was a fun card to make. Hope you enjoy it!

Oh yes, and if you're looking for a few more stocking ideas, please consider:
1) Sanding Kit - Item Z1294, $3.50, another inexpensive way to get a totally different look from your papers.
2) Texture Tools - Item Z1298, $9.95, the foam tool I used for this card is just one of the great tools in this kit that will allow you to create a variety of textures and effects on your projects.

Products Used
Stamps: SSD - Sassy Snow
Ink: CTMH - Pacifica, Heavenly Blue, Black
Paper: CTMH - White Daisy, Black, Chocolate, Sunset, Believe Level 2 Paper Pack
Other: Sponge Tool, Cranbery Grosgrain, Sanding Kit, Dimensional Foam Tape

Monday, November 28, 2011

SSD Sketch #103 - Another Gray Hare


Just a quick card tonight for Skipping Stones Design sketch 103.

I wanted to make a really simple card, and cut it to make a mosaic (or at least part of a mosaic) rather than use the squares as a design element.

There's very little in this card, which I thought was appropriate given the 'gray' subject matter. To color in the balloons and create the ground I used my go-to blending pen.

Hope you like it!

Supplies Used:
Skipping Stones Design - Gray Hares Stamp Set
CTMH - White Daisy Cardstock; Gray Flannel, Holiday Red, Topiary, Tulip and Pacifica Ink, Blending Pen

Sunday, November 13, 2011

SSD Sketch #101


I won a free stamp set from Skipping Stones Design a couple weeks back for this card: http://mprantner.blogspot.com/2011/10/fall-card-for-ssd-create-and-h2h.html.

I chose Gray Hares, which is a great versatile set for Easter, Birthday, and Get Well Soon cards, and decided to go with the Get Well Soon theme for this card.

The bunny and balloons are stamped in second generation black ink, and then paper pieced. I added a touch of pink to the bunny with my blending pen.

The borders are Kraft borders that I covered with black ink. Rather than sponging the ink on the borders, I think it's faster to just take your inkpad and swipe it over the border. You can very quickly get a very saturated color this way.

One more thing, the sentiment is not normally curved. This is one of my favorite things about acrylic stamps, you can bend them, curve them, etc. In this instance, I shaped the sentiment to follow the line of the bunny.

Even with the paper piecing, this card came together very quickly. Hope you like that little bunny as much as I do!

CTMH Supplies Used:
Paper: White Daisy, Olive, Lucky Level 2, Fanfare Level 2, Smoothie
Ink: Black, Sorbet
Other: Kraft Borders, Blending Pen

Other Supplies:
Skipping Stones Design - Gray Hares

Monday, October 31, 2011

Fall card for SSD, Create, and H2H


Due to technical difficulties at work today (strange electical outage), I find myself home with time to blog and craft (yay!).

I was originally going to submit this card for the H2H challenge and Skipping Stones Design Sketch, but it turns out I should pay more attention to deadlines, and I had to have posted the card to the H2H site by Saturday night.

Oops. (This has happened to me a couple of times recently, also a product of waiting to the last minute, I guess).

Anyway, I really enjoy the Skipping Stones Design sketches. For any who have not tried them out, take a look....you might even win something (I did!). They are very basic, which means you get to be very creative. I often feel a little tied down by sketches, but never over at SSD.

I am also submitting this for the Create Blog challenge this week which is 'no sentiments'.

So let's get down to the creative process. I am a huge fan of this blog: http://stampingmathilda.blogspot.com/. If you've never visited, you must. Godelieve does great work, and must just stamp all the time. I'm no mathematician, but if you are posting 500ish times a year, you are posting more than once a day. While I'd love to be that prolific, I'd also love to have some of her stamping chops.

Godelieve has a weekly post called Sunday Scraps where she uses the scrap materials from her projects for the week to create a new creation. I love that idea, and since I have LOTS of scraps, wanted to try that on this card.

This is what I started with (some of the scraps from my card for last week's CAS-ual Friday and Play Date Cafe card, which incidentally got posted too late to make the PDC cutoff....told you it had been happening a lot lately):


I cut the top and bottom of the frame down to make them even, then I used a tissue (since I need to get some more sponges) to add some Autumn Terracotta ink to the Honey cardstock to give it a richer color. I wanted the edges to stand out a bit more, so I started swipe/sponging Chocolate ink on them, but it gave it a kind of greenish tone, so I went back and did the same with Cranberry ink to balance the colors.

For the center portion, I cut the rectangular piece down 1/2" on both the width and height, rounded the corners, and used it as a mask. First I sponged chocolate, and then added some Autumn Terracotta. Lest you think I am a neater stamper than I actually am, I cut that masked piece out and adhered it to my white background piece hiding the edges beneath the frame.

The leaf is cut out of Kraft paper using the Cricut AP cartridge and stamped with the coordinating stamp set in Autumn Terracotta. I swiped a tiny bit of Chocolate ink on the edges for contrast.

I wanted the frame to stand out a lot, so it's adhered with a double layer of 3-D Foam tape, the leaf has a single layer, and I added a bit of Cocoa grosgrain ribbon to complete the look.

Thanks for visiting and have a great Halloween!

CTMH Supplies Used:
Stamps: Cricut AP cartridge coordinating stamp set
Ink: Autumn Terracotta, Chocolate, Cranberry
Paper: Autumn Terracotta, White Daisy, Honey, Kraft
Other: Cricut AP cartridge, Cocoa Grosgrain Ribbon, 3D Foam Tape

Monday, October 24, 2011

SSD #98 Card


I'm back from my self-imposed exile from challenges....had to put my head down and get a bunch of stuff done last week for the Open House on Saturday, but I'm happy to be back creating again!

I really enjoy how simple the sketches at Skipping Stones Design are. There is so much freedom for interpretation.

As soon as I saw this week's sketch I knew I wanted to incorporate the sun. I also took the opportunity to finally break out the sewing machine I made the hubby drag down from the attic for me (like a month ago).

This is my first card ever that involves sewing, so it was a little bit of an experiment, but I kind of like it and I definitely want to do some more sewing on my projects....and it was fun. So, if any of you are nervous about putting machine to paper, don't be. It's just another great tool to use.

Monday, October 10, 2011

You put a song in my heart, card for SSD and CAS-ual Friday


This week I decided I would play along with the Skipping Stones Design challenge. The card also works for this week's CAS-ual Friday challenge which was a tribute to Operation Julie's Smile, an amazing blog hop to raise money for Julie Ranae.

I actually printed out the sentiment on the front of the card (the inside is stamped and says 'and a smile on my face'). This is the first time I've tried doing that, and it was easy and quick. I used Brenda Frerich's cloud technique on the paper with the sentiment (http://brendafrerichs.blogspot.com/2011_08_01_archive.html), and on the mat I just sponged a piece of white cardstock until I got the color I was looking for.

The tag was cut with the AP cartridge (2") in White Daisy and Kraft, using just the top and bottom of the tag as accent pieces for the tag. And I used my trusty Blending Pen to add a little depth to the birdie.

Hope you enjoy it. More Christmas cards tomorrow!

CTMH Supplies Used:
Stamps: Hot Diggity
Ink: Twilight, Black, Chocolate
Paper: White Daisy, Kraft
Other: Blending Pen, Cricut Art Philosophy, Hemp, 3-D Foam tape