Showing posts with label Kids Projects. Show all posts

Saturday, February 9, 2013

This Year's Valentines


Thought I would quickly pop in to show you guys the Valentines the girls will be sharing with their friends on Thursday.  My goal for Valentines is not to spend a ton of time on them, but to make something that they (or at least Ellie) can help with and be excited about taking in.  I think these fit the bill.

You've probably seen the one on the left on the web/pinterest already, but since Ellie's Kindergarten class is the Goldfish, it just didn't seem right not to make those.

To create the fishbowl, I used the free printable found here, and then added some text in Powerpoint.  I cut them out, and Ellie colored them.  She also addressed them on the backside.  The little bags I found at Tuesday Morning, and I added just a bit of twine to seal it off.

The valentine on the right is for Carina's class.  Carina is always wanting to glue things, so I thought it would be a great idea for her friends.  I created them in Powerpoint, and the JPEG version is below if you want to use it.  The glue stick is held on with a glue dot, and I added some twine that is strung through the back of the valentine just for show.


Hope that your Valentine preparations are going smoothly!

Wednesday, February 8, 2012

Valentines with Ellie - 2012


One of my favorite developments over the last six months is Ellie's new found interest in doing arts and crafts. Last year at this time arts and crafts mostly consisted of her taking a stack of white paper, scribbling a few lines on one, and moving onto the next piece of paper.

These days she's so much more coordinated. She loves to do projects. She has a great fondness for scissors, but is only using them on paper now and not her hair. She can color in the lines, and draws lots and lots of pictures of our family.

Last year she helped with her school valentines treats. We got the store-bought ones, Dora the Explorer. I labeled them, she added some extra color, and then helped to stuff the bags.

This year, since she is so into all things crafty, I wanted to do something more ambitious.

It involved my trusty Cricut, my new toy (5" creative station courtesy of Beth Kingston/Xyron - thanks Beth!),


and Pinterest. I found this idea on Pinterest and wanted to do something similar.

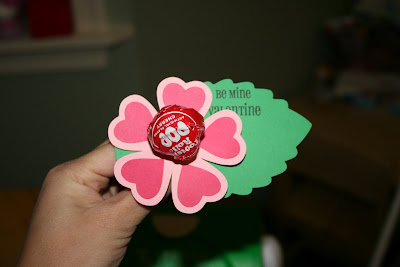
I pulled out my Art Philosophy cartridge book and flipped through settling on Flower 8, which I thought was perfect since the petals resemble hearts. I cut the flowers at 3" and then a bunch of hearts at 1". I ran the hearts through my new Xyron to create this lovely carpet of heart stickers.


I used Leaf 4 from the AP cartridge, cut at 4 1/2". The sentiment is two stamps from Say it in Style. It's a little bit large, and if it was just for me, I would have cut them a little smaller, but since Ellie was going to be doing all the writing, I thought she could use a little more space.


If you have a gypsy, you can add a little circle in the center of the heart and corner of the leaf for the lollipop stick - it needs to be bigger than the stick so it can make it over the wrapper. I don't have a gypsy yet, so I just used my piercing tool to approximate the center and then pierce a circle around it, it really doesn't have to be exact. (I tried using my hole punch, but it wasn't long enough to get in there....a cropodile would work well too.)


We had a GREAT time making these, and Ellie is SO excited to take them into school next week. I picked up this little metal bucket and a styrofoam ball at Michael's the other day, so this is how she's going to be taking them into school.


This was so easy to do, with just a little bit of prep time. If you have more time or your kids are older, you can always add some additional stamping to the mix, but this was just the right level of effort for us this year.


Supplies Used
Cardstock: Recollections, various colors
Stamps: Say it in Style
Ink: Black
Other: Xyron 5" Creative Station, Cricut Art Philosophy Cartridge, Piercing Tool

Wednesday, October 12, 2011

Do you see what I see?


I stumbled on a fun, easy project to do with the little kids today. Actually, the idea had been percolating in my brain since I got out my Christmas Ornaments Dimensional Elements the other day (I've been working away at projects for my upcoming Holiday Gift Giving Open House).


I took a look at the piece that I popped out of the middle of the ornament and thought, that looks like a bat, but as I'm really not that into Halloween, I let the thought go and moved on with what I was doing.

THEN, yesterday, Ellie got a late birthday present which included a book called 101 this to do and make with Googly Eyes. I call that providence, and I just couldn't help myself. I 'borrowed' a pair of the littlest googly eyes (I mean, they're a choking hazard, right)?

This is what I came up with. Really easy to do. I just swiped my black ink pad over the shape until I got a covering that I was happy with. You could always cover with paper and use a file/sander on the edges, or, if you're working with really little kids and you don't want to deal with ink pads or glue, use markers or crayons.


I cut a skinny oval for the body of the bat out of white daisy cardstock and swiped that over the ink pad. I used some 3-D foam tape to pop it out from the wings, and then secured the eyes with Liquid Glass. This project might have taken 5 minutes, but I doubt it was even that long. Easy!


So, before you throw out those excess pieces from your Dimensional Elements sets, take a hard look and see what YOU can see.