Showing posts with label Typed Sentiments. Show all posts

Thursday, February 18, 2021

SSS Geometric Builder Squares, Take 1

Hi all!  I finally carved out some time to focus on these Geometric Builder Squares dies from Simon Says Stamp.  Just like a few weeks ago when I was working with the Geometric Circles, I'll be sharing several days worth of cards using these guys.  

Today I thought it would be fun to create essentially the same card, but in two very different styles.

For both of these cards I used the square that cut four triangles.  For this first card, I cut the die twice using four different shades of solid cardstock.  

I then assembled my pattern on a piece of scrap white cardstock by using the same square, i.e. the four colored triangles are in the same order, but I changed the orientation of the square itself, rotating it a quarter turn each time.

I used Altenew's Caps Bold Alphabet dies as well as a sentiment from the retired Typed Sentiments set from Neat & Tangled.  Which was embossed and popped up with foam tape.

For this next card, I pulled four different patterned paper scraps from the piles and piles of scraps that I have, and cut the die twice from each.

This time, I wanted a more quilted look, so the pattern is more regular.  I started by creating a larger square using eight of the triangles, and then expanding the pattern from there to complete the look.

Again, I used a scrap piece of cardstock as my base.  I wanted a more uniform look, so I trimmed my card base down 1/4" so there's 1/2" border all around (the quilted piece is 3" x 4 1/2").  

To add to the quilted/homespun look, I stitched around the border of the quilted piece.  

The sentiment was created using Pinkfresh Studio's Lea's Ornate Lowercase dies and another stamp from the Typed Sentiments set.  I added a bit of stitching to the ends of the secondary sentiment, although my zig zags got a little too close to the 'me' for my liking.  The alpha dies were originally white, but I thought the contrast was a little too much, so I just die cut another set of letters from a soft gray and adhered them over top.  Super easy fix.

Which version is your favorite?  Isn't it so fun to see such different looks from the same basic card?

More from these dies coming soon!

Tuesday, October 20, 2020

More Circle Backgrounds - Faux Watercolor

I've been pulling on this solid circle image thread lately.  A couple weeks ago I created a circle background for a Pinkfresh card by free hand watercoloring circles.  Last week, I used solid stamp images to create backgrounds, and today I'm blending the two techniques, using a solid stamp to create a faux watercolor background with Distress Inks.

These backgrounds were all created using the medium sized circle image from Ellen Hutson's Wonky Backdrops set.

This technique is basically this:  I stamped the image with Distress ink, spritzed it once with water, stamped it off on a scrap piece of watercolor cardstock, spritzed it again, and then stamped onto my watercolor panel.  I spritzed it again with water and then stamped a third time on my watercolor panel.  Each time you spritz/stamp the image gets less saturated.  I wanted a lighter look with more variegation in the look so except for the second card shared below, I didn't use the initial stamping with is much more saturated.

The process is so quick and easy and makes some lovely card backgrounds.  For this first card I just created a nine by nine grid using Chipped Sapphire Distress Ink.

Once dry, I stamped a sentiment from an old Studio Calico set I have with Versafine, and embossed with Ranger Frosted Crystal Antiquities embossing powder.

The finished panel was popped up over my card base with foam tape.

Next, is the card where I did use the initial spritzing for my panel.  Note, when creating these panels, I did not wait for anything to dry.  The stamps are very wet/saturated when you stamp, so they haven't fully dried when you stamp the next time.  I really enjoyed the play between the circle images where the ink blends from one circle to the next.  This card again uses Chipped Sapphire Distress Ink.

In this detail shot you can see pretty clearly in the first row the difference between the first, second, and third spritzing/stamping.  

I trimmed the panel down and constructed a sentiment using The Stamp Market's Skinny Upper Alpha dies as well as part of a sentiment from Neat & Tangled's Typed Sentiments set which was embossed in white on a black banner and popped up with foam tape.  The 'YOU' is three layers, one a dark gray and two layers of watercolor cardstock.  The finished letters were adhered directly to the panel.  I think using the gray for the first layer helps to set the letters off a bit more.

For this next card,  I switched over to Dusty Concord Distress Ink

After creating my four by three grid, I trimmed the panel down and finished it off with Altenew's Waterbrush Hello die.  This was cut three times, adhered together and then to the panel.

Super quick and easy.  This hello might be my favorite hello die!

This is a really fun technique where you get unique results every time.  No two panels will ever look exactly alike, which is something I love.

Thursday, September 10, 2020

Letters are Better with Purple Onion Designs


I'm slowly but surely working my way through all the images I picked up from Purple Onion Designs recently.  This one from Stacey Yacula called Nora & Butter was just too cute to pass on, and I knew exactly what sentiment I was going to use with it.

The image was stamped with Gina K Amalgam ink and then colored with Copics.  

When I'm coloring in neutrals, I try and mix up the families to create more of a contrast.  I used Warm Grays for the mouse (at least I think he's a mouse) W0, W1, and W2, Cool Grays for the mailbox C0, C1, C3, C5, and C7, and Neutral Grays for the ground N0, N1, N2.

The little bird was colored with E42, E43, and E44, and I used E21, E23, and E25 for the wood elements.


The hats and gloves were done with B000, B32, B34, and B37, and I used R22, and R29 for the red elements.

The sentiment is from my retired Typed Sentiments set for Neat & Tangled.  It's a perfect match with the image don't you think?

This is such a fun image, and I think it would be perfect for decorating an envelope too, especially one of those new slimline ones! 

Friday, February 7, 2020

Fun with Dies


Sometimes it's just fun to pull out a product with no real plan in mind.  Today I'm sharing a few cards created using this older die set from Papertrey Ink (I actually can't even remember what it's called).  I had been wanting it for a while, and picked it up second hand (who knows how long ago), and then promptly lost it in the morass we call my craft room.

It was recently unearthed, and I figured I should use them before I lose them again....

This is one of those dies that is right up my alley because there are so many interesting combinations and ways to put the pieces together.  I love the clean, modern, graphic look that it yields.

I selected five different shades of color from yellow to dark orange (Lemon Drop and Persimmon from MFT and Summer Sunrise, Orange Zest, and Terracotta Tile from PTI), and die cut 2-3 of each color.

This die ended up being a little different than I though, the ends don't cut fully, so I had to snip off the pieces at each end, but no big deal.

Then, I just played with them for a bit, assembling them in different combinations and shapes.

Once I settled on my three combinations, I adhered them to white card bases, and then added some simple sentiments from sets that I previously designed for Neat & Tangled (So Many Sentiments and Typed Sentiments).


For this one, I use two sets of the dies, varying the order of the colors.  I used the sentiment strip to hide where the two sets of dies came together.


For this next card, I started by placing the angled end of the largest strip/curve right in the corner of my panel, and then placed the remaining pieces, trimming the die cut pieces where they went over the edge of the panel.


I also die cut two pieces of black cardstock, to get the pieces for the centers of the curves.  


Finally, the simplest of the cards.


I thought this sentiment fit perfectly with the simple upturned curve.


This was such a fun and relaxing way to spend an evening!  Which do you like best?

Wednesday, January 15, 2020

Us


Hi friends!  It's been quiet here on the blog lately.  We've got a lot going on at home in terms of the kids school/sports schedules, so crafting time has been hard to find, but I managed to get a little bit of coloring done over the weekend.

This cute little pair, Rory & Noelle, is from Stacey Yakula's most recent Purple Onion Designs release.

They were stamped on Neenah Solar White with Gina K Black Amalgam ink, colored with Copics, and then fussy cut.

I added them to a journaling card from Studio Calico.  I really enjoy using journaling cards on my actual cards because it often saves me a bit of type in composing/laying out my card.  For this card, I added just a hint of inking to the journaling card using Tumbled Glass Distress Ink to create a ground line.


The sentiment is one of my favorites from the Typed Sentiments set I designed for Neat & Tangled.

I added a panel of white cardstock that I rounded the corners on, but it was a little too stark, so using the same ground line I created on the journaling card, I added some inking to the white panel.

Hope 2020 is treating you well!

Friday, December 13, 2019

Simon Says Stamp Love You More Release


There's a new release at Simon Says Stamp, lots of new products that are perfect for Valentine's Day.  

Today I'm showing off the new You Are background.  I love a text background.  I love both the typewriter font and the size of the font.

The background was stamped on white cardstock with Altenew Silver Stone ink. 


For the focal point of my card, I stamped and fussy cut a pair of cats from The Right Meow set, and colored them with Copics.

The sentiment is from Neat & Tangled's Typed Sentiments set which was stamped on one of the Skinny Strips dies after I colored it with Copics to match the cat's bow tie.  I also colored the little die cut heart.

Thanks for visiting, and be sure to head over to Simon to check out the rest of the release!

Thursday, July 25, 2019

Simon Says Stamp Believe in You Release - Die Cut Overlay Inlay


 Hi all!  Just popping in to share a card created with the Carnation Frame die from the new Believe in You release from Simon Says Stamp.

To create my focal point, I adhered a bunch of different scrap paper strips to a piece of white cardstock.  I then die cut that piece. 

Because of the thickness of the paper with the scraps adhered to it, you'd have to run this through a few times to get it to fully separate, but I wanted the pieces to stay together a bit so that I could do the overlay.

Next, I die cut both a black and white piece of cardstock.

The place outline piece was adhered over my striped die cut, and then the white pieces of the flower were inlaid into that black outline.


I added a sentiment from Neat & Tangled's Typed Sentiments set, and the popped the die cut piece up with some foam tape.

Thanks so much for stopping by.  Be sure to head over to Simon Says Stamp to check out the full release!

Thursday, June 6, 2019

Coloring Stencils Two Ways with SSS Rest and Refresh Release


Hi everyone!  Have you seen the new Rest & Refresh release from Simon Says Stamp?  It was just released today, and if you love nautical, this is the release for you.  The folks at Simon sent me the new Buoys stencil to play with.  Today I'm going to show you two ways to color with stencils.

For this first look, I cut a panel of watercolor cardstock and then used regular embossing paste over the stencil.  Once the paste was dry, I carefully painted the paste with watercolors.  The nice thing about watercoloring embossing paste is that it behaves a lot like watercolor paper, so if you use a color you don't like, or make something too dark, you can easily dab paint away/remove paint.


I finished the panel off with a punny sentiment created using Neat & Tangled's Journaling Alpha Dies and a sentiment from the N&T's Celebrate stamp set.  The Alpha dies were cut twice and adhered together so that they had a little bit more substance to them, and then I cut the tiniest slivers of foam tape so they could be popped up over the card.


For this next card, I colored the stencil using a no-line coloring technique.  I've colored with stencils before where I traced the stencil spaces like in this card (and before you go over to that post, let me just say that sometimes I cringe at my old photos because they are so dark).  But for this card, I figured out a much easier way to trace the stencil, and that is to ink it with a very very light color.  I took a quick snapshot with my phone so you can see what this looked like (forgive the very dim photo).


I used a ton of Copics on this card, but basically I had several different color trios that I then used randomly to color the different buoys.  This took A LOT of time to color, but I think that the results are definitely worth it.

For the sentiment, I again used the Journaling Alpha dies and then a sentiment from N&T's Typed Sentiments set on one of the Skinny Strips dies.


So there you have two very different ways to color with stencils.  I hope you'll give these techniques a try!  

And be sure to stop by Simon Says Stamp to check out the new release!

Monday, May 13, 2019

Neat & Tangled May Release Day 1 and Giveaways - and a Big Change


Hi all!  It's time for the May Neat & Tangled Release.  I've got a couple of items in this release that I can't wait to share with you, but today we're showing off a new set from Elena called Barnyard Buddies.

There are lots of different animals in the set that you can mix and match.  I picked a cute little trio for today's card and colored them with Copics.  The sentiment is from the Typed Sentiments set which I altered just slightly to remove the 'i'.  They do look like they are missing someone, don't they?

Then I added a few different patterned paper mats and that's was it.


You'll want to head over to the Neat & Tangled blog to see the whole reveal and enter to win this set there.

OK, I mentioned a big change right?  This really is a big one.  In fact, for me, if this year had a theme, it would be change.  There are some really exciting changes coming down the pike for Neat & Tangled that you'll start learning about soon  At the same time, I've been weathering some pretty big changes at work/home, both in terms of assignments as well as hours.  Based on all the changes happening (could I use the word change anymore in this post?!), this will be my last release/month designing for Neat & Tangled.

This was not an easy decision to come by.  I have been working with Danielle/Neat & Tangled for the last six years, as a designer, illustrator, and design team coordinator.  It's been a huge part of my life.  I am so grateful to Danielle for giving me the opportunity to dip my toes into the world of design, and for producing those designs month after month and year after year.

What comes next?  Well, honestly I'm not really sure.  I'll still be creating and sharing here on my blog - I have a very large pile of unused products that I'm looking forward to working with, and my scrapbooking has been severely neglected the last few years.  I've continued to design/illustrate, and am looking for the right fit for me going forward.  While these changes make me a little sad (because in general I am not a fan of change), I'm excited for Danielle and Neat & Tangled, and also to see what comes next for me.

Alright, enough of the sappy stuff.  This is only Day 1 of the release.  There's lots more to come, so I'll see you back here tomorrow for Day 2!

Tuesday, February 12, 2019

i love you


Hey everyone!  I started this card last week, but didn't end up finishing it in time for release week.  Luckily I had a bit of time over the weekend to get it done.

I started by stamping the Mail Background on some white cardstock with Silver Stone Altenew ink. 

The heart is from the Love Mail die set and was cut from some Hero Arts paper.  I also cut a mat for the background using that paper.

The sentiment is from the new Typed Sentiments set and was stamped on the smallest of the banner dies from the Skinny Strips set.  I also cut one of those in a light gray cardstock to set it off a bit.


Finally, I stamped the bunny from the Jump for Joy set using Copics (Warm Grays) and fussy cut him.  I have the dies of course, but I still like fussy cutting from time to time.

That's all for me today.  Thanks for visiting!


Thursday, February 7, 2019

Neat & Tangled February Release & Giveaways - Day 4


It's the final day of February release reveals at Neat & Tangled, and this mini set from Elena is one of my very favorite images from her ever.  This sloth and turtle just make me laugh.  They are quite the couple aren't they?

I stamped the image on a panel of white cardstock and colored it with Copics.  I added a ground line using Antique Linen distress ink and some masking tape.

I had a bit of fun with the image too, adding a 26.2 in the little flag, because really, what are the odds these two are going to finish a marathon?


Then I finished things off with one of my favorite sentiments from the new Typed Sentiments set which was stamped and embossed on one of the new Skinny Strip dies. 

I added several patterned paper mats to finish things off, and popped up the sentiment piece for a bit of dimension.

OK, head over to the N&T blog to check out the rest of the DT's creations and to enter to win this new set. 

Be sure to leave comments here this week also - I'll be selecting some winners for my new release products.  Winners will be announced tomorrow!

Wednesday, February 6, 2019

Neat & Tangled February Release & Giveaways - Day 3


It's Day 3 of the Neat & Tangled February release, and today we're showing off the last of my new products for this release, the Skinny Strips dies and the Typed Sentiments stamp set. 

The nice thing about being a product designer is that you can create the stuff you want to have in real life.  I've been needing a set of thin strips for sentiments for a while now.  There are 12 different strips. four each 1/4" wide in lengths from 2 1/2" to 4" in a rectangle and banner style.  Then there are two each in rectangle/banner that are 3/8" wide. 

For the Typed Sentiments set, I tried to provide a good mix of basic sentiments, but also ones that are a little more unusual.  I think you'll get a good giggle out of a few of them!

You've been seeing these skinny strips pop up in a lot of projects already this week, so I thought I'd use them in a different way.  I cut all four of the skinniest rectangle strips from five different shades of cardstock - just pieces that I found in my scrap bin.  Then I arranged them along the bottom of a panel of white cardstock.  Once i was done, I die cut the piece using the 4" x 5 1/2" rectangle from the Card Front Dies set.


The sentiment is of course from the Typed Sentiments set.  Super quick and easy. 

I did basically the same thing using the banner style strips and five colors of pink/red cardstock, but adhered them on an angle for this next card. 


The panel was again cut using the smaller rectangle from Card Front Dies, and I added another sentiment from the Typed Sentiments set.


These cards are really so easy to create and I love that you can use your scraps for them. 

Be sure to head over to the Neat & Tangled blog to check out what the rest of the team created, and to enter to win these new goodies. 

Leave a comment here as well as I'm picking some commenters from this week's posts to win some of my new products.  You'll want to stop by my Instagram account as well (@mprantner) as there are extra chances to win there.  Winners will be announced Friday morning.

See you back here tomorrow for our final reveal day!

Monday, February 4, 2019

Neat & Tangled February Release & Giveaways - Day 1


Hi friends!  It's the first day of this month's Neat & Tangled release week!  I've got several new products to share with you this week, starting with today's featured products, Mail Background and the Love Mail dies.  The Mail Background is also a new product type for Neat & Tangled - a red rubber background!

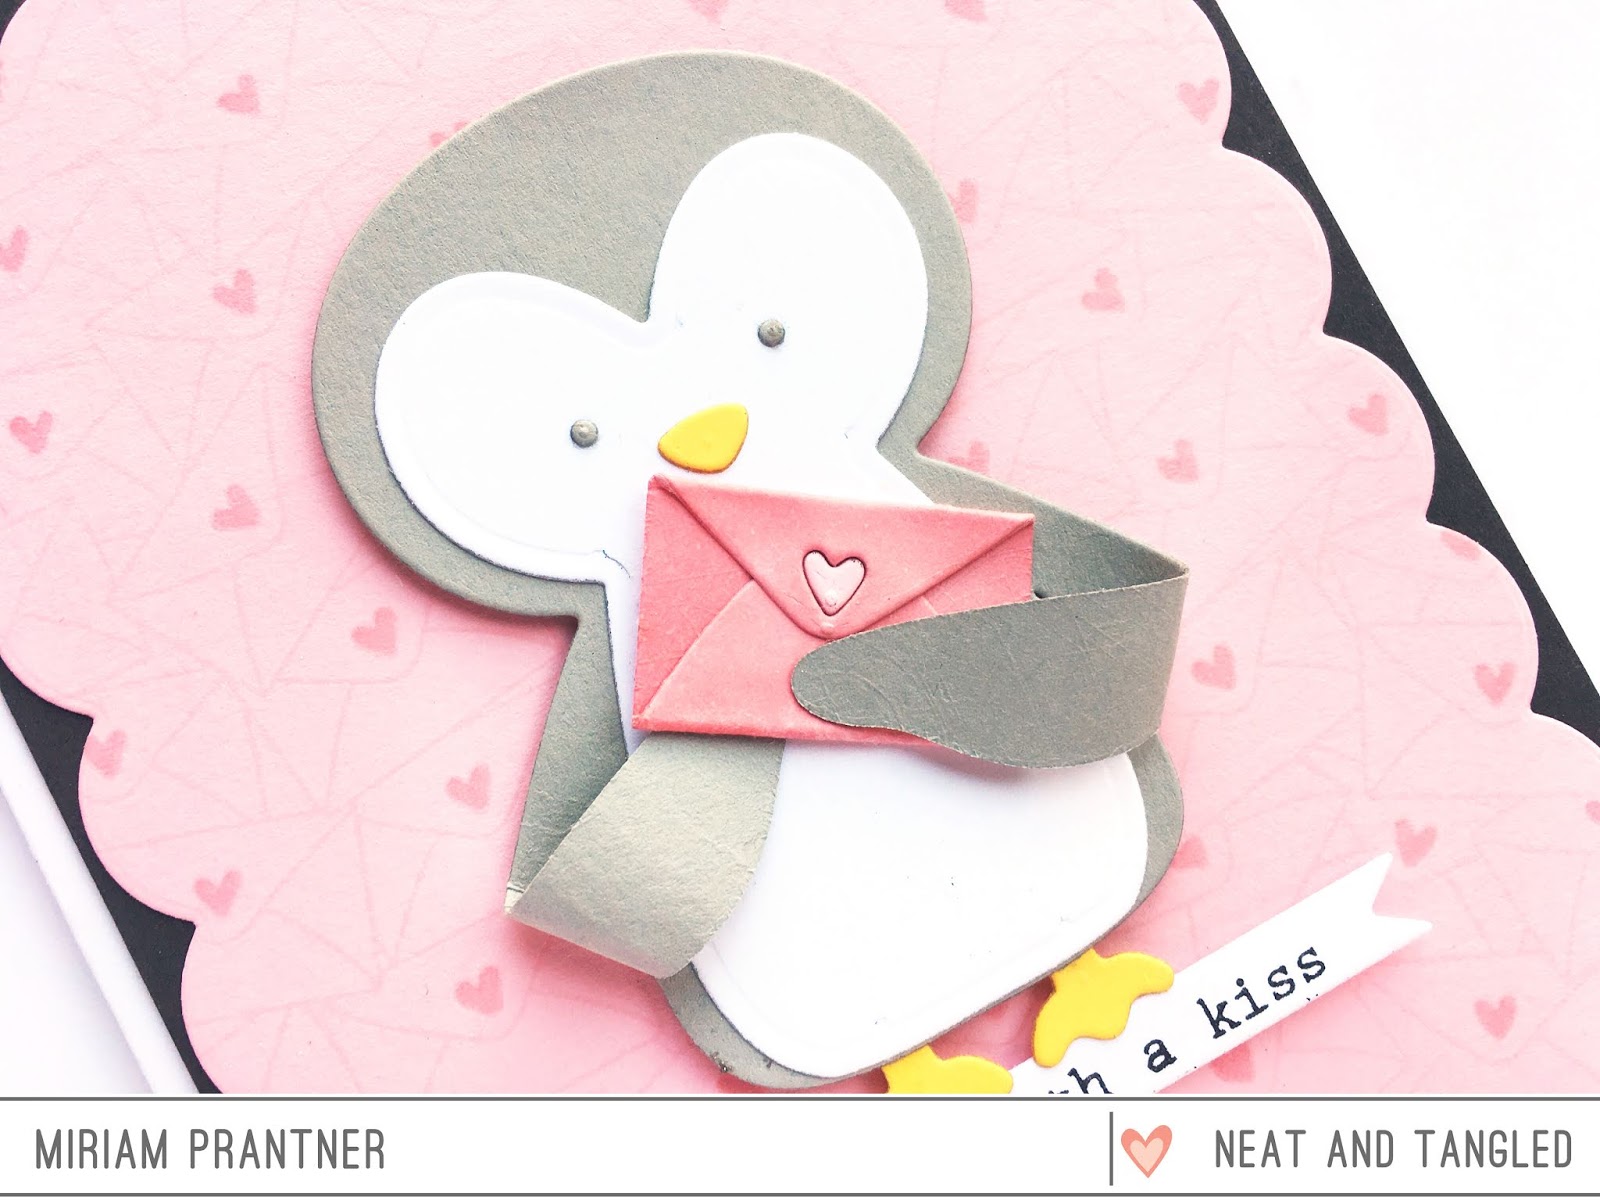
I started out by stamping the background in a very soft pink ink (Frosty Pink from Altenew) on a light pink cardstock.  The little hearts on the envelopes stamp just an outline, but I went in with a very light pink Copic marker (RV11) and colored them all in.  I then used the largest scalloped frame from the Scalloped die set to die cut the background piece, and adhered it to a dark gray panel to give it a bit of definition.

I knew I wanted to use the faux envelope die from the Love Mail set on my card, and I needed someone to hold it.  The Penguin Treat Holder die was the perfect candidate.  I cut the penguin from a light gray cardstock for the main body and used a lighter yellow for the feet and nose/beak.

Next, I cut the envelope from the same pink cardstock I used for the background, coloring the envelope with the same pink Copic I used to color in the hearts on the background (I left the heart uncolored).  Since this is a faux envelope, you just fold the top and bottom flaps in to create the look of an envelope, but it doesn't actually hold anything.  Once the envelope was assembled, I used glue dots to adhere the penguins wings and the envelope.


The sentiment is from a new set I have that you'll see later this week.  

Both the penguin and sentiment strip were popped up over the base.

That's all for me today, but be sure to head over to the Neat & Tangled blog to see what the rest of the team created.  You can also enter to win today's featured products there.

Leave a comment here as well.  I'll be selecting some commenters to win some of my new release products at the end of the week.  For extra chances, head over to my Instagram account (@mprantner) and follow the directions there.  See you back here tomorrow for Day 2!